
Starscape photography is becoming increasingly popular. Dramatic photographs of a starry sky over a scenic landscape. Properly done the results can be truly impressive. The photo is a beautiful landscape with a glorious display of bright stars overhead. For those who have long enjoyed the night such a photo captures a sense of being there, of standing beneath those brilliant stars. This is starscape photography, a relatively new type of photography made possible by improved photographic technology.
We will define starscape photography as shooting traditional landscape photographs with only starlight and skyglow for illumination. The exposure is fast enough to keep the stars from trailing. The result is a recording of what the scene would look like to a person standing under a starry sky.
The Camera
If the camera and lens are not fast enough, star trail photography becomes the option. Simply allow the stars to trail into attractive arcs as the night sky rotates overhead. The boundary between star trail and starscape photography is simply time. How long can you shoot before the stars start to trail. Another option to provide a little light is to use a little moonlight to illuminate the scene. This provides an attractive blue tone to the photograph as moonlight scatters in the air. Unfortunately moonlight has the effect of diminishing the stars, obscuring the glory of star clouds of the Milky Way and other subtle phenomena of the sky.
This form of photography requires a sensitive camera and a fast lens. It is only the last couple generations of DSLR cameras that are truly capable of landscape photography under starlight. With the advent of the latest generation of cameras, such as the Canon 5DMkIII and Canon 6D, starscape photography is well within the reach of the technology.
The Lens
The second requirement of starscape photography is a fast lens. For every full stop of aperture the lens gathers twice as much light for the sensor. Thus an f/2.8 lens will admit twice the light of a common f/4 lens. Compared to an f/4 the even faster f/2 lens will admit four times as much, while an f/1.4 will provide eight times the light.
Thus the use of a f/2.8 or faster lens is of enormous value in taking starscape photographs. This will allow shorter and brighter exposures without unduly increasing the gain in the camera.
Wide angle lenses are also helpful here, allowing the capture of a sweeping scene. The lower magnification of a wide angle lens will also reduce trailing of the stars, allowing the use of longer exposures before trailing becomes apparent. (More on that later)
Stars are a notoriously difficult photographic targets. Each star should be a bright, perfect pinpoint of light and the viewer knows this. What shows up in the photograph is often not that perfect point. Rather there is a smear of light, or a rainbow of color in the photo. This is a result of optical imperfections in the lens, aberrations that are present in any optical system. A lens that performs beautifully for normal, daytime photography, may produce unacceptable results when photographing stars.
Zoom lenses typically exhibit worse optical aberrations than a prime lens, a fixed focal length lens. This is a classic engineering trade-off, it is extraordinarily difficult or even impossible to optimize the design to reduce aberrations in a zoom lens. Thus you will find that the best lenses for starscape photography are fast prime lenses.
Fast, wide, prime lenses can also be quite expensive, several times the cost of mid-range lenses. There are some good exceptions to this… The Canon 50mm f/1.8 is a very inexpensive lens, the least expensive lens Canon sells at about $125. It is also a pretty good lens, one to keep handy for a wide range of photography. The Rokinon 14mm f/2.8 or 24mm f/1.4 are also excellent choices at reasonable cost. The Rokinon lenses are also noted for their very low aberration designs, providing excellent stellar images. These are all manual lenses, no auto-focus or image stabilization, totally unnecessary features for nighttime photography.
Focus
Focusing in the dark is not easy. Poor focus has ruined more nighttime shots than all of the other causes put together. Auto-focus is not going to save you here, there is simply not enough light. The camera may indicate it managed to achieve focus, but did it really? You will usually need to focus manually. There are many tricks to getting a decent focus. You can find some of them in focusing on another photography basics post here on Darker View.
Often you will not have any special equipment available. Thus the best approach will be to use a magnified live view to focus on the brightest star or planet in the sky, or simply a distant streetlight.
Some prime lenses will have an upper stop that occurs right at infinity focus. This makes focus trivial, simply rotate the focus ring until it stops. The Rokinon 14mm f/2.8 used for many of the shots here on Darker View exhibits this feature. If the stop is not set correctly it is possible to adjust, under one of the rubber grips are a set of screws that allow adjustment of the infinity stop.
Settings
In starscape photography two camera settings become critical… Exposure and gain (ISO). These two factors will determine the brightness of the final image. Gain is chosen to be as high as possible without undue noise in data. Exposure is chosen to avoid trailing in the stars as the Earth rotates.
To capture a high quality photo of the sky requires the use of a fairly high gain on the camera. Called ISO in the camera manual this is simply the electronic gain applied to the signal before digitizing. The downside to using high gain is increased noise that is seen as a graininess in the final image. These high gains, at ISOs of thousands, have been available on digital cameras for many years. High gains once came with the accompaniment of truly horrible noise, something that has recently changed.
It is the improvement in the sensors and readout electronics that have changed this. The latest generation of high end cameras are capable of high gains while still providing a relatively low noise image. Working at ISOs from 3200 to 6400 these cameras provide beautiful results. Even with the latest Canon 5dMkIII and 6D, or the Nikon D4, ISO settings above 6400 will produce increasing levels of noise, quickly becoming objectionable at the highest settings.

What is the best ISO setting for your camera? A number of folks have done testing to determine the performance of various cameras. Either do a little research to find these recommendations for your camera. Or simply take a series of frames while adjusting the ISO and see for yourself where the limit is. The allowable noise in an image may be a matter of personal choice.
Each model of camera will have a typical gain setting that results in the best trade-off between sensitivity and noise. The usual technique to find this point is to keep adjusting the ISO upwards until the noise becomes objectionable, then dialing it back a bit. Once this point is found for your camera and personal taste you can simply make this setting as your starting point for the shot. You may adjust upwards or downwards a bit, but most of the time this will be the default.
For the Canon 6D I have found this point to be about ISO6400. This is in agreement with other users of the camera. Combined with a fast lens ISO6400 is high enough to reveal the Milky Way in beautiful detail using a 15 second exposure. I will occasionally shoot higher ISO, up to 12800, but ISO 6400 is my starting point for a star filled sky.
Exposure is chosen to avoid trailing in the stars. How long it takes for trailing to become notable depends on the focal length of the lens. A longer focal length provides more magnification, along with magnifying the image, the motion of the Earth will also be magnified, leading to short lines rather than pinpoints for the stars.
Stars at the equator, around zero declination, will move faster and require shorter exposures than stars near the pole. If pointed towards the north or south celestial pole you may be able to use somewhat longer exposures. Another complication is the size of the camera pixel. Cameras with higher pixel counts, more megapixels, will require shorter exposures simply as a result of increased resolving power. Taking all of these factors into account requires a non-trivial calculation.
One rule of thumb, neglecting the complications of declination or pixel count, is to take 250 and divide by the focal length of the lens. For example, using a 14mm lens as shown above… 250 / 14mm = 17.8seconds of exposure. A quick rule, but one that should work for the current 20-30Ppix cameras.
To determine the exposure limit to avoid trailing, you may also simply shoot a test shot and examine the photo. Zooming in on the image will reveal how much trailing occurred. It is this last method that most photographers actually use.
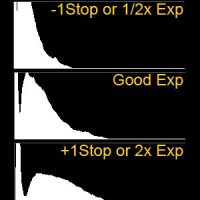
Another limitation of gain and exposure is the background sky brightness. This can be evaluated by reviewing the histogram of each image as you shoot. Shown here are three different histograms of a starscape image. As much of the image is dark sky and only a small fraction is stars, the values are mostly in one large hill representing the background of the image. It is this background level that is of most interest when judging the exposure.
The top histogram indicates an underexposed image, the data is hard against the black, piled against the left side of the histogram. A large number of pixels are at or near zero and have no useful information. It may be that this is the best you might achieve given other restrictions (camera, lens, etc.) At least some of the data is above zero.
The middle histogram is properly exposed. The sky background has separated from the black side of the histogram. This will allow the most flexibility during processing. There is still some areas of the image that are black, in this image this is the foreground hills, not the sky background. It may be the case that a black sky between the stars is desired for the final image, this can be done with a levels or curves adjustment during processing.
The bottom histogram is probably overexposed. The background is starting to occupy a great deal of the dynamic range of the image. The useful information within the image is now between the background and the white on the right side of the chart. It is also likely that the most of the bright stars in the image are badly saturated.
Histograms are the single most powerful tool for informing the photographer about the image. Most modern cameras allow the histogram to be displayed when composing the image or while reviewing the image after the exposure. This is often a feature that must be enabled in the camera menus. Learning how to read and interpret a histogram is a valuable tool when shooting in low light conditions. If you do not know… Do it.
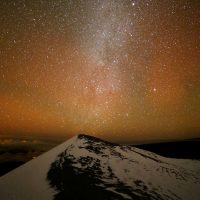
An Example
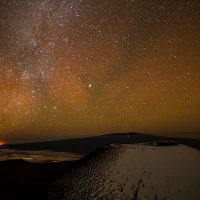
Shown here is a starscape photograph taken from the summit of Mauna Kea with a Canon 6D and a Rokinon 14mm f/2.8 lens. Several of the issues described above are clearly demonstrated. The full version can be seen at the right, a 100% crop of the upper left corner is included below.
In this 30 second exposure the stars are slightly trailed. The trailing is not noticeable in a small version of the photo, such as might be used for web publishing or a smaller print. In an 8″ x 12″ print the trailing is too small to be an issue. In a larger print the trailing becomes quite noticeable. A 15 second exposure would nicely reduce this trailing to allow larger prints without trailing.
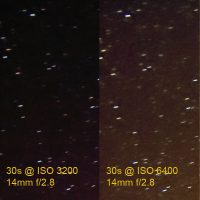
The same photo was taken at three different ISO settings without changing any of the other settings. The frames were converted from raw and the same moderate curves adjustment applied to all three. As can be seen in the 100% crop shown here noise is not a major issue in the 3200 and 6400 ISO images. In the 12800 image noise becomes apparent.
Another thing to note in the ISO12800 image is the rising level of the background between the stars, this has become quite notable and will be a problem in processing. Despite the brighter background there are no additional stars visible, the higher gain is not revealing any additional photographic detail. The image is background limited, the use of additional gain in the image will not result in any additional signal. With exposure limited to 15 or 30 seconds to avoid trailing and gain limited to 6400 by the background limit, the current setup of camera and lens has reached the limit.
One last item of note in the cropped images are the pleasantly well focused stars. As discussed above the Rokinon lenses are quite well corrected, even wide open and in the corner of the frame. There is some very minor chromatic aberration visible as a blue/purple fringe to the brightest stars. In this case the issue is minor enough to be ignored in processing.
Taking the Photograph
All that remains is to apply the information above and to take the photograph. With a little experimentation you will generate standard recipes for starscape shooting. Setting up in the dark will become a simple matter of using the settings you have used in the past. Shoot a test shot and adjust your setup as needed for the situation.
With my Canon 6D and the 14mm f/2.8 my usual settings are 15 second exposures at ISO6400. This may be adjusted up or down depending on the conditions (moonlight, dawn light, weather, etc.) this is where I will start. Bracketing exposure or ISO is recommended to insure you get the shot. Remember to set the camera to store the raw frames to allow the best possible start to processing. Focus will be, as always, a problem. You can read another post here on Darker View on the tricky subject of focusing in the dark.
Armed with a little information there is nothing left but to get out and try it! Shots in the dark are always interesting, sometimes it will work, sometimes not.

Hey, thanks so much for the information I used it to take my own shot just the other night. I wrote up a quick article to summarize the settings so I don’t forget them and published the shot, check it out http://www.r-f-k.co.uk/
A very good read and most informative. Thanks.
I thought this was great.