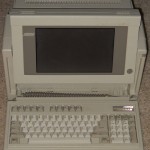
When powering up a nearly three decade old computer for the first time I should really have a video camera running…
The loud pop, and the stream of smoke issuing from the side vents was bad enough. It was the ominous orange glow seen for just a couple seconds from the same vent that really sent me the message…
Not good.

Without this machine it will be very difficult to program the old PLC the dome runs on. I do have a replacement for that PLC controller running in my office, but I face the challenge of verifying the design, I would like to run the old software in the test setup to compare it to the new. I would also like to have a backup in case something goes wrong during the transition, a way of putting the old PLC back into the system and programming it.
I had powered the thing on a few months ago to see if it actually worked. It did that time, allowing me to peruse the file system on the hard drive and see that the software was still there. This time? Not so good. I fear the worst, charred traces and a unrepairable power supply.
Oh well, time to get the cover off this thing and see how bad the damage is.
First the expansion backpack and the ISA cards have to be removed before I can even get at the back cover. I puzzle out the odd release mechanism for the expansion chassis, that takes a bit of poking and prodding. The old spring loaded cams do not release fully and need to be coerced with a screwdriver tip. Then the back cover, then the main motherboard and all of the connectors to it. Only then can I release a few more screws to reach the power supply where the little explosion occurred.
It is a capacitor, a small tantalum cap that exploded. I first come across fragments of the epoxy coating. It takes some looking to locate the damaged part, given the magnitude of the pyrotechnics I expected it to be easy. But no, I eventually spot the charred remnant of a capacitor in between a heatsink and a daughter-board soldered vertically into the main board, rather well hidden. It is a tight spot, I have difficulty even inspecting the damaged part.
Too tight a spot to get a tool into to cut the damaged part away. Everything around the capacitor is soldered, it would be very difficult to disassemble my way to the part. Instead I place the tip of a flat bladed screwdriver against the lead and give the handle a sharp tap to shear the wire lead. Repeat for the second lead and I have the remnants of the capacitor in my hand with no damage to the PCB.
There is hope, tantalum caps do just fail. When they do it is usually quite dramatic as I saw here. It is possible that there is no other damage beyond the single capacitor. I just need to get the old part out and find a suitable replacement.
A stroke of luck, one of the fragments of epoxy I found has at least part of the component ratings… The numerals 5-25 can be read under a magnifying glass. Something, something 5µF at 25V is at least clear. It is the voltage rating that is most important to me, I need to match or better that, a critical issue when installing a tantalum capacitor. In many power supply circuits the actual capacitance value is not very important, the cap is just being used as a filter, where some minimum capacitance is needed. I find a 6.8µF 35V capacitor in the lab… That should work. I solder the cap on the bottom of the board, much easier than trying to reach the original location.
A bit of reassembly and the power supply module is back together. Time for another smoke test! Applying power results in the whirr of the cooling fan and little else, no dramatic events occur. The meter shows that all of the supply voltages are present… Just maybe this might work.
Put it all back together, remembering which screw goes where. Put the motherboard back, along with various metal EMI covers. Slide the expansion memory module into place, someone maxed out this machine with all of the optional extras when buying it. The coil cord insulation for the keyboard is crumbling, the old vinyl is just gone, at least that I could replace without too much effort.
With the computer fully reassembled it is time for one more smoke test.
It failed.
That smell that anyone who works in electronics is all too familiar with fills the air. I need to get on without this piece of gear.

