
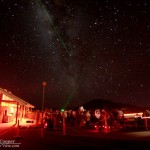
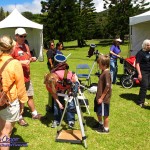
Presenting the wonders of the night sky to the general public can be a rewarding experience. The smile on a child’s eyes they first time the see the rings of Saturn or the craters of The Moon is a truly a wonderful thing.

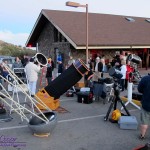
I am attempting to put down a few of the things I have learned in over a decade of hauling a telescope around. In that time I have used countless schoolyards as observatories, set my gear up at posh resorts, on the tee line of a driving range, outside the front door of Wal-Mart, across the fence from cows at a dude ranch, parking lots, city sidewalks and grassy lawns, under conditions both perfect and absolutely lousy for doing astronomy. Dealt with everything from drunks to two year olds, and I still do this regularly… It is worth every young smile!
Have a Plan
Think through what you are going to do. When you read through the notes below think of how these ideas can be adopted to your gear and the events you will be doing. Know what you are going to look at and what gear you need. Make a list if you need it.
Pick out a few objects that will be in the sky and be ready to find them. Three or four is enough for most events. If there will be a lot of light around (school yard? city park?) it will severely restrict your choice of objects.
This plan will be revised with experience, put two or three events behind you and you will be a public star party veteran!
The Telescope
The perfect telescope for public observing can be any telescope that gives your guest a beautiful view of the night sky. But a few practical features do help…
Keep the eyepiece at a convenient height and viewing angle, particularly for kids. Fork mounted SCT’s and GEM mounted refractor’s are great at this as the eyepiece is generally down low, kid height. Small dobsonian mounts also have this advantage. I generally go for getting the eyepiece down lower for the kids and let the adults lean over a little. Maybe a slight boost will be needed so carry a step a step stool so kids can get to the eyepiece without being held. Mom or dad holding a kid up to the eyepiece is seldom satisfactory as the view is not steady and there is the risk of bumping an eye into the eyepiece.
Big dobs can certainly give bright images, there is nothing like a bight nebula, or even better, a big globular cluster in a big dob. But the issues of moving a large dob are daunting, setting up can take even longer. Then there is the issue of viewers standing on a ladder to reach the eyepiece. I occasionally use my 18″ for public work, but it is very seldom, a smaller ‘scope is usually a good idea.
Fork or GEM mounted telescopes with a rear eyepiece can accommodate wheelchair viewers when appropriate objects are chosen for eyepiece location. A small dob will work with a wheelchair if objects are chosen for eyepiece height. I was able to get a wheelchair to the eyepiece of my 18″ dob once, the object was Omega Centauri low on the southern horizon.
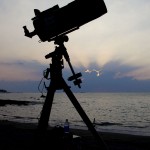
For public work I use a Nexstar 11″ GPS telescope. This telescope and similar modern SCT’s work extremely well for public observing. It has enough aperture to show objects at their best, or as well as can be managed under light polluted city skies. The ‘scope is GoTo which allows me to find objects quickly under those same light polluted skies. The longer focal length is good for planets but precludes wide field objects like the Pleiades. With the GoTo and tracking the ‘scope takes very little of my time allowing me to focus on my guests. It is carried in a hard case that gets set beside the scope for use as a table for the eyepiece case. This case also has wheels for easier transport when I have to haul this heavy scope any distance. This scope has also proven relatively kid proof, nothing like a four year old hanging off your eyepiece to ruin your alignment. This has not caused any damage to the scope and at worst has resulted in a few minute pause to realign the scope, while you do this use the time to explain to your audience how the scope works.
The Eyepiece
Some thought should go into your choice of eyepiece as well. Remember that many of your guests will have little or no experience at using telescopes of similar types of optical gear that require a little practice. Many people or young kids will have no idea where to put their eyes to get an image and they see only black. A forgiving eyepiece with a large exit pupil helps with these viewers. If you have a very young crowd go to the moon or a bright planet to make the image obvious to young eyes.
An eyepiece with long eye relief will allow eyeglass wearers to keep their glasses on. This means the scene will be in focus to start with for most viewers. This is also advised for those with an astigmatism, as no refocusing will properly correct for this issue and it will be necessary for them to keep their glasses on.
When asked “do I keep my glasses on or take them off” I tell them to try it with glasses on first, if that doesn’t work for them then try taking them off and re-focus. If using bi-focals or vari-focal glasses the viewer should look through the upper part or long-distance part of the glasses. As a non-eyeglass wearer I had to learn these tricks from those that do need them. Ask viewers how they are doing at the eyepiece, and let them tell you what is working and not working for them.
Lower power eyepieces generally have both of these advantages, long eye relief and a large exit pupil. Many modern (and more expensive) designs usually have these features as well, even in the shorter focal lengths. Despite the little fingerprints and occasional mascara I do use good Nagler and Radian eyepieces for public work, the better views are worth it in my opinion. These eyepieces are tougher than many give them credit for and clean up just fine.
The Laser Pointer
More than once I have held a crowd spellbound with nothing more a green laser pointer and a dark sky. There is more than just pointing out the constellations… Explaining the seasons of the sky, the rotation of the earth or the special place of the North Star. With the laser I have found that I can put across concepts successfully like never before. Not only can you point out objects, but creative gestures with the beam can be used to explain the motions of the sky, movements of the Moon or Planets.
A laser pointer is a useful tool, but like many tools it can be misused. I never allow a child to use the pointer and avoid pointing the beam anywhere but into the sky. I do like to use a slightly more powerful laser, about 20mW to allow easy visibility in a crowd, even with bright moonlight. Lasers above 50mW can be quite dangerous and should never be used for this sort of work.
Reference Material
You will get questions you do not know that answer to! The temptation is to bring along a pile of reference materials. I practice I find this doesn’t work as it takes time to find that answer, time you usually do not have. There is no problem with saying “I don’t know”, even after all of these years I still have to say that at least once every time I am out.
One practical idea is to make up a set of four or six index cards, one card for each of a few objects visible that night. Pick a few showpiece objects that will be visible and do the research ahead of time. On the card you write the basic facts about the objects, size, distance and a few lines about just what it is. Keep the cards in your pocket for quick reference and stick to those objects for the evening. I find that for many events I end up staying on the same object all night long, so pick one you like, if you are fascinated by the object your interest will be obvious to your audience.
Another practical method of keeping some reference material handy is to load a planetarium program like SkySafari or Pocket Universe on your phone. Available for any smart phone platform, these programs have a lot of basic data loaded and can be easily searched. Plus, you will have your phone with you anyway. The programs can also show the positions of Jupiter or Saturn’s moons, or calculate the current coordinates of a comet.
Less is Better
My normal gear set is the telescope, a battery pack, an eyepiece case, laser pointer, a stool for myself, a step stool for the kids and nothing else! This is definitely a case where simplicity is golden… Less to carry, less to remember, less to keep track of.
I use an adjustable drummer’s stool so I can sit near the eyepiece and answer questions and coach inexperienced observers how to use and focus the telescope. The stool will be located just to the side of the eyepiece. The stool puts my head at the same level as the eyepiece, perfect for showing a young child where to look and allow me to see where they are looking.
The step stool is a standard two step kitchen step stool with a top rail. The rail gives an observer someplace to put their hands and steady themselves without touching the telescope. I may have a little backup gear, like a spare battery pack, I leave in the vehicle. Something I can get quickly if a problem arises.
You Will Hear it All
Planet Niburu is disturbing the Earth’s orbit… My dog was abducted by aliens… This a bad week for me while Mercury is in retrograde… The amount of pseudoscience some people believe is staggering. Personally, I have little patience for this stuff, the real universe we live in is such a fantastic reality that it needs no embellishment.
But what do you do when the conversation turns down this path?
Directly contradicting people seldom works and merely leads to confrontation, no one learns anything. Turning the conversation to a safer subject is a better bet. I simply try to talk about the real science involved. For example… The suggestion of aliens visiting earth is a perfect opening to talk about the sheer size of the galaxy and the vast gulfs between stars, quietly let the side subjects drop out of the conversation and stick to educating your guests about the universe around us.
Enjoy Yourself!!
If you are not enjoying yourself your audience will know it quickly. Most of us do public observing because we love astronomy, do not be afraid to let that enthusiasm show! Have fun, and your guests will have fun as well.

Hi Andrew,
thanks for this tellingly summary/guide to public observing. It definitly match all points I have learned from past sessions. It’s hard to beat that splendid feeling of having enthusiastic guests inspired by your passion, but bright eyes of children are the BEST.
I really enjoy your blog and would be glad to maybe work @ Keck some day.
Cheers, Ralf