Mt. Hamilton and Lick Observatory are located in the middle of the Diablo Range overlooking San Jose and San Francisco. From this high peak the sunsets reveal a beautiful view of the rest of the range when rich light mixes with haze and smog from the city.
Looking north through the Diablo Range at sunset from the summit of Mt. Hamilton
Another quick project to solve a little equipment issue. I realized I had a problem the morning before I was planning to spend a night shooting astrophotos up on the mountain. The batteries for my 20Da are old and do not hold a charge, no way I was going to be able to use the camera through the night.
The regulator circuit installed inside the battery shell and connected to the existing contactsThe camera is an older model that remains quite valuable to me as it has been adapted to shoot astrophotos. The 20Da model differed from the standard 20D in having live focus and a re-tuned red cutoff filter that allows the glowing red of nebulae to reach the sensor. After seven years I still use the camera regularly.
I have the AC power supply for the 20Da, this is what I have been using for some time now. Shooting astrophotos in the driveway allows access to AC power. For field use this will not do, I need to operate fully from battery power. The camera batteries that I do have for the camera are now at least six years old, and do not hold enough charge to last.
Without AC power available I needed something that could plug into one of my 12V field battery packs. I really did not want to cut up the existing AC power supply to create a version to be used with an external battery. Plus, Canon used odd, proprietary connectors on the supply. (I really hate it when they do that!) I can not even use parts of the AC supply without modification.
With only a few hours available I came up with a plan. A little digging showed I had all of the needed components on-hand. Off to the work bench!
The G11 clamped to a piece of construction gear to shoot a time lapse of sunrise atop Mauna KeaA few projects have been completed, but more are in work. I continue to accumulate material for new video projects.
Sometimes I specifically plan to shoot a scene. Other times I simply take advantage of what opportunities present as go about the usual business of life. Driving home the light and clouds catch my attention. I stop along the road, setting up the camera and shooting 20 minutes of time lapse. This will become ten seconds of video, clouds sweeping past the summit of Mauna Kea in late afternoon light.
I have located several more pieces of music appropriate for soundtracks. It is the music I start with, building the video around the soundtrack. With music in hand I can plan, visualizing the finished video, deciding what further scenes I need to go out and shoot.
It was a full dress rehearsal. Both telescopes, two cameras, the entire streaming rig set up on the lanai. No less than three computers with cables all over the driveway! Surprisingly enough, everything went pretty well!
The Sun on June 2, 2012If you had been watching the Keck Transit of Venus stream, you would have been looking at a live image of the Sun for several hours. The seeing from my driveway was pretty poor, but there is a nice collection of smaller sunspots across the disk.
Everyone wandering by the house noted the telescopes. I gave peeks to our mail-lady and a couple young women who stopped by, intending to read me a bible verse or two (that was fun;)
Two technical issues were key today… Using thirty feet of active USB extension cables to run the streaming camera remotely, no problem. Co-aligning the two telescopes to aim at the same point, no action needed, aligned from the start. I had thought I might need to shim the mount for the piggyback ‘scope. I was also able to play with the streaming camera further. The Baader film filter gives a blue-white image. Adjustment of the camera white balance will restore a little yellow cast. I do not have much problem with the white, but a hint of yellow will allow people to instantly realize they are seeing the Sun. The same reason I adjust my processed photos for a golden orange hue.
We are all swapping gear around to get the set-up ready. Chris was nice enough to loan me a Canon T-ring and some Baader film. I built a battery pack and some sun-finders for several telescopes. Last night I picked up a whole solar rig from Cliff for delivery to Olivier. Olivier lent a 40mm eyepiece to Keck for the public telescope that will be setup at HQ. The list goes on…
I was not the only one doing a dress rehearsal. So far today I have been on the phone to other folks setting up and using a sunny Saturday to check gear. Some of the guys over on Maui even posted a video of their test run. I should have thought to do the same thing! Will have to time lapse the summit setup.
With the Transit of Venus looming on the calendar, a discussion of solar photography is in order. Taking good photos of the Sun is not that difficult, but can be aided with a little information. There are some unique challenges in solar photography.
A solar filter mounted on a refracting telescopeThe one obvious problem is dealing with the sheer intensity of the Sun. An intensity that can easily damage a camera if placed behind unfiltered optics. A proper solar filter is the easiest way to reduce the light to a safe level.
A solar filter will also produce the most pleasing images of the Sun. Indirect techniques like projection can be used. But for good solar photos, a proper filter in front of your optics is the single best method.
Solar filters for optics are constructed with a thin film of metal such as aluminum or stainless steel vacuum deposited on a substrate. This substrate is usually glass or a thin mylar film. The resulting filter allows only a small fraction of the light through, about 0.01% or 1/10,000 of the unfiltered value. Importantly, the filter blocks the ultraviolet and near infrared part of the spectrum as well. The result is a safe filter than can be used on a telescope or telephoto camera lens.
Sufficient magnification is needed if details of the Sun’s surface are to be well recorded. A few hundred millimeters focal length, found in common telephoto lenses will produce a reasonable solar image. The image will still be fairly small. To fill the sensor requires more. For an APS-C sized sensor (Canon T2i, 60D, 7D, Nikon D5000, D3200 or similar) a telescope with 1,000mm focal length will create an image filling a good portion of the image.
Image sizes for APC-C Sensors
Focal Length
Image Size (arcmin)
100mm
760×510
400mm
190×128
800mm
95×64
1000mm
76×51
1500mm
51×34
2000mm
38×25
The table to the left shows the resulting images sizes, in arc-minutes, given various focal length lenses, on an APC-C sized sensor. Recall that the Sun is about 30 arcminutes across as seen in our sky. With 100mm the resulting image is 510 arcminutes from top to bottom in the frame. This is 17 times the width of the solar image, a pretty small image indeed. With 400mm this improves to about 4, thus the Sun will reach about 1/4 the height of the image. At 1000mm this is about ideal, the Sun will reach more than halfway across the frame.
1500mm will just fit the solar image. While this may seem ideal, there is an issue. A small amount of drift will put part of the Sun out of the image, cutting off part of the disk. Sizing the image to fit in the frame with a good margin will allow some drift, while still giving a good image scale.
If you have a full frame camera (Canon 5DMkII, Nikon D800, etc.) a larger image can be used to fill the larger sensor, thus a longer focal length can be used. A telescope with 2000mm focal length will produce an image 17mm across, neatly fitting in the area of a full frame sensor.
Few compact cameras can boast a lens that will zoom far enough to produce an image of the Sun filling the frame. For these cameras another technique can be used, afocal photography. This can also produce good images, but will require experimentation to find the right combination of telescope, eyepiece and camera to produce a correctly sized image.
The full frame solar image with about 1000mm of focal length and a Canon 60DIf you want to calculate the image scale for your optical combination, lens and camera, I suggest downloading the CCD Calculator from New Astronomy Press. You can enter the optical parameters and see exactly what the resulting image will look like with a sample image of the Sun, Moon or other selected objects.
Another issue is resolution. Our atmosphere usually limits the practical resolution to about one or two arcseconds, blurring any finer detail through atmospheric distortion. This can be much worse in the daytime with solar heating of the ground and air around the telescope. Thus the limit for resolution will be reached with about 1000mm focal length and a modern 10-15 megapixel camera. Any further magnification beyond about 1000mm will simply result in magnifying the blur. There are techniques for overcoming this (image selection and stacking), but if you know how to do that, you already know what you are doing.
Just a bit of summing up… You need a proper solar filter or other method of safely reducing the solar intensity. A long telephoto (400mm or more) will produce a reasonable solar image. A small telescope with about 1000mm of focal length is ideal for photographing the entire disk of the Sun with a DSLR camera.
The Sun on 13May2012Time to start preparing the gear for Venus Transit! This means dismantling the astrophotography rig in the garage and reconfiguring for solar work. Taking the the AT6RC telescope off and remounting the 90mm APO. The APO has just the right focal length to produce a nicely sized solar image on an APC-C sized sensor, such as the sensor in the Canon 60D.
First up? just setup the ‘scope in the driveway and take a few photos of the Sun. Just checking the photographic setup, the necessary parts and pieces. Nothing misplaced? Where did I store the solar filter? A nice focus on the camera? Perhaps take some nice photos of the large sunspots that current grace the surface of the Sun while I am set up. I hope we have some nice spots during the transit, they make focusing so much easier!
Next step is to get autoguiding operational, this will be a seven hour event and I really do not want to manually guide for the entire duration. Particularly with a telescope that was setup in the daytime and is not properly polar aligned.
A couple other steps remain in the preparation. Automate the camera to take photos at a regular interval. Insure I can provide a good video feed to the computer sending out the webcast. I do have a few more weeks to accomplish this. I am certain those weeks with speed by surprisingly quickly. Time to get ready!
Most of my astrophotos are taken with my venerable Canon 20Da, a special version of the EOS 20D that was produced for astrophotography. Normal DSLR cameras work quite well for astrophotography, with one major drawback… The filter placed in front of the sensor blocks much of the Hα light emitted by many nebulae.
NGC1976 or M42, the Great Orion Nebula, taken with the Canon 20Da and a AT6RC telescope.This light, emitted at 656mn, a wavelength deep in the red, give emission nebulae their characteristic shades of rich red. Hα is the strongest component of light produced by emission nebulae. Without this light, the nebulae will often appear bluish in photographs, as the next strongest component OIII dominates.
Specifically for astrophotography, Canon produced a special version of the 20D with a re-designed filter that allowed Hα light to reach the sensor, the Canon 20Da. The camera also featured on-screen focusing, a feature now found on most DLSR cameras, but unusual back in 2005.
The 20Da was discontinued in 2006. Astrophotographers wanting a DSLR camera with a filter that admits Hα light must buy a standard camera and remove the filter, or have it modified by specialist that offers a conversion service.
Despite numerous attempts, I had never managed a decent shot of the Moon using an iPhone. When showing people how to do afocal photography, I have leaned how to make just about any compact camera perform nicely, but routinely seen nothing but trouble with cell phone cameras.
Lunar photography is incredibly popular with folks using the telescope, a great activity for a night with a bright moon. Long ago I found that an inexpensive 20-25mm Plössl is a good match for the lens of most compact cameras. On a 1-2m focal length telescope this combination can produce very nice lunar photos. The setup does not work with cell phone cameras. Though people do try, the results have been routinely disappointing.
Working a resort star party recently, I discovered a combination of telescope and eyepieces that works very well. A C11 telescope, an f/6.3 focal reducer, and a 20mm Nagler type 2 eyepiece produced very nice photographs with several different cell phone cameras. The result was a very happy audience and a lot of great lunar photos. As people walked away from the telescope they were rapidly replaced by a crowd holding glowing screens, all wanting to get a nice lunar shot for themselves. I will have to explore other telescope/eyepiece combinations to find another solution that does not involve a $500 eyepiece.
An eleven day old Moon, taken with an iPhone 3GS, a C11 and a 20mm Nagler 2 eyepiece
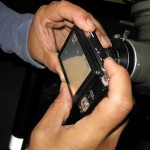
When doing any sort of public astronomy, showing folks the beautiful sights available to a telescope, I often hear the question “Can I take a photo of that?” The person asking the question is usually holding the ubiquitous compact digital camera. They are often surprised when my answer is “Yes”.
Taking a photograph of the Moon using afocal photography
It is indeed possible to manage hand held shots of bright astronomical objects by simply holding the camera up to the eyepiece. There are a few tricks to making it work, but nothing that can not be demonstrated in a minute or two. The resulting photographs can be quite pleasing, definitely worth showing to friends and family along with the rest of the Hawai’i vacation shots.
The method of positioning a camera with a lens in front of an eyepiece is called afocal photography, or sometimes digiscoping. Afocal has been around for a while, but was not considered a practical photographic method by most. The advent of common digital cameras without removable lenses has changed this.