Finally, a night where… A) The sky is clear. B) The wind is not howling through the palm trees. C) I am not exhausted by working the summit. D) I do not have to get up early the next morning.
A + B + C + D = Astrophotography from the driveway!
Comet C/2009 P1 Garradd on 29 March 2012 showing both tails, sum of 50 x 1 min exposures CoolSNAP ES and 180mm f/2.8 lensThus, under a very pretty sky, I rolled the photo rig out of the garage and spent some time getting everything back together. I was not in a hurry, time to let a bright crescent Moon set a little and my primary target rise a little. The target at the top of the list? Comet C/2009 P1 Garradd.
The comet is nicely placed in Ursa Major, transiting late in the evening, available for several hours of exposures. And expose I did, with the auto-guider locked on the a dim star beside the comet, the shutter open for well over two hours. I was shooting my Canon 20Da and the AT6RC, a combination that framed the comet nicely.
It will take a while to get the resulting images processed. In the meantime I did a quick process on a set of images taken with the wide field/finder CCD camera. The results of which can be seen at the right. I also shot a few quick images of the M95 area with the CCD to capture SN2012aw.
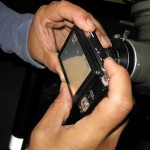
Despite numerous attempts, I had never managed a decent shot of the Moon using an iPhone. When showing people how to do afocal photography, I have leaned how to make just about any compact camera perform nicely, but routinely seen nothing but trouble with cell phone cameras.
Lunar photography is incredibly popular with folks using the telescope, a great activity for a night with a bright moon. Long ago I found that an inexpensive 20-25mm Plössl is a good match for the lens of most compact cameras. On a 1-2m focal length telescope this combination can produce very nice lunar photos. The setup does not work with cell phone cameras. Though people do try, the results have been routinely disappointing.
Working a resort star party recently, I discovered a combination of telescope and eyepieces that works very well. A C11 telescope, an f/6.3 focal reducer, and a 20mm Nagler type 2 eyepiece produced very nice photographs with several different cell phone cameras. The result was a very happy audience and a lot of great lunar photos. As people walked away from the telescope they were rapidly replaced by a crowd holding glowing screens, all wanting to get a nice lunar shot for themselves. I will have to explore other telescope/eyepiece combinations to find another solution that does not involve a $500 eyepiece.
An eleven day old Moon, taken with an iPhone 3GS, a C11 and a 20mm Nagler 2 eyepiece
Last week I shot a little video of Mars and Saturn in an attempt to get some nice imagery of these planets. Mars is approaching opposition and Saturn is well placed in the sky for observation. It appeared at first as if the seeing was pretty good, but reviewing the video shows that there were issues.
The results? No so good actually. The Mars shot shows no detail beyond the polar cap, the Saturn shot is marginally better, but still nothing I am happy with. The imagery was taken with the Canon 60D in crop movie mode, and the C11 telescope operating at f/10. I spent some time tweaking the collimation, that looked looked fairly good. The video? The resulting material is not so good, I suspect the main cause of the poor results was seeing, some variant of high frequency distortion blurring the fine details.
There may also be some issues with the new version of Registax. Version 6 has some major differences in how it operates, not sure if I am doing everything right. The program may have some bugs as well, I crashed it several times while attempting to process the imagery.
Saturn, C11 and Canon 60D, best 800 of 1200 frames processes in registax
When doing any sort of public astronomy, showing folks the beautiful sights available to a telescope, I often hear the question “Can I take a photo of that?” The person asking the question is usually holding the ubiquitous compact digital camera. They are often surprised when my answer is “Yes”.
Taking a photograph of the Moon using afocal photography
It is indeed possible to manage hand held shots of bright astronomical objects by simply holding the camera up to the eyepiece. There are a few tricks to making it work, but nothing that can not be demonstrated in a minute or two. The resulting photographs can be quite pleasing, definitely worth showing to friends and family along with the rest of the Hawai’i vacation shots.
The method of positioning a camera with a lens in front of an eyepiece is called afocal photography, or sometimes digiscoping. Afocal has been around for a while, but was not considered a practical photographic method by most. The advent of common digital cameras without removable lenses has changed this.
Our neighborhood is a somewhat odd case. A large development surrounded by miles of empty land. Get just outside the neighborhood and the skies are quite dark. Inside the neighborhood one has to deal with the usual house lights and a plethora of streetlights. Still, I can see the Milky Way from the driveway, pick out M31 with the unaided eye, and make out a number of star clusters. There is one streetlight directly across the street from my front yard. A notable problem, only partly dealt with by way of a strategically planted Royal Poinciana. A few years old now, the tree has begun to shade the driveway from the worst local light source.
Despite the fact that the neighborhood is disgustingly overlit, there is a mitigating factor. All of the streetlights are low pressure sodium type lights. These lights emit all of their power at 589nm, a sharp emission which can be filtered at the camera. Filters for this and other common light pollution wavelengths are readily available from several manufacturers in a number of sizes and formats.
One minute Orion without LPR filter
While taking some wide field shots using a 50mm lens I had recent opportunity to see the difference with and without the filter. I did not have a filter that fit the 52mm thread on the lens, but rather simply set my 48mm filter on the front of the lens. I had not performed this simple experiment before as the usual mounting location of the filter is buried inside the setup. On this occasion it was a simple matter to take identical frames with and without the filter.
The resulting frames can be seen at the left. These are taken from the camera raw images, imported with daylight color balance, cropped and sized for display. Both images have been handled identically. Neither is a “pretty” picture, these are unprocessed images, none of the stacking, stretching and sharpening that would vastly improve the visual appearance.
A different use for amateur astrophotography gear.
An amateur CCD camera can do more than take pretty pictures. There is no reason why any decent telescope, however small, and a CCD camera can not be used to do real science, or real engineering in this case.
The goal of the night was to perform proper photometry on the laser returns with independent equipment. We want to quantify the performance of the Keck adaptive optics laser systems. We launch two powerful lasers into the sky, one from each telescope, to allow analysis of the atmospheric distortions through which the telescope is observing. Using the data the system can correct for this atmospheric distortion and create much sharper images of distant stars and galaxies.
The lasers pass through a layer of sodium atoms about 90km (55miles) above the ground. There the 589nm yellow light excites these sodium atoms creating a glowing beacon, what we call the laser return. This return is what we look at to analyze atmospheric distortion. A brighter return allows better data and better performance of the system.
Both the Keck 1 and Keck 2 lasers in operation under the light of a nearly full Moon
Amateur astrophotography gear is perfectly capable of doing this task. A portable telescope, a proper CCD camera, combined with care to acquire calibrated images. All that I needed to add to the setup was a photometric V filter.
It was a perfect night for it, clear, dry and cold. Best of all, there was no wind to bounce the telescope around and chill anyone working outside. The winds are nearly constant atop at 14,000ft peak, calm nights are unusual, I was lucky indeed.
I setup the telescope atop a crust of ice and snow. The snow was convenient as it allowed me to set down gear on a cleaner surface than the gritty volcanic cinder underneath, keeping everything quite a bit cleaner. The altitude and cold made setup and breakdown a slow, laborious process, and added unique difficulties. I had to be very careful moving the heavy gear, so as not to slip on the icy snow. When I went to move the telescope tripod I found it frozen into the snow and cinder! I had to heave hard to break it free.
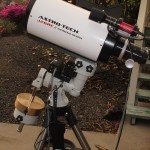
The Astro-Tech 6″ RC is a wonderful little telescope… A true Ritchey–Chrétien design, at a size well matched to DSLR astrophotography. It was get one now or never, these were the last of the production run, and now they are gone.
Best of all, Astronomics was letting them go at a fire sale price… Less than $300 each!! It may have taken months on a waiting list, but I finally received one. Then it took another two months of waiting for some necessary accessories to make it work! No problem with the wait, I was patient… mostly.
With the final parts, the extension tubes, in hand. I determined to spend part of my four day Thanksgiving weekend getting the new ‘scope into service.
NGC1976 or M42, the Great Orion Nebula, sum of 113 frames at 35x5min, 38x1min, 20x20sec, and 20x5sec. Taken with the Canon 20Da and a AT6RC telescope.It took hours to rearrange the setup, un-bolting and re-bolting telescopes to and from the plates of aluminum that hold everything. Carefully aligning each of the four items in the setup… Main telescope, guide telescope, the finder CCD camera and a Telrad. Finding the best focus, recollimating the 6″RC, re-balancing the mount, fixing a computer power supply issue, rearranging and tying up all the myriad of cables, etc. etc… Astrophotgraphy really is the art of endless details. Finally, late into the evening, I took the first test image.
A few images later and things were not looking all that bad, maybe even functional. Better yet, my venerable ST-4 autoguider seemed to be tracking well. Maybe take a real picture? What to shoot? Something easy… M42 was rising over the garage… Why not? Just a test for the new setup, a fair chance something will go horribly wrong.
AT6RC atop an iOptron ZEQ25 mountResult? Not too bad. This is despite many shortcomings… I forgot to take raw images, thus I had to process from the JPEG’s. I didn’t get any decent calibration frames. There seems to be substantial flexure between the guide ‘scope and the imaging ‘scope, but it is slow and does not effect individual frames. Actually the registration drift over the hours helped me process out the hot pixels and other image artifacts by creating an effective dithering. I did lose a few frames to vibration, the mounting could be stiffer, and I must be careful to walk softly on the concrete slab of the driveway during exposures.
But still, not bad for a first real attempt.
The stars look nice across the frame, showing that the collimation is decent, always an issue with the RC design. I suspect the optical quality of the telescope is quite acceptable. The brighter star images are a bit “fat” but that is due more to the mediocre seeing over Waikoloa. After all of these years shooting with a refractor, I had forgotten how pleasing diffraction spikes can be. Better yet, with the scope positioned for north up on the tube, the spikes are neatly at 45° to the cardinal directions. I am looking forward to some more imaging sessions with a new telescope.
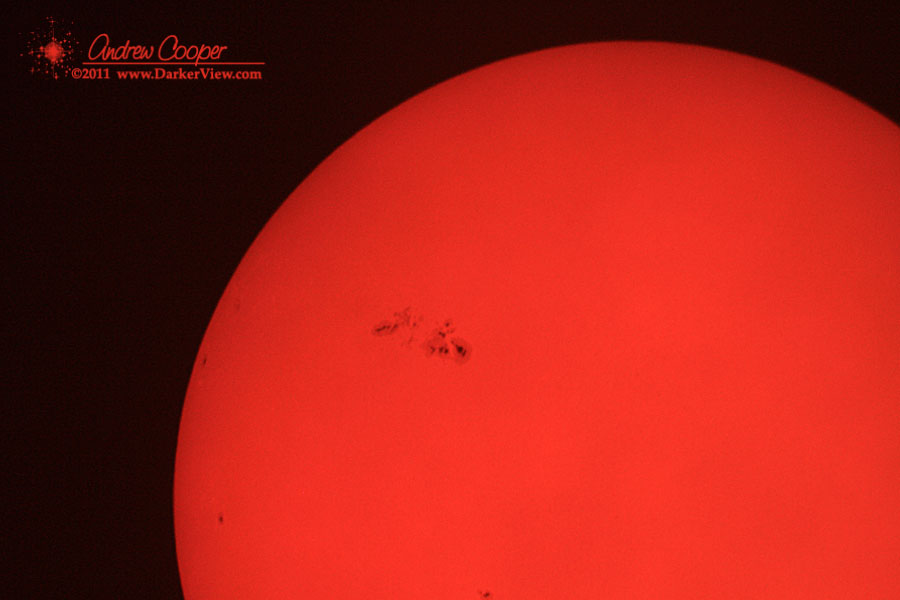
As we approach solar maximum, large sunspot groups have again become a common sight. The last few years have seen an unusually quiet solar minimum, long stretches of time when not a single sunspot appeared. that has certainly changed, the Sun is now dotted with sunspots, with the occasional monster. At it’s peak, AR1339, seen above, was over 100,000km across. That is larger than 15 Earths, side by side. I mean monster!
The photo was taken with the Canon 60D, a 0.8x TeleVue adaptor, a C-11 and a Thousand Oaks full aperture solar filter.
Sunspot group AR1339 as seen on the afternoon of 5Nov2011
Yes, I have shot the Pleiades many times before. Still, a nice test of the new camera. I was limited to short exposures, 2 minutes in this case, as I was not setup for guiding. I took more frames instead, over thirty exposures of two minutes each for an hour total. After throwing a few out I still had enough to beat down the noise. I expect that with guiding and longer exposures the result would be better, but this wasn’t too bad…
The Pleiades, M45, sum of 27x120s exposures, TV-76mm and Canon 60D
But it does prove one thing, you can see the Large Magellanic Cloud from Mauna Kea… Barely.
The photo was taken from the Mauna Kea VIS parking lot as the LMC rose above the slopes of Mauna Loa. As the object skirted the distant ridge line I shot a dozen frames with the 60D and the TV-76mm scope. The resulting photo is nothing to be proud of, I expected it to be pretty bad when I shot it. It was taken simply to prove the point.