The seeing was terrible, but at least we could see the Sun while much of the island was overcast and raining. I had hoped to set up in the parking lot for Puʻukohala Heiau but arrived a few minutes after they closed the gate. Instead I set up just below at Spencer Beach park.
Of course the telescope drew a crowd of folks who wanted a look. No matter, an eclipse is a slow motion affair with plenty of time to share the eyepiece. I showed my guests how to take photos with their cell phones at the eyepiece, so everyone got a photo or three of the event.
The solar eclipse of March 8th, 2016 taken from Spencer Beach State Park. Celestron C8 with a Canon 6D at cassegrain focus, 2000mm focal length
I still have an 8″ solar filter on-hand, leftover from the Meade LX50 I used to have many years ago. A quick inspection to insure it is in usable condition (take no chances with solar filters) and a fit check… It fits the restored C8 perfectly.
With a few public outreach events this last week I had a few opportunities to hold my phone up to the eyepiece and shoot a few shots of a waxing Moon. The iPhone 5S does have a notably better camera than my old 3S. The afocal method does provide some nice snapshots of the Moon.
As usual I demonstrated the technique to our viewers, showing them how to use their phone to shoot the Moon. The result? Big smiles and happy folks, thrilled to have some great Moon photos of their own.
The Moon approaching full, afocal photograph with an iPhone 5S and a small refractor
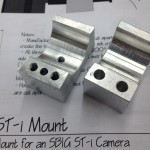
The SBIG ST-i is a useful little camera, I have enjoyed using mine. I usually use the camera for autoguiding, but it can also be used for basic astrophotography and even some science. In preparation for using the ST-i with a group of students I had need to make a couple additional mounts. After I go to the effort of designing a simple solution to my problem I may as well share the solution.
A simple mount for an SBIG STi camera for use in a piggyback setupThe ST-i camera is designed to slip into a standard telescope focuser in place of an eyepiece, as it is the same diameter at 1.25″. The camera can also be used in a “piggyback” style, mounted atop a telescope and fitted with a standard c-mount lens. Using a lens the camera will have a much larger field of view. The front of the camera is threaded for c-type 1″ threads to accomodate this. The SBIG guiding kit provides such a lens and a ring style mount. If you do not have the kit, or already have a suitable c-mount lens you still need a suitable mount.
I have included the mechanical drawing for the mount in the link above. I machined this from a block of aluminum. There is no reason it could not be made of wood or plastic to allow fabrication with whatever equipment is available. For wood you may need to make the block a little longer and use inserts for the threading. Plastic could be done pretty much as drawn.
The version I made was milled from a solid chunk of aluminum, but a good version could be easily cut from wood and assembled with brass inserts. The design could also be 3D printed without much loss in mechanical robustness.
To mount a c-mount lens you will need the adapter ring sold by SBIG to convert the 1.25″ filter thread found on the camera to the 1″ c-mount thread. Still, at $40 this ring is a lot less than the $350 guiding kit. Good c-mount lenses can be found from many sources for less than $100. You will need a focal length between 75 and 150mm for a nice image scale and as wide an f/ratio as you can find. The kit includes a 100mm f/2.8 lens which I find is quite useful in guiding my Televue 76mm or the AT6RC.
Taking astrophotos or time lapse often involves leaving a camera out in the dark for long periods. Cameras are somewhat more robust than humans, tolerating the cold for a bit longer. As a result often the cameras are unattended while the human seeks shelter in some warmer place. This can result in the theft of the unattended camera.
A camera security block for unattended camera operationThis was recently highlighted when a camera was stolen from near the Keck 2 telescope last week. Left outside for a nighttime time lapse it simply vanished. We all commiserated with the victim in a Facebook conversation, we have all run the same risk and worried about this happening to us. I usually place the camera somewhere inaccessible to the public or somewhere remote enough that it is unlikely to be found. I still worry.
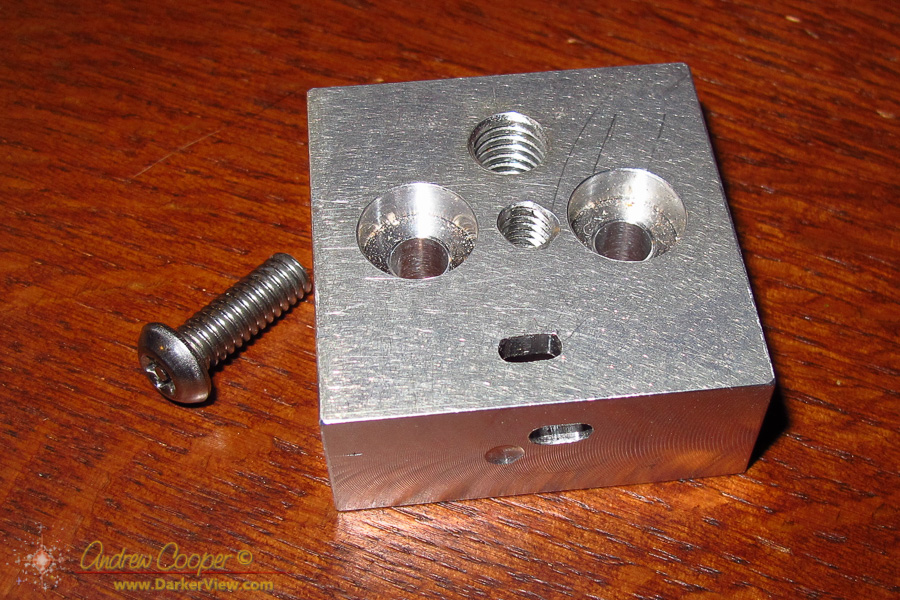
On the mountain is not the only place this risk exists. I have often left a camera operating for hours in my driveway at the front of my house attached to a telescope. In an attempt to make it somewhat more difficult to simply grab and run I designed a simple security device. A little block of aluminum with a slot that accommodates a standard computer cable lock.
Machined from aluminum the block took very little time to make and provides a great deal peace of mind. It is not impervious to a determined attack, but does prevent the camera from simply walking away. In place of aluminum it could probably be 3D printed if you do not have a machine shop available. With a little more patience it could be manufactured with simply hand tools.
The slot is the standard Kensington security slot, a 3mm x 7mm slot as found in almost all laptop computers. The locks are available from just about anyplace that sells computer accessories.
The screw I use is a tamperproof button head screw, one that requires a special tool to remove. A standard hex button head screw would probably work in most situations, it is unlikely that an opportunistic thief will have a set of allen keys handy.
The block can be used on a telescope, with the cable wrapped around a tripod leg. It can also be used on a tripod, a ¼-20 hole is tapped to allow the block to sit between the camera and the tripod head. The security cable can then be secured to anything available. Atop Mauna Kea there are many railings, guardrails and signposts that would provide a solid locking point. In nature there are fewer steel poles, but a tree trunk or something similar would also serve.
The design can be modified to suit ones needs, the mechanical drawing above shows the device in its simplest form. As you can see in the photo my prototype block includes two screw holes for the camera and a 3/8″ threaded hole for larger tripods. I also put a second lock slot on the bottom to have the option of having the lock stick out in a different direction.
Check the dimensions of your camera, tripod head or favorite adapter plate to insure that the lock will fit without interference. You can always adjust the dimensions or the mounting hole positions to accommodate your setup.
It may be the day after Thansgiving, but that did not stop the electrical contractors installing new streetlamps in Waikoloa Village.
The electrical contractors show off the new LED lights for our neighborhoodWe noticed the truck and crane setup mid-morning under the light across the street from our house. It was no surprise, the streetlights have been getting changed throughout the neighborhood over the last couple months. The new LED lamps are far better, with almost no glare seen from the side.
We are not sad to see the old low pressure sodium light go, it has been a nuisance. The poorly designed sodium lamp creating glare into our windows We had called to complain with the county, but nothing was ever done. The glare intruded on our bedroom window, a real issue, somewhat alleviated by the growth of our plumeria along the front blocking the light, a deliberate solution on my part.
The big question is whether the new LED light improves the astronomy situation from my driveway. The old sodium lamps along the street made it impossible to do visual observing, there was simply too much glare. The new lamps should darken the sky and create far less light directed at my driveway.
Even better, the lamps in question are C&W Energy Star Friendly® units with reduced blue emissions. Elimination of almost all of the blue light greatly reduces scatter in the atmosphere and is better for the observatories.
The view down the street from the driveway with the new LED lampsThis seems to be the case. I can see the light from our driveway where it is strong enough to cast shadows. Still, it is much darker than it was with the sodium lamps. The overall amount of light is way down, indeed the entire neighborhood is darker.
With the old light I was able to do astrophotography from the driveway using an LPR filter that blocked the 589nm of sodium light. The new lights will have a broader spectrum and be more difficult to block. On the other hand they send very little light upwards, possibly improving the situation. It will be interesting to see what the difference is. When the Moon is a few days further gone I will have to setup the camera and find out.
It may also be a good idea to check the old CloudCam images against new images as the replacement continues. It will be interesting to see if the emissions from the neighborhood are effectively reduced as seen from the top of the mountain.