Control

When you want to see the stars, find someplace dark

The view was pleasing sharp and crisp, revealing decent optics and steady air over the mountain. I could just make out the central star on M57, something I had only done before with and even larger telescope.

The instrument may date to the 1800’s but at that time it was powered by water and muscle as there was no electricity on the mountain. It was not until much later, in the middle of the twentieth century that the telescope was refitted with electrical controls and motors.

The visitor directions on the website had specifically cautioned that the summit road was curvy, something I found to be a drastic understatement. From the very bottom it is curve after curve all the way up, with almost no straight sections. S-curves followed sharp bends leading to hairpins. Nearer the observatory the curve intensity only increases as the road narrows. Local history indicates that the horse-drawn wagons that transported heavy equipment up this road could not negotiate steep grades, the only solution was to follow the contour of the mountain, resulting in an incredibly curvy road.
On a sunny Saturday afternoon there were other users, the road is apparently popular with local cyclists. With the density of the sharp curves there was often little choice but to follow at bicycle speeds at times. I would much rather drive up Mauna Kea than this road again. Next time up Saddle to the summit I will recall Mt. Hamilton road and consider myself lucky.
The reason I was climbing this winding road was simply to be a tourist. Unlike the previous seven days, this day was to be fun. For much of the previous week there had been full day sessions of lectures and labs covering the intricacies of adaptive optics systems. Spending a full week in Santa Cruz might be considered a vacation, aside from the fact there had been very little open time to explore the surrounding area. There was only one open day in my travel plans, and I had specific plans for that day, a visit to an observatory.

The massive set of cables going into the telescope must twist as the telescope rotates. Besides cables there are also hoses to carry high pressure oil, glycol coolant and compressed air. To accommodate the rotation, these cables and hoses go through a large assembly called the Azimuth Wrap. Looking a bit like an oversize bicycle chain with cable laced through the links, the wrap insures the cable does not kink, tangle or stretch as the telescope sweeps back and forth.
Lacing new cable through the wrap is an intricate task of threading through the metal comb that supports the cables in each link. See the little pink one in the middle, just did that…

Apparently the purple refractor was quite the hit on yesterday’s webcast. Not only did it provide beautiful imagery of the Transit of Venus for everyone to enjoy, but caught the attention of many viewers. There we many comments… “Where can I get one?”, “How much?”, and my favorite… “…paint Keck purple!”
Violet Haze really is a great telescope, an entirely hand-made instrument, with the exception of the focuser. The lens set is a full apochromatic triplet by Roger Ceragioli, a true expert in refractor design and manufacture. The purple optical tube is my own machine work. The result is a truly unique telescope that is a joy to use.

Aiming a telescope at the Sun is deceptively difficult. You can not use a optical finder for risk of eye damage. Unit power finders, like a Telrad, are of little use as you can not see the projected image. Telrads can also be damaged by sunlight. In a pinch you can simply use the shadow of the telescope, positioning for a minimum shadow. This at least gets you close.

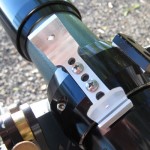
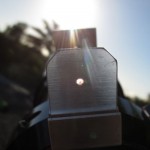
There are many plans for Sun Finders posted to the web. Most use a shadow or projected point of light. The version I built is no exception, using a pinhole to project a point of light on a translucent screen. The trick is to make such a device simple and accurate.
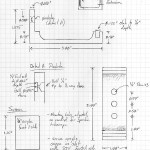
With simple metal working capability a Sun Finder like this one can be made from sheet metal, or machined from solid aluminum. I chose the latter as I had the capability. This design uses a pinhole that projects a similarly sized dot of light at the rear of the finder. The front face or the finder, through which the pinhole is drilled, creates a shadowed area for in which the projected dot can be seen.

This design is based on an aluminum extrusion, a 3″ x 1.5″ channel. This save a good deal of machine work in creating the finder. As much of the machining is done along the length, a number of finders can be made at the same time. I made six finders from a seven inch scrap of extrusion out of the shop scrap pile.

To keep the device simple there is no adjustment in aiming. If the finder is mounted reasonably well, the dot of light will be on the screen. The first time out it is necessary to first get the Sun in the field of view. You can then mark the position of the projected dot with a permanent pen (Sharpie or similar). After that aiming is simply a matter of positioning the dot on the mark. If the mark is made on the smooth side of the acrylic screen it can be easily erased and re-marked if necessary.
Done, a simple and reliable Sun Finder to work with just about any small telescope.
It was a full dress rehearsal. Both telescopes, two cameras, the entire streaming rig set up on the lanai. No less than three computers with cables all over the driveway! Surprisingly enough, everything went pretty well!

Everyone wandering by the house noted the telescopes. I gave peeks to our mail-lady and a couple young women who stopped by, intending to read me a bible verse or two (that was fun;)
Two technical issues were key today… Using thirty feet of active USB extension cables to run the streaming camera remotely, no problem. Co-aligning the two telescopes to aim at the same point, no action needed, aligned from the start. I had thought I might need to shim the mount for the piggyback ‘scope. I was also able to play with the streaming camera further. The Baader film filter gives a blue-white image. Adjustment of the camera white balance will restore a little yellow cast. I do not have much problem with the white, but a hint of yellow will allow people to instantly realize they are seeing the Sun. The same reason I adjust my processed photos for a golden orange hue.
We are all swapping gear around to get the set-up ready. Chris was nice enough to loan me a Canon T-ring and some Baader film. I built a battery pack and some sun-finders for several telescopes. Last night I picked up a whole solar rig from Cliff for delivery to Olivier. Olivier lent a 40mm eyepiece to Keck for the public telescope that will be setup at HQ. The list goes on…
I was not the only one doing a dress rehearsal. So far today I have been on the phone to other folks setting up and using a sunny Saturday to check gear. Some of the guys over on Maui even posted a video of their test run. I should have thought to do the same thing! Will have to time lapse the summit setup.
Sad news that two of the telescopes atop Mauna Kea will be losing funding. Word comes from Tom on his blog Pacific View…
• extend operation of JCMT to end September 2014, to allow for completion of the agreed science programme for the SCUBA-2 instrument on the JCMT
• cease STFC support for the operation of UKIRT from end September 2013, a year after the completion of its current survey programme
These shutdowns have been threatened for some time. It is disheartening to learn that the worst outcome is now reality.
