I have completed the first set of the Astronomy Basics posts I intended to do. I really wanted to get these posted as support material for the astro-events posts.
As I finished these I realize I should probably continue and hit a few more subjects. Look forward to a few more Astronomy Basics posts in the coming months.
Watching meteors is one of the simplest forms of astronomical observing. Just about anyone can enjoy meteor watching, from just about anywhere in the world. Enjoying the show takes only a couple things… A dark sky and a comfortable place from which to watch.
A pair of Leonid meteors streak through OrionMeteors are simply small bits of debris hitting the Earth’s atmosphere at very high speed, typically tens of thousands miles per hour. Our solar system is rich with this debris. Most of these bits are quite small, about the size of mote of dust or a grain of sand. Something the size of a pea would create a spectacular fireball that lights up the whole sky. While they often seem close, they are actually quite high, 60 miles (100km) above the ground when they flare into short lived fireworks.
The mechanism for the show is simple. When something hits the very thin air high in our atmosphere at very high speed it compresses the air in front of it. This compression also heats the air, causing it to glow white hot. Heated enough, the air becomes a plasma, the molecules shredded and electrons freed from the atoms. It is not the meteor itself that you see, but the glowing plasma around it.
There are a number of questions many people ask about meteor observing. You can find many of the answers below. Watching a meteor shower takes no special equipment, expert knowledge or extravagant preparation. This is an activity nearly anyone can enjoy, one of the spectacles of nature available to all.
Does the Moon seem a little larger and brighter than usual? It may not be an illusion, sometimes the Moon really does look a little larger or smaller in the sky.
Like all orbiting objects, the Moon does not orbit in a perfect circle, but rather in an ellipse. This means that as it orbits it is a little further away or a little closer. In the case of the Moon the difference is not much, but you can see it, if you know to look.
The apparent size of the moon as seen at perigee versus apogeeWhen the Moon is furthest from the Earth, a point called apogee, it will be about 405,000km (251,000miles) from the Earth. While at perigee, the Moon will be about 360,000km (223,000miles) from the Earth, as measured from the center of the Earth to the center of the Moon. The change in distance leads to a noticeable difference in the size of the Moon as seen by an observer here on Earth. When at perigee the moon will appear about 12% larger than when seen at apogee.
Click to view a simulation of a lunar month showing phase, libration (tilt), and the size change as the Moon goes from apogee to perigee. Image credit Tomruen via Wikimedia CommonsThe difference is most noticeable at full Moon. If the full Moon occurs near apogee or perigee, an experienced skywatcher can spot the difference. The effect should not be confused with the well known Moon illusion, where the Moon can appear larger near the horizon.
The period of time between full Moons, the synodic month, is about 29.5 days. While lunar perigee occurs every 27.5 days, an anomalistic month. Since these periods are not equal, the cycle drifts in and out of phase. About once a year the cycles coincide and full Moon and apogee or perigee will occur near the same time.
At apogee, the Moon will be appear about 29 arc-minutes in size, a little less than half a degree. At perigee the Moon will be about 33 arc-minutes across, a bit more than half a degree. The numbers may not seem like much, but it is a visible difference. The simulated images shown here will give a better idea of what the numbers represent.
This change in size and distance leads to the moonlight being a bit brighter at perigee than at apogee, about a 30% difference. So if that moonlit night seems brighter than you remember it may actually be the case.
Throughout the astronomical descriptions and event posts here on Darker View I use the term magnitude to describe the brightness of an object in the sky. Magnitude is a simple scale, but somewhat confusing without a quick introduction.
The origins of our current magnitude scale are as old as the science of astronomy itself. One of the first stellar catalogs, the Almagest, was compiled by Claudius Ptolemy in the 2nd century. To denote the brightness of stars the catalog assigned the brightest as being “stars of the first rank”, with a corresponding second rand, third rank, etc. The dimmest of stars, the faintest visible to the unaided eye, were assigned to the sixth rank. This system was used with little alteration for the next two millennium. Subsequent catalogs and observers used their own versions of the scale, perhaps adding a decimal place to denote finer differences in brightness. As there was no instrumental method of measuring the brightness, magnitude estimates varied widely from source to source.
With the dawn of modern photographic methods and later electronic methods, it became possible to systematize the scale. It was desirable to create a scale that approximated the old system and time honored traditions. Thus the current magnitude scale was developed, understanding the origins allows understanding of the modern system.
As a planet moves across the sky there are particular points in its orbit that describe the motion, part of the jargon of astronomy that can confuse the uninitiated. These terms do not represent anything difficult, you just have to visualize what they mean. Understanding the movements of planets across the sky gives a little insight into our beautiful universe.
Elongation, opposition and conjunctions, the apparent positions of a planet with respect to the EarthThe terms used commonly here on Darker View are ideas that date back to the early beginnings of astronomy. Those ancient astronomers were fascinated by the movements of the bright wandering stars, the planets. They tracked and recorded the motions meticulously and invented the terminology we still use today to describe those motions.
Superior Conjunction, Inferior Conjunction, Opposition and Maximum Elongation tell any experienced skywatcher exactly where a planet is with respect to the Earth, where it is in our sky, and where it will be in the coming weeks or months. It is all part of the intricate patterns of our solar system that allow anyone who learns to become familiar with the night sky.
-4.9 magnitude? Inferior conjunction? Maximum elongation? 3.4° separation? To explain many of the basic terms I use to describe sky events I really need to post some explanation. Something I can link to in order to explain myself. Using the magic of hypertext as it was originally meant to be used.
I have written a couple more astronomy basics posts to go along with the sky events postings. I have copied over a few more posts from the old DV blog, updating and refreshing them as I did so. Expect to see a series of astronomy basics posts through the month as I get everything setup in the new blog.
Visual astronomy is the practice of pushing our built in optical detectors to the limits of performance. Our eyes are surprisingly good optical instruments, and until the advent of film about a century ago were the only means we had of observing the universe. Even now, in the age of sensitive electronic detectors there are those who appreciate the view of the heavens through our own eyes.
The edge on spiral M104 photographed with a Collins I3 Image IntensifierThis does not keep some from trying other ways to improve the view. Night vision technology, devices pioneered by the military that amplify the available light, offer intriguing possibilities. Available in compact packages these amplifier image tubes have been incorporated into an eyepiece sized package that can replace a standard eyepiece and offer an amplified image.
The image tube operates by charging a grid to a high voltage inside a small vacuum tube. Incoming light (photons) strike this grid and create a shower of electrons that continue onwards to strike a phosphor screen at the rear of the tube. A single photon can create a shower of hundreds of electrons, a very large signal gain. The phosphor screen glows where struck by photons, creating a image of the amplified signal.
A bright image is seen on the screen of the object, hundreds of times brighter than the original. The image is green, as result of the phosphor, this amplification is a monochromatic process. There is some noise in the image, random “sparkles” called scintillation that result when electrons leave the charged grid in a random fashion.
The images shown here are taken with the Collins I3 eyepiece or I3piece. The device is a very nicely built unit that is about the same size as a modern high quality eyepiece. Actually it is much smaller than some of the large designer eyepieces seen on some telescopes. An internal battery means there are no cables resulting in a neat package. The intensifier has a standard 1.25″ or 2″ nose piece threaded to accept standard astronomy filters.
The image intensifier is not a panacea, there are some objects where the intensifier works well, and others where it does not perform. Globular clusters and planetary nebulae are quite dramatically represented in the intensified view. It is faint, low surface brightness objects like galaxies and extended nebulae that are often better appreciated with a normal eyepiece. Switching back and forth is generally a poor idea as using the intensifier decreases dark adaptation.
The edge on spiral M51 photographed with a Collins I3 Image IntensifierDuring personal observations of galaxy views in two large telescopes side by side, I noted more detail in the un-amplified images compared to those using the intensifier, particularly where subtle detail was concerned. I have had opportunity to observe the same galaxy in my 18″ f/4.5 followed by the view in a 24″ with the intensifier. The images in the intensifier were much brighter, but the contrast range seem compressed, such that HII regions and similar low contrast details disappeared.
One place where the value of the intensifier is undeniable is in public outreach. The live views of bright galaxies show far more detail to the inexperienced observer that they would otherwise have missed in the eyepiece view. A spiral galaxy is clearly a spiral galaxy, even to a first time observer. In addition the intensifier can be used to provide views of faint objects under less that ideal conditions. Addition of a narrowband filter can increase the signal to noise and allow viewing of emission nebulae even with substantial light pollution from natural (e.g. the Moon) or artificial sources.
Unfortunately the Collins intensified eyepieces are no longer available from the manufacturer, though the website still appears functional. There is an equivalent product from BIPH which uses the same technology. At nearly four thousand dollars these devices are not for everyone. they can be used to good effect under the right conditions.
Sounds like someone acting very foolishly has pointed a green laser at aircraft around the Hilo airport. Thanks to Baron for noting the HPD press release on the issue. I wonder if there is someone out there who is unaware that aiming a laser at an aircraft is a violation of federal law.
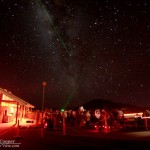
Green lasers in use at the Mauna Kea VIS nightly observing with the Milky Way high overheadGreen lasers have been in the news quite a bit over recent years, ever since they became inexpensive enough that people buy them on a whim. Lasers in the under 100mW range used to cost hundreds of dollars, can now be ordered on-line for less than fifty dollars. There have been multiple incidents of these lasers pointed at commercial and law enforcement aircraft. Fortunately the usual result is simply distraction for the pilot and no accidents have been reported from laser interference with flight operations.
These lasers are also immensely useful. At the VIS and other local star parties we use green lasers to point out the constellations and to educate our visitors about the sky. There is nothing like being able to point out a specific star, nebula or galaxy directly, you can instantly connect an entire audience with the sky without the usual confusion. Friday night it was a green laser that served as a link to the stars when I used it on the patio of the Mauna Kea VIS.
I use a laser under 30mW, bright enough to be seen by a large crowd, as well as being visible with a bright Moon in the sky, but with a low enough power to be reasonably safe. Above about 50mW these laser pointers become much more dangerous as the laser can inflict injury to the eye faster than you can blink and turn away. Fortunately there is almost no air traffic over Mauna Kea making this a place where you can use the lasers with little worry. Another personal rule I follow is to never let kids handle this laser, even though they always clamor to see this bright wonder of technology.
I can only hope this issue does not attract the attention of our reactionary county council, they have a tendency to ban anything that even seems dangerous. This would be another classic case of one stupid person creating problems for those of us who use a technology responsibly.