
The Keck domes can be controlled three ways… From a set of manual controls on a panel at the base of the dome, via computer control when observing, and from a radio controller that you can use from anyplace in the dome. This radio controller has long been called Capt. Marvel around Keck, the original versions looked like a prop from a 1930’s sci-fi serial movie.
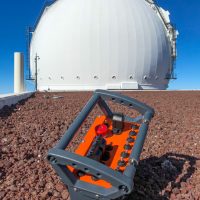
The unit is standard, the panel is custom. When buying the transmitter you need to specify the front panel layout including the switches and labels for your application. Thus our transmitter has a panel arranged to our specification with switches for dome rotation and opening the shutters. In the middle is a bright red-emergency stop switch to insure you can immediately stop everything if something goes wrong.
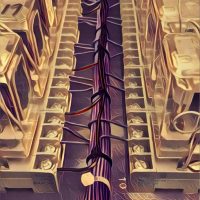
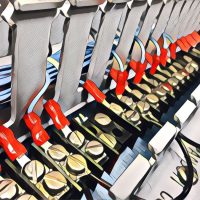
Wiring the receiver into the dome control system requires the re-wiring of twenty nine relays. There is a relay for each function of the controller… Dome left, shutter power on, top shutter raise, lights on, etc. Press a switch on the controller and the appropriate relay activates, provided I wire everything correctly.
Worse, the controller relay panel is six inches below the 480V bus bars. Just working here with power on means full arc-flash resistant suits, helmets, face shields, and insulated gloves. I may be trained in the use of the suit, I avoid it whenever possible. The plan? Simply remove the entire panel and go work on it somewhere else!
In suits we carefully un-wire the panel from the dome, remove the support screws and lift the relay sub-panel out of the power panel cabinet. Now I can sit in a nice comfortable electronics lab and do the wiring.
All of the control voltages to the dome PLC and crane controls are 120Vac, lovely things happen if you wire something incorrectly, things smoke and burn. Yes, I spend a few days wiring, then double and quadruple checking every one of those connections. Fortunately I can test everything right there on the bench, toggle a switch on the controller, watch a relay click. Rather fun actually.
Another problem! The way the radio controller handles e-stop and how the dome handles e-stop just do not work together. The logic is just different. I try to reconcile the differences for a few hours without success. I have to create a bullet proof solution, e-stop just has to work. Go home and sleep on it, try again tomorrow.
The solution is a little timing circuit to interface the two together. When an e-stop occurs it holds the e-stop for a couple seconds after the radio controller trips off. To mount this little circuit neatly on the panel I enclose it in a gutted ice-cube relay shell and mount it alongside all of the other relays on the panel.
Installing the relay panel back into the cabinet requires several hours of work, a couple dozen wires need to be wired in without errors. Rather than wear an arc-flash suit we simply power down the entire dome, cutting power at the main panel. This also means no dome lights, a few battery powered work lights create an island of bright light in the vast cavern of a darkened dome, a somewhat surreal scene.
Check the wire label, check the schematic, check the wire list, remove the insulated cap, crimp a ferrule on the wire, check the terminal number, insert into the screw terminal and fasten. Then check the documentation again, marking off another wire in red pen. Repeat a couple dozen times.
Everything rewired it is time to test, cross my fingers and start pressing buttons. To my intense relief everything works exactly as it should, press a button and the entire 700 ton dome rotates, the shutters open on command.

That would make you Capn Electron