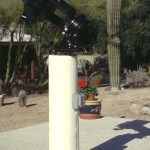
A pier is also the first step in a real backyard observatory, build the pier first, then a building around it. The process shown here works for any pier and can be scaled as needed for larger scopes. The pier shown in the photos is intended to hold an eight inch SCT.
The plans and photos shown here have been used for several piers here in the Tucson area and have been refined with the experience. Feel free to improve on what is here, and if your idea works well send photos!
Be sure to plan ahead carefully before you start to avoid any nasty surprises. Once concrete is being poured is a bad time to find out you missed a step.
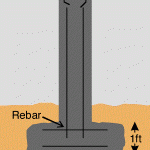
Don’t skimp on either part of this solution. Mix the concrete well and put plenty of rebar in, at least four length of half inch rebar up the column.
At the base of the pier is the ‘deadman’, a large chunk of concrete to anchor the pier and make it resistant to settling, frost heave and or shifting. The deadman is tied to the pier with rebar going through both parts.
To top if off the wedge is anchored into the concrete with three lengths of threaded rod. If you are handy with metalwork you could fabricate you own wedge or just buy a standard wedge from the telescope manufacturer. The wedges can usually be ordered separately.
Step 1 – Purchase the Materials
A trip to your local home center will likely turn up most of what you need. I find that most small hardware stores do not stock rebar and sonotube, you can check, but you will most likely need to go to one of the bigger places like Home Depot for what you need. A materials list is shown below. The prices are 2004 prices, I expect they will have gone up since then.
For the stainless steel all thread rod it was necessary to go to an industrial hardware supplier. Look in your local yellow pages under ‘fasteners’ for a professional supplier and call ahead and see if they will sell over the counter to the general public. Before you go be certain just what you need, knowing the proper terms and having a list will make you much more likely to get just what you need.
Once all the materials are on hand you are ready to proceed.
| Item | Qty. | Cost Each | Total Cost | |
|---|---|---|---|---|
| 90lb. bags concrete mix | 10 | 2.67 | 26.70 | |
| Sonotube, 12in x 4 ft | 1 | 4.97 | 4.97 | |
| 2×4’s eight feet long | 3 | 3.37 | 10.11 | |
| Stainless all-thread rod, 3ft x 3/8″-24 | 1 | 7.08 | 7.08 | |
| Stainless nuts, 3/8″-24 | 6 | 0.05 | 0.30 | |
| Stainless washers, 3/8″ | 6 | 0.05 | 0.30 | |
| Carriage Bolts, 3/8″-16 x 4″ long | 3 | 0.65 | 1.95 | |
| Nuts, 3/8″-16 | 3 | 0.03 | 0.09 | |
| Washers, 3/8″ | 3 | 0.05 | 0.15 | |
| Rebar, 3/8″ x 4ft | 4 | 1.38 | 5.52 | |
| Rebar, 3/8″ x 2ft | 4 | 0.69 | 2.76 | |
| Wood screws, 3in | 6 | 0.05 | 0.30 | |
| Total Cost | 60.23 |
Step 2 – Survey the Site
A very important task that must be complete before you start digging is a proper site survey. The easiest way to do this is to setup your telescope on the site you wish to use for the pier and observe. Check your horizons and make sure you want to use exactly this site in the future. Look for any trees that might grow up into your way or other features that might interfere.
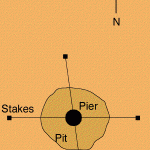
There are a few other things that you need to do. One is to mark the exact site of the center of the pier with a stake directly beneath the telescope. You will also need to mark due north from your pier site so that you can align the bolts in the top of the pier. Put a stake or some other mark you can use well away from the pier at a point due north. I once used a piece of cloth tied to a chain link fence fifty feet away.
It is important to measure the height of the tripod to determine the height of the pier you want. Find a comfortable height for viewing. With a refractor or an SCT it is often possible to choose a height that will allow sitting in an observing stool. Very useful for long, relaxed observing sessions. A shorter pier is also more stable.
After you have marked your spot remember that you need to dig a pit here. You now need to place four surrounding stakes. This is done in such a way that if two strings are tied to each pair of stakes around the site the strings will cross over the exact center of the pier. (see the site drawing) You can now check your center anytime you need to during construction.
Step 3 – Excavate
An often overlooked but extremely important part of the pier is the deadman or footer. It is the deadman that gives the pier stability. So how big should the deadman be? This depends on the size of the scope and the soil into which the deadman is placed. The hard caliche soils of our desert here in Tucson do not require a very large deadman. But the soft damp soils of the north would require a larger deadman. Ask the builders of the Leaning Tower of Pisa about damp soils and what can happen. A good recommendation for the size of your deadman would probably be at least three feet in diameter and a foot high. If in doubt concrete is only three dollars a bag, so a couple more bags are cheap insurance.
On the other hand it is amazing how fast a hole in the ground can swallow concrete when you start pouring. Don’t go too large, as you will be pouring concrete all day, and driving down to the hardware store to get more. If you are in doubt about how many bags will be needed just stack up the bags and measure. A bag of concrete will fill about the same volume after mixing so your stack of bags is the same size as the hole it will fill.
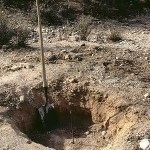
The pit dug here is probably large enough for any soil and is planned for an eight inch SCT telescope. It is about three feet in diameter and about a foot and a half deep. It is deeper than the deadman is high so that soil can be backfilled about the pier covering the deadman.
It is also important not to disturb any more soil than necessary under the pier. Loose soil will compact underneath the deadman causing it to shift after completion. Dig no further than necessary and then carefully clean out the loose material and do not backfill if you think you have dug too deep, just make the column of the pier taller.
The pit will serve as the forms for the deadman, so dig it with steep sides in the shape of the deadman for the pier.
Step 4 – Prepare the Forms
‘Forms’ is the proper term for whatever holds the concrete in place while it cures. This is what the sonotube and 2×4’s are for.
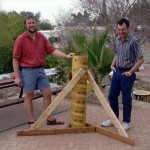
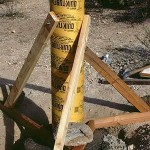
If necessary you will need to cut the sonotube for the height of pier you want. The sonotube will be held in place by three eight foot 2×4’s cut in half, forming a triangular frame. (See the photo) Three lengths will be used to form a base level with the ground by securing the lengths in a triangular pattern around the base of the tube. The lower pieces are secure to each other but not the sonotube. The remaining pieces are secured high on the tube with carriage bolts from the inside of the sonotube, the smooth head of the carriage bolt will leave a slight depression in the side of the pier. It is not important that the frame look good or even be straight, just solid. However crooked the frame it can be used to level the pier and hold it securely.
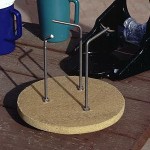
You need to mark a line due north with respect to the bolt pattern. Examine the wedge so you are sure how it mounts and then use a ruler or carpenters square to measure and mark a reference line on the template that can be used to align the template to your north.
Step 5 – Pour the Deadman
After you have the site excavated, built the forms and double checked that everything is ready it is time to mix concrete.
Mixing concrete is fairly easy if done right. read the instructions that come printed on the bags and do not add to much water. Add water slowly until you reach the correct amount. The concrete should be stiff and will not readily flow. As you shovel the concrete into place tamp it to remove air pockets and to settle it into place.
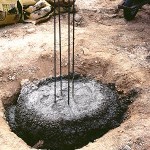
Shovel or pour the concrete into the pit. After four inches or so of concrete is in the bottom of the pit lay two short sections of rebar in the concrete. After adding a few more inches place the last two crosswise to the first two. These will tie the footer together.
When the deadman is in place you can insert the rebar for the column, make sure it is tall enough to overlap the mounting bolts for the wedge to insure a solid mount. Now check to be sure the rebar is in the right place by using the stakes out to the sides and use a level to check that it is also straight up and down.
It is time to take a break and allow the concrete of the deadman to set up a bit before you proceed. Not to long however, if the concrete is fully cured, the new concrete of the pillar will not adhere completely to the deadman. An hour or so ought to do it, probably a good time for lunch.
Step 6 – Pour the Pier
First step in pouring the pillar is to place the form. It is carefully lowered over the rebar coming from the footer. The form is then leveled by placing or removing soil under the legs of the frame. Be sure the tamp the dirt down so that settling will not cause problems later. A little weight placed on the frame will keep it from moving while pouring the concrete. Note the large rocks (see photo) placed on each leg and in the center.
A level is placed against the side and the forms are checked for level. It isn’t really important that the forms be perfectly level. The telescope wedge gets leveled on its hold down rods so don’t be too paranoid about level at this point. All that is really important is that it be close enough not to look bad.
Having a little help greatly improves the situation at this point. We had one person mixing concrete, one person pouring and another tamping the concrete into the forms by stabbing another piece of rebar into the wet concrete.
The sonotube form is filled right to the rim before the template with the hold down rods is emplaced.
Step 7 – Place the Holdown Bolts
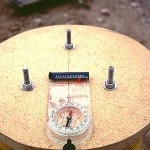
Just take the prepared bolt template and plunk it into the concrete and center up the bolts. Remember to shake it for a few moments to allow the concrete to settle properly around the bolts. Take another look at your wedge and make sure you have the bolts aligned properly and then carefully align the bolts to true north. If you sight along the line marked on the template it should line up with your survey mark for north. A quick check with the level again is also in order.
You must get this right! Otherwise you will not be able to polar align the wedge without trouble. Take care and get it right the first time.
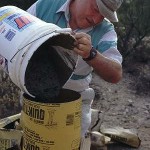
Another method of aligning the hold down bolts is to use a compass as shown in the photo. This only works with stainless steel hardware which is nonmagnetic, otherwise the steel bolts would interfere with the reading of the compass. Remember the difference between true north and magnetic north, you have to look this up for each location. Shown in the photo is the twelve degrees difference for Tucson.
We had had a couple cloudy days and could not use a telescope to survey for true north. It had also clouded up right at local solar noon which stopped us from using a shadow line like a sundial (with appropriate longitude correction) to find true north. So we resorted to a magnetic compass, which despite care, barely worked. The wedge just aligned on this pier at the limit of the bolt slots.
Step 8 – Wait for Curing
You should allow the concrete to cure for at least 24 hours before removing the forms. And wait another few days before applying the weight of a telescope to the pier.
Step 9 – Remove the Forms
Dismantle the frame and remove the template. Sonotube is easy, the several layers just peel away like a paper towel tube if you start at an upper corner.
Step 10 – Patch and Paint
While waiting for the concrete to completely cure you can patch and paint so that your pier looks good. A little concrete patching compound can patch any voids left if the tamping wasn’t complete. A coat of exterior latex paint can blend the pier into its surroundings.
Step 11 – Attach the Wedge
Attaching the wedge is the last step. Run a set of nuts and washers down the bolts before you put the wedge on, these can be used to level the wedge before tightening the upper nuts.
Step 12 – Viewing!!!
Congratulations! if you have accomplished all of the above successfully you have something to be proud of, and a pier that will provide a stable mount for your scope during many backyard observing sessions. You can use a drift star polar alignment to properly align the wedge insuring polar alignment without hassle each time you setup.


How is the latex paint holding up on your pier? Thank you.
Unfortunately I have no way of knowing. I sold the house in Tucson eight years ago. Now on the Big Island, Hawaii.
Thanks for the great article on building a telescope pier. Any thoughts on sizing this up for a pier 25 ft high? I need to get it up to my elevated deck to make observing ideal. I would suppose just going with larger everything; sonotube 24″, deadman 2x or 3x??
25 feet! Now there is a challenge. I have seen a successful pier like this. It was a cinder-block column with two blocks on each side making it about 32 inches on a side and about 18 feet high. The last four feet through the floor of the observatory was a steel tube. The resulting structure was pretty solid and without the weight of concrete that a solid column would have required.
If I recall properly he jammed something into the open cinder-block channels then poured a little concrete into each one to allow a large cover plate to be bolted in place on j-bolts. This was just below floor level and the steel pier was welded to that.
I do not have any photos of that pier, but I see Fred Espenak did something very similar… http://astropixels.com/bifrost/bifrost.html
The problem is that as you get bigger the amount of concrete increases dramatically, adding to the expense. The fluid pressure in the forms from that weight of concrete also grows dramatically, necessitating massive forms or casting in stages.
Another option is to not use a traditional pier, rather a frame. A triangular steel tower could do the job. A bit of fabrication for a steel shop, but possibly less expensive than all that concrete. Something like this… http://www.tmt.org/graphics/fig-1-lg.jpg?
Thanks for is very informative guide.This is giving me ideas. So the actual pier base, where its attached to the deadman is only about 6 inches or so below ground level, correct? Would that design be sturdy enough for a 12 in sonotube with a 10-12 inch SCT sitting on it, or does it need to be all set up into a deeper hole? Would the deadman also have to be deeper and wider?
The size of the deadman is all dependent on the soil… Soft soil would require use of a larger deadman with the larger pier, hard soil and rock could require less. A taller pier might require a larger deadman as well. It is really just a bit of judgement on the part of the builder. If in doubt buy a few more bags of concrete.
Thank you for the helpful article.
I’m studying the pictures. The picture above step 8 shows the tube with the supports. It appears to be resting on the recently poured deadman. Is this correct?
The area where I plan to put the the pier is not level. So the supporting 2x4s won’t be able to sit parallel to the deadman, as in your picture.
Any suggestions?
Yes, we placed the tube atop the deadman and just started to fill it to form a seal that will hold while pouring the column. Pour about 6-10 inches into the tube then wait for it to set up a bit. A lot of pressure at the bottom of the tube when filling it that could squeeze out if it is free to move.
Just adapt your framing design to the hill or dig out a bit temporarily. I would suggest you want some level around the ‘scope to work on it later. Dig some soil out above the ‘scope and fill on the downhill side to make a terrace?