
How simple can a focuser be?
This has been a bit of a design challence for me… Just how small, how simple, can I make a focuser and yet still provide excellent usability. My latest Helix 1-14 design is my best yet.
As my 3D printer design skills improve I applied lessons learned and the unique capabilities of an FDM printer to the problem of a focuser. After a bit of a journey I have arrived at a design I can consider finished. Is it the final design? I may tinker some more, but I am satified for the moment.
The design is based on a few ideas from here and there, products I have seen or used, internet postings from others faced with the same challenge. I am not one for just printing someone else’s design, I rarely do that, I want to do my own, and maybe make it better.
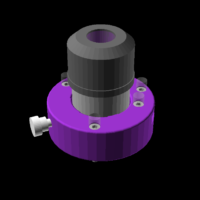
One ring of 3D printed plastic, two small 10mm bearings, two small 3D printed bushings, two screws, four washers, three brass threaded inserts, and one nylon lock screw… Not sure if I can get it simpler than this.
Focus is now a matter of simply twisting the eyepiece, it smoothly rises and falls creating a very nice feel for focus, one that allows precision adjustment. A nylon retention screw adjusts the force as necessary.
To get here required a realization I could strip the design down a bit. The primary feature, or lack of a feature, is the lack of a drawtube in this design. This is an idea I had never seen in any other the other designs out there. Normally the eyepiece would sit in a tube that then runs up and down against the bearings in a Crayford design. This design dispenses with that tube, or rather the eyepiece barrel becomes the drawtube reducing the parts count, size, and complexity.
Getting the design just right was more than a bit of a challenge. I adjusted dimensions, positions of the bearings, positions of some guides and pads, height of the bearings and tension screw, etc., etc., etc.
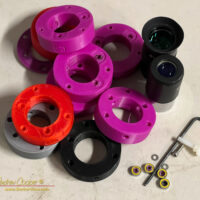
As the pile of discarded parts grows I get closer to a working version. Not this one… The eyepiece rocks from side to side, need to add some guides. Nope, too tight, the eyepiece has to be shoved in. Nope, need to adjust the angle of the bearings. Nope, need to move the bearings closer together and move the lock screw up.
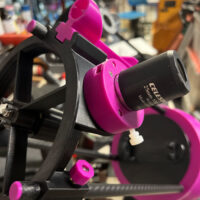
Finally I have one that works. I install it on the telescope and use it for a bit, taking it out into the dark to view a comet and a few galaxies. It work reasonably well. Even then I decide I can do better, repositioning the bearings and guides yet again. Hit start on the 3D printer one more time.
It works notably better, solving the little slop in motion I had found while using the design under the stars. Time to call it done, maybe even publish the design for others, repay the community for the inspiration and ideas I borrowed.
I realize that a big part of the success is making the focuser from ABS plastic as opposed to machined from aluminum or brass. The smooth plastic forms integral slides against which the eyepiece slides smoothly. In some ways this is a device that just begs to be 3D printed.
The simplicty of the focuser does not come without cost.
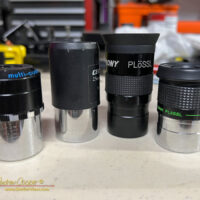
No drawtube does creates the first problem… Eyepieces with a large relief cut in the 1.25″ barrel will not work, the design requires a smooth barrel of constant diameter, or one with a smaller retention cut near the top. I have a few older University Optics Plössl and Celestron SWA eyepieces, these work quite well. So too does a modern budget Svbony Plössl with a small retention cut at the top of the barrel. Otherwise many modern eyepieces can not be used as they have large relief cuts.
The second problem is a notably limited focal travel, only about 10mm. As the telescope this is intended for allows the cage to slide on the support struts the lack of focal travel is not an issue. The cage position can be adjusted to place the eyepiece at the center of focuser travel. The cage position becomes coarse focus. Of course adjusting this can affect collimation, thus I make the focal adjustment, then collimate.
A final complication… The design is quite sensitive to getting dimensions exactly right. As plastic shrinks a bit while cooling, the design has to be adjusted carefully. The ABS I usually print with shrinks about 1.5%, if printed with another plastic such as PLA there would be a need to adjust the dimensions baked into the model.
The design took far more revisions than I anticipated when starting out, with over a dozen prints made. Given the number of revisions and reprints it took to get to a working design I am not sure whether to call the final success a product of perseverance or bull headedness.
The design files can be downloaded at the Cult3D archive.
A few notes about printing…
- ABS plastic is the default, shrink factor parameter will need to be adjusted, or the design scaled during slicing for other materials
- Use a 0.4mm nozzle or smaller
- Heavy walls, 2mm or five line count minimum
- At least 40% infill
- Standard support on
- Once printed check to see if a 1.25″ drops into the ring with little resistance while also being held securely with no slop side to side
A few notes about assembly…
- Remove the support material and scrape the bearing slots free of any remaining plastic debris
- Place the two #6 inserts for the bearings using the anvil or plate set method
- Place the #10 insert by pulling it into position with a #10 screw
- If neccessary clear the threaded inserts of plastic using a #6 or #10 tap
- Insert the bushings into the bearings, trimming to length if needed
- Insert the bearings into the slots with a washer above and below the bearing, line up the stack with a tool like a small screwdriver and insert a 1/2″ #6 screw, tighten firmly
- Thread the #10 thumbscrew into position
- Test with a 1.25″ eyepiece
| Part | Qty |
| Focuser Ring, 3D printed from ABS | 1 |
| Bearing bushing, 3D printed from ABS | 2 |
| Bearings, 5 x 10 x 4mm | 2 |
| #6-32 x 1/2″ cap head machine screw, stainless | 2 |
| #6 washers, stainless | 2 |
| #6 brass heat-set threaded insert | 2 |
| #10-32 x 1″ nylon knob | 1 |
| #10 brass heat-set threaded insert | 1 |
I am pretty happy with the curent version, Can it be tinkered with some more? Yes. But right now it works satisfyingly well.
