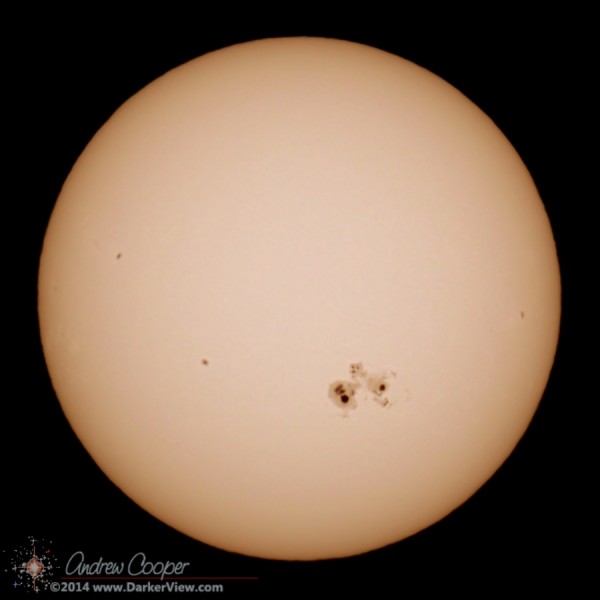
The conditions were about the same, the telescope and camera the same, but no clouds cutting short my time at the camera. I took a few video segments and processed these with AutoStakkert! to produce a stack of the best 900 frames out of 1800. The result is a much better image.
The image is more representative of what you see at the eyepiece, with somewhat more detail visible to the eye. These active sunspots have been the source of strong flares including at least one X class flare. The resulting CME’s have sparked displays of aurora over the last few days.
A parade of large sunspots crossing the disk of the Sun on 11 Aug 2024
The equipment is capable of yet better images, but I would need better conditions than the poor seeing we usually get in Waikoloa. Perhaps load up the ‘scope and travel to higher ground.
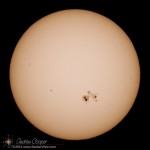
Solar maximum is upon us and the Sun is a very busy place these days. To the delight of those of use who watch, a parade of large sunspots can be observed crossing the Earth facing side. These magnetic tangles have also been releasing flare after flare, sometimes causing strong araoras here on Earth.
It is cetianly worth the effort to drag the ‘scope into the driveway and take a look. Unfortunately the seeing at the house was poor this morning so the resulting photos are not as sharp as I would like…
A parade of large sunspots crossing the disk of the Sun on 10 Aug 2024.
You have heard it before, but it really is true! Looking at the Sun for longer than a few brief moments with an unprotected eye can lead to permanent damage. Looking at the Sun with any sort of optical deceive that has not been properly filtered can lead to instantaneous eye damage.
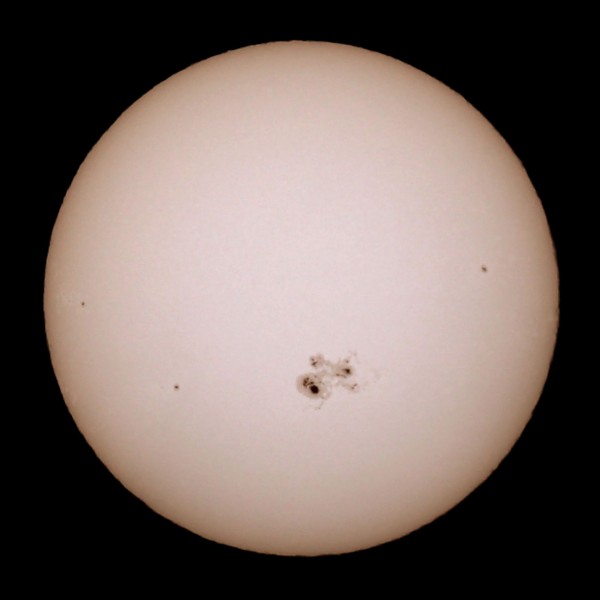
The complex sunspot AR2192 visible on 24 October, 2014
Discussed below are the only safe methods I am aware of to view the Sun. There are some dodgy methods out there. Take chance with your irreplaceable eyesight? I think not. Be careful and do it right if you want a look.
For the unaided eye there are a couple options to view the Sun safely…
Sunspot complex AR2192 is the largest I have seen in a long time. Easily visible without a telescope, simply using appropriate eye protection. It is quite large, more than ten times the diameter of the Earth. There are reports of it being noticed at sunset.
I photographed the sunspot during lunch fron Waimea, setting up a little telescope next to my vehicle in the Keck parking lot. The photo was taken using a TV-76mm telescope, the EOS-M camera and a Baader solar film filter, the same setup I viewed the Venus transit with.
Of course there was a partial solar eclipse today, visible across western North America. Photos of this enormous sunspot and the eclipse are now being posted across the web. Unfortunately this eclipse was not visible from Hawai’i. If you have not taken a look, I urge you to step outside with your solar viewing glasses and take a quick look. You do have solar viewing glasses handy… Right?
Sunspot complex AR2192 on 23 October, 2014, Canon EOS-M and TV-76mm telescope
Amateur astronomers love lists… The Messier observing list, the Hershel 400, the Hershel II, and on. Some lists can be complete on a night or two, some lists may take years, or even a lifetime to accomplish. Amateur astronomy is not the only avocation to use lists like this. Birders attempt to see all of the birds known to occur in their home country. Aircraft spotters love to see each model of aircraft in the air. Divers keep lists of species seen underwater.
Lists like these are not only fun, but allow the list chaser to sample the wonders our universe has to offer. The challenge of finding and observing each of the items is worthwhile. Each object is a lesson into the science, hunting each object allows skills to be practiced.
Most of the astronomy observing lists require a small telescope to accomplish, or at least a pair of binoculars. One list is a bit different, it does not require any optical aid at all… The Naked Eye 100.
Jan 15th, 2010 annular solar eclipse, photo by Dan BirchallA reminder that this afternoon we will have the opportunity to see a partial solar eclipse. For viewers further south, in Australia and across the South Pacific, this will be an annular eclipse. For viewers here in the Hawaiian islands this will be a deep partial solar eclipse, with well over 40% of the Sun obscured by the Moon. This is enough to produce a noticeable drop in the Sun’s brightness at mid-day.
Please exercise caution when viewing the Sun! Use appropriate eye protection or indirect observing techniques to project an image of the Sun. The link at the start of this paragraph leads to a great discussion on viewing the Sun safely. As always the single best source on the web (or anywhere) for eclipse and transit information is Fred Espenak’s eclipse website at NASA. Stop by whenever you have a question on upcoming events as well as viewing and photography tips.
During a deep partial such as this one check out the shadows under nearby vegetation. Small gaps in leaves can act like pinhole cameras projecting small crescent images of the Sun.
Jan 15th, 2010 annular solar eclipse photographed from Kampala, Uganda by Dan Birchall, used by permissionMay 9th will see a solar eclipse sweep across the Pacific. For viewers in Australia and the southern Pacific Ocean, this will be an annular eclipse, not a total eclipse. With the Moon near apogee and further from the Earth, its apparent size will not be quite enough to cover the entire disk of the Sun, resulting in a ring of light surrounding the silhouette of the Moon.
For viewers here in the Hawaiian islands this will be a deep partial solar eclipse, with well over 40% of the Sun obscured by the Moon. This is enough to produce a noticeable drop in the Sun’s brightness at mid-day.
Please exercise caution when viewing the Sun! Use appropriate eye protection or indirect observing techniques to project an image of the Sun. The link at the start of this paragraph leads to a great discussion on viewing the Sun safely. As always the single best source on the web (or anywhere) for eclipse and transit information is Fred Espenak’s eclipse website at NASA. Stop by whenever you have a question on upcoming events as well as viewing and photography tips.
The June 2004 Transit of Venus, image credit Jan HeroldThe gear is tested, packed and ready. All of the arrangements have been made. It is time for the 2012 Transit of Venus!
We will be webcasting the transit live from the Keck telescopes at the summit of Mauna Kea. Tune in for images of the transit, and a lot of information about the transit. Larry O’Hanlon and I will be talking about the transit, the science, the history, and just generally enjoying the experience. You are invited to join us. Expect the broadcast to start about 11:45HST, or about 25 minutes before first contact.
Want to see for yourself? There are multiple locations around the island where you will find solar telescopes and volunteer guides to answer your questions about this event. Not on the Big Island? Check you local paper or look up your local astronomy club to find public events. Science museums, colleges, astronomy clubs and other astronomy organizations are organizing public events wherever the transit can be seen.
Please exercise caution when viewing the Sun! Use appropriate eye protection or indirect observing techniques to project an image of the Sun. The link at the start of this paragraph leads to a great discussion on viewing the Sun safely. As always the single best source on the web (or anywhere) for eclipse and transit information is Fred Espenak’s eclipse website at NASA. Stop by whenever you have a question on upcoming events as well as viewing and photography tips.
With the Transit of Venus looming on the calendar, a discussion of solar photography is in order. Taking good photos of the Sun is not that difficult, but can be aided with a little information. There are some unique challenges in solar photography.
A solar filter mounted on a refracting telescopeThe one obvious problem is dealing with the sheer intensity of the Sun. An intensity that can easily damage a camera if placed behind unfiltered optics. A proper solar filter is the easiest way to reduce the light to a safe level.
A solar filter will also produce the most pleasing images of the Sun. Indirect techniques like projection can be used. But for good solar photos, a proper filter in front of your optics is the single best method.
Solar filters for optics are constructed with a thin film of metal such as aluminum or stainless steel vacuum deposited on a substrate. This substrate is usually glass or a thin mylar film. The resulting filter allows only a small fraction of the light through, about 0.01% or 1/10,000 of the unfiltered value. Importantly, the filter blocks the ultraviolet and near infrared part of the spectrum as well. The result is a safe filter than can be used on a telescope or telephoto camera lens.
Sufficient magnification is needed if details of the Sun’s surface are to be well recorded. A few hundred millimeters focal length, found in common telephoto lenses will produce a reasonable solar image. The image will still be fairly small. To fill the sensor requires more. For an APS-C sized sensor (Canon T2i, 60D, 7D, Nikon D5000, D3200 or similar) a telescope with 1,000mm focal length will create an image filling a good portion of the image.
Image sizes for APC-C Sensors
Focal Length
Image Size (arcmin)
100mm
760×510
400mm
190×128
800mm
95×64
1000mm
76×51
1500mm
51×34
2000mm
38×25
The table to the left shows the resulting images sizes, in arc-minutes, given various focal length lenses, on an APC-C sized sensor. Recall that the Sun is about 30 arcminutes across as seen in our sky. With 100mm the resulting image is 510 arcminutes from top to bottom in the frame. This is 17 times the width of the solar image, a pretty small image indeed. With 400mm this improves to about 4, thus the Sun will reach about 1/4 the height of the image. At 1000mm this is about ideal, the Sun will reach more than halfway across the frame.
1500mm will just fit the solar image. While this may seem ideal, there is an issue. A small amount of drift will put part of the Sun out of the image, cutting off part of the disk. Sizing the image to fit in the frame with a good margin will allow some drift, while still giving a good image scale.
If you have a full frame camera (Canon 5DMkII, Nikon D800, etc.) a larger image can be used to fill the larger sensor, thus a longer focal length can be used. A telescope with 2000mm focal length will produce an image 17mm across, neatly fitting in the area of a full frame sensor.
Few compact cameras can boast a lens that will zoom far enough to produce an image of the Sun filling the frame. For these cameras another technique can be used, afocal photography. This can also produce good images, but will require experimentation to find the right combination of telescope, eyepiece and camera to produce a correctly sized image.
The full frame solar image with about 1000mm of focal length and a Canon 60DIf you want to calculate the image scale for your optical combination, lens and camera, I suggest downloading the CCD Calculator from New Astronomy Press. You can enter the optical parameters and see exactly what the resulting image will look like with a sample image of the Sun, Moon or other selected objects.
Another issue is resolution. Our atmosphere usually limits the practical resolution to about one or two arcseconds, blurring any finer detail through atmospheric distortion. This can be much worse in the daytime with solar heating of the ground and air around the telescope. Thus the limit for resolution will be reached with about 1000mm focal length and a modern 10-15 megapixel camera. Any further magnification beyond about 1000mm will simply result in magnifying the blur. There are techniques for overcoming this (image selection and stacking), but if you know how to do that, you already know what you are doing.
Just a bit of summing up… You need a proper solar filter or other method of safely reducing the solar intensity. A long telephoto (400mm or more) will produce a reasonable solar image. A small telescope with about 1000mm of focal length is ideal for photographing the entire disk of the Sun with a DSLR camera.