As the New Horizons data trickles back to Earth we are being treated to ever better images of this distant dwarf planet. Soaring mountains, glaciers of nitrogen ice flowing into ice caps that cover huge areas, a hazy and layered atmosphere, Pluto has turned out to be a surprise to just about every one. Those who expected an ancient cratered terrain have been presented with a surprisingly dynamic world.
Click on the image for more information, click again for the big version to really appreciate…
Pluto’s Majestic Mountains, Frozen Plains and Foggy Hazes: Just 15 minutes after its closest approach to Pluto on July 14, 2015. Credits: NASA/JHUAPL/SwRI
A six-inch f/5 telescope designed to allow maximum portability. A simple travel telescope that can go anywhere, small enough to fit in an airline carry-on bag while leaving room for clothing. Large enough to provide good views of celestial targets.
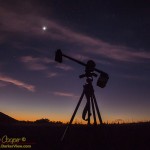
Makaʻiki under the stars for the first time at Hale Pōhaku on the side of Mauna Kea
I call the design Travel6, for obvious reasons. The actual telescope I have dubbed Makaʻiki, or simply “little eye” in Hawaiian. While 6″ may seem big to some, by the standards of amateur telescopes it is quite small. By the standards of the telescopes I work on it is downright miniscule.
Still, a 6″ telescope is quite capable in the right hands, able to give pleasing views of many celestial objects. The design is an RFT, or rich field telescope. A low power, wide angle eyepiece will result in a field rich in stars.
Like all good telescopes the design is based on ideas borrowed from other telescopes I have seen. In this case the basic design is from a very similar telescope by Brett Schaerer he named WikiKea, a telescope I had a chance to examine at Oregon Star Party a couple years ago. He incorporated a clever focus mechanism into that ‘scope that got my attention. This is a design I liked, I would have to build one for myself sometime.
Of course I had no plans for the ‘scope, just a couple photos. The first task was to draw up a complete set of plans, only then would I be able to understand all of the design issues. I have posted the full mechanical plans for the telescope at the link above. These plans should be enough for anyone with a little workshop savvy to duplicate the telescope.
The design shown could be notably simplified if one chose to do so. I have enough parts left over to build a second scope, and may consider a refined design the second time through based on the lessons of the first pass.
With aluminum shavings flying about I was enjoying an after work session in the machine shop.
Machining the mirror cell from an aluminum scuba tank on the latheMaking the heavy cuts to rough out the part I needed to remove a lot of material with a boring bar, I was cutting hard. The tool was also getting bogged down with aluminum sticking to the steel tool, to prevent this I was using a little machine oil while cutting. Predictably things got hot and started smoking, no problem, just stop and let the metal cool as I watched a streamer of smoke waft up from the spinning part.
Then the fire alarm goes off.
A moment of disbelief ensues, this had never happened before, and this was certainly not the first time I had created a little smoke in the machine shop. Nothing to do but call our facilities manager and let him know that I had just set off the fire alarm, not that he could mistake the loud ringing in the background of the phone call.
I also realized that earlier that day the fire alarm company had been about, replacing old sensors on the alarm system. This had to be related. With my phone call complete I joined everyone else outside. Admitting responsibility led to a round of good natured joking at my expense… Yeah, I will hear about this for a while.
Fire alarm reset everyone went back to work. I hope my disruption of the night crew preparing to observe was not significant. It was still quite light out and observations had not yet begun. I returned to finish the part, this time carefully not creating any smoke in the process.
The next day I found out what really happened. It had been decided to replace the heat detectors in the machine shop with smoke detectors. To my mind not a great decision, they will get set off. It is not a question of if, but when and how often. I just find it amusing that this occurred the first day. No worries, I expect it will get fixed. The same person who made that decision gets the phone call when the alarm goes off. Sufficient motivation to deal with the problem I expect.
First light is complete… It works very nicely, the images of rich star fields and sweeping nebulae are worth the hours of work it takes to complete the fabrication of a telescope.
Makaʻiki under the stars for the first time at Hale Pōhaku on the side of Mauna KeaThe telescope is Makaʻiki, a new 6″ travel scope. Hours of design, cutting and drilling, sanding and spraying paint. There is nothing particularly hard about building a telescope, but it always takes more work that you remember from the last.
As usual the most difficult part of assembly is the last. Installing and aligning the optics. Adjustment of the secondary mirror for the correct position takes an hour of mucking about with allen keys, a Cheshire eyepiece, and a laser collimator. Get it centered, get the tilt right, correct placement of the secondary is critical for good performance of the telescope.
The final step is first light, the traditional ceremony when a new telescope is aimed at the sky for the first time. My traditional first light target is M42, the Great Orion Nebula. An old friend and telescope maker, Bob Goff, often stated he would like to tour this nebula in spirit after he died. I do not know if he made it, but I remember him each time I commission a new telescope and peer at the beauty of this nebula.
Given the time of year I had to get up before dawn for a view of this nebula. Driving uphill from the village I could see Orion rising above the dark shadow of Mauna Kea. In the predawn darkness I set up near Hale Pohaku for my first light checks. Set up is a bit grandiose for this telescope, there is not much to it. Open the tripod, set the scope on top, take the covers off and aim at the sky.
The first object to focus in the telescope was M42, the nebula appearing quite nice at low power. The 40mm eyepiece gives a 3.3° field at about 19x, wide enough to comfortably fit the entire nebula region in the field, from NGC1980 to NGC1981. From there I wandered about the sky… M1, M78, M79, M41, M35 made for a nice sampling of objects.
Higher powers shows that collimation can be a bit touchy in the ‘scope, not a surprise given the single strut design.
There were also three bright planets in the dawn. The brilliant Venus is shining near its maximum brightness right now, showing a nice crescent in the telescope. Mars is still too far away to show much of anything and Jupiter was still quite low in the brightening dawn, the moons barely visible.
First Light complete I knew that the effort to create a new telescope was worth it. Makaʻiki performs as designed. With a sense of satisfaction I headed uphill for breakfast and to join the crew for a day on the summit.
A very young moon over Waikoloa, this is only 26 hours after new, visible to the unaided eye as a sliver in the fading glow of sunsetNew Moon will occur today at 20:41HST.
An international team of astronomers has discovered a distant massive galaxy cluster with a core bursting with new stars. The discovery, made with the help of the Maunakea-based W. M. Keck Observatory and Canada-France Hawaii Telescope, is the first to show that gigantic galaxies at the centers of massive clusters can grow significantly by feeding off gas stolen from other galaxies. The study has been accepted for publication in The Astrophysical Journal.
A massive cluster of galaxies, called SpARCS1049+56, can be seen in this multi-wavelength view from NASA’s Hubble and Spitzer space telescopes. Credit: NASA/STSCI/ESA/JPL-Caltech/McGill“Clusters of galaxies are rare regions of the Universe consisting of hundreds of galaxies containing trillions of stars, as well as hot gas and mysterious dark matter,” said the lead author, Tracy Webb of McGill University, Canada. “The galaxies at the centers of clusters, called Brightest Cluster Galaxies, are the most massive galaxies in the Universe. How they become so huge is not well understood.”
What is so unusual about SpARCS1049+56 is that it is forming stars at a prodigious rate, more than 800 solar masses per year – 800 times faster than in our own Milky Way.
This surprising new discovery was the result of collaborative synergy from ground-based observations from Keck Observatory and CFHT as well as space-based observations from NASA’s Hubble, Spitzer and Herschel Space Telescopes.
The Keck Observatory data was gathered by the powerful MOSFIRE infrared spectrograph and was crucial to determining SpARCS1049+56’s distance from Earth as 9.8 billion light-years, that it contains at least 27 galaxies and that it has a total mass equal to about 400 trillion Suns.
The cluster was first identified from the University of California, Riverside-led, Spitzer Adaptation of the Red-sequence Cluster Survey, or SpARCS, which has discovered about 200 new distant galaxy clusters using deep ground-based optical observations combined with Spitzer Space Telescope infrared observations.
Because Spitzer and Herschel Space Telescopes detect infrared light – enabling observers to see hidden, dusty regions of star formation – they were able to reveal the full extent of the massive amount of star formation going on in SpARCS1049+56. However, the resolution of the infrared observations was insufficient to pinpoint where all this star formation was coming from. Therefore, high-resolution follow-up optical observations were performed by the Hubble Space Telescope to reveal “beads on a string” at the center of SpARCS1049+56 which occur when, similar to a necklace, clumps of new star formation appear strung out like beads on filaments of hydrogen gas.
“Beads on a string” is a telltale sign of something known as a wet merger, which occurs when at least one galaxy in a collision between galaxies is gas rich, and this gas is converted quickly into new stars. The large amount of star formation and the “beads on a string” feature in the core of SpARCS1049+56 are likely the result of the Brightest Cluster Galaxy in the process of gobbling up a gas-rich spiral galaxy.
Today Mercury will be at maximum eastern elongation, as high in the evening sky as it will appear for this current apparition. After today the planet will slide back into the sunset, passing through inferior conjunction on September 30th and reappearing in the dawn during the first weeks of October.
The secondary mount is often one of the most complex pieces of a telescope build.
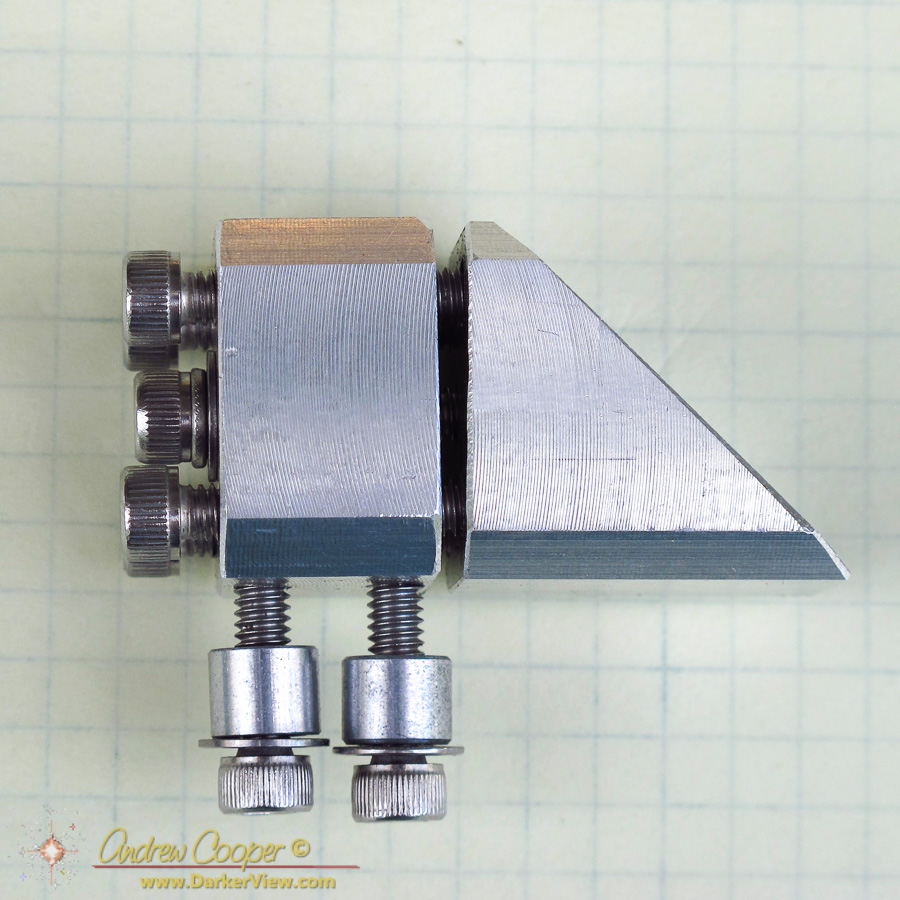
Side view of the Travel6 secondary mount
The mount must be small, not blocking any more light than the secondary mirror. It must be adjustable to allow tip, tilt, and centering of the secondary mirror. it must be rigid, able to hold the adjustment precisely once the telescope optical alignments are made.
Thus I have put together a new design for myself, to be used in the 6″ travel ‘scope under construction. The design is simple and robust, a pretty solid little device using the lessons I have learned across the years. It draws upon ideas from many other secondary mounts I have seen.
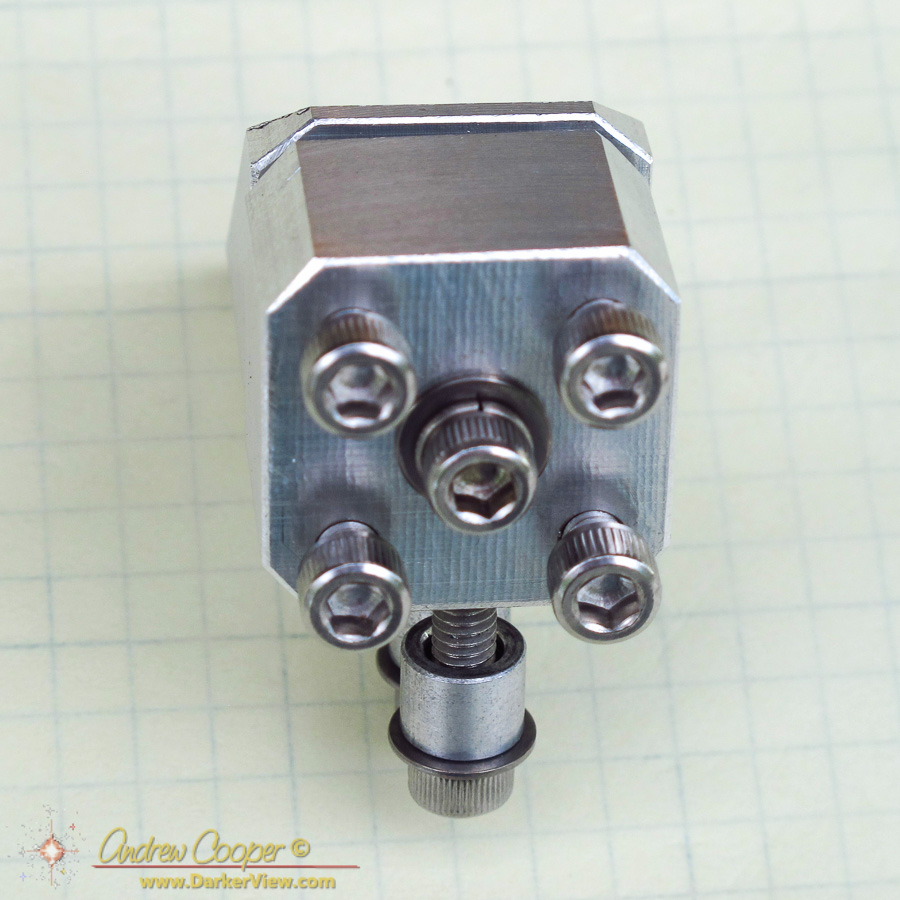
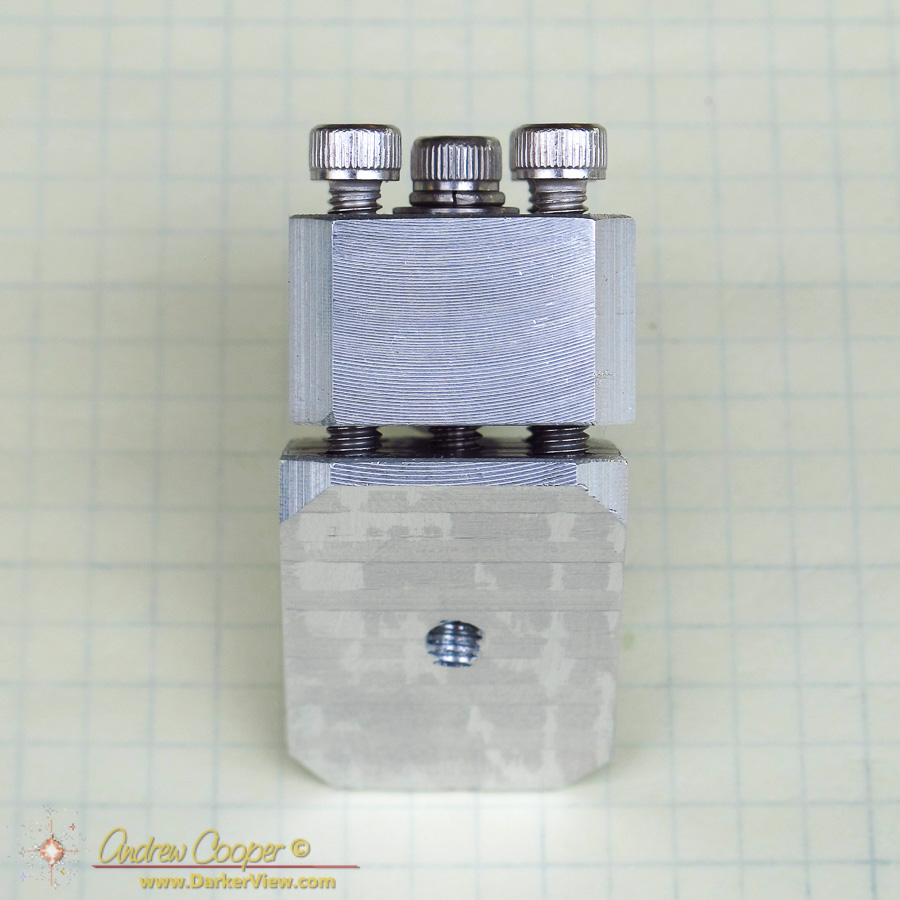
Rear view of the Travel6 secondary mount
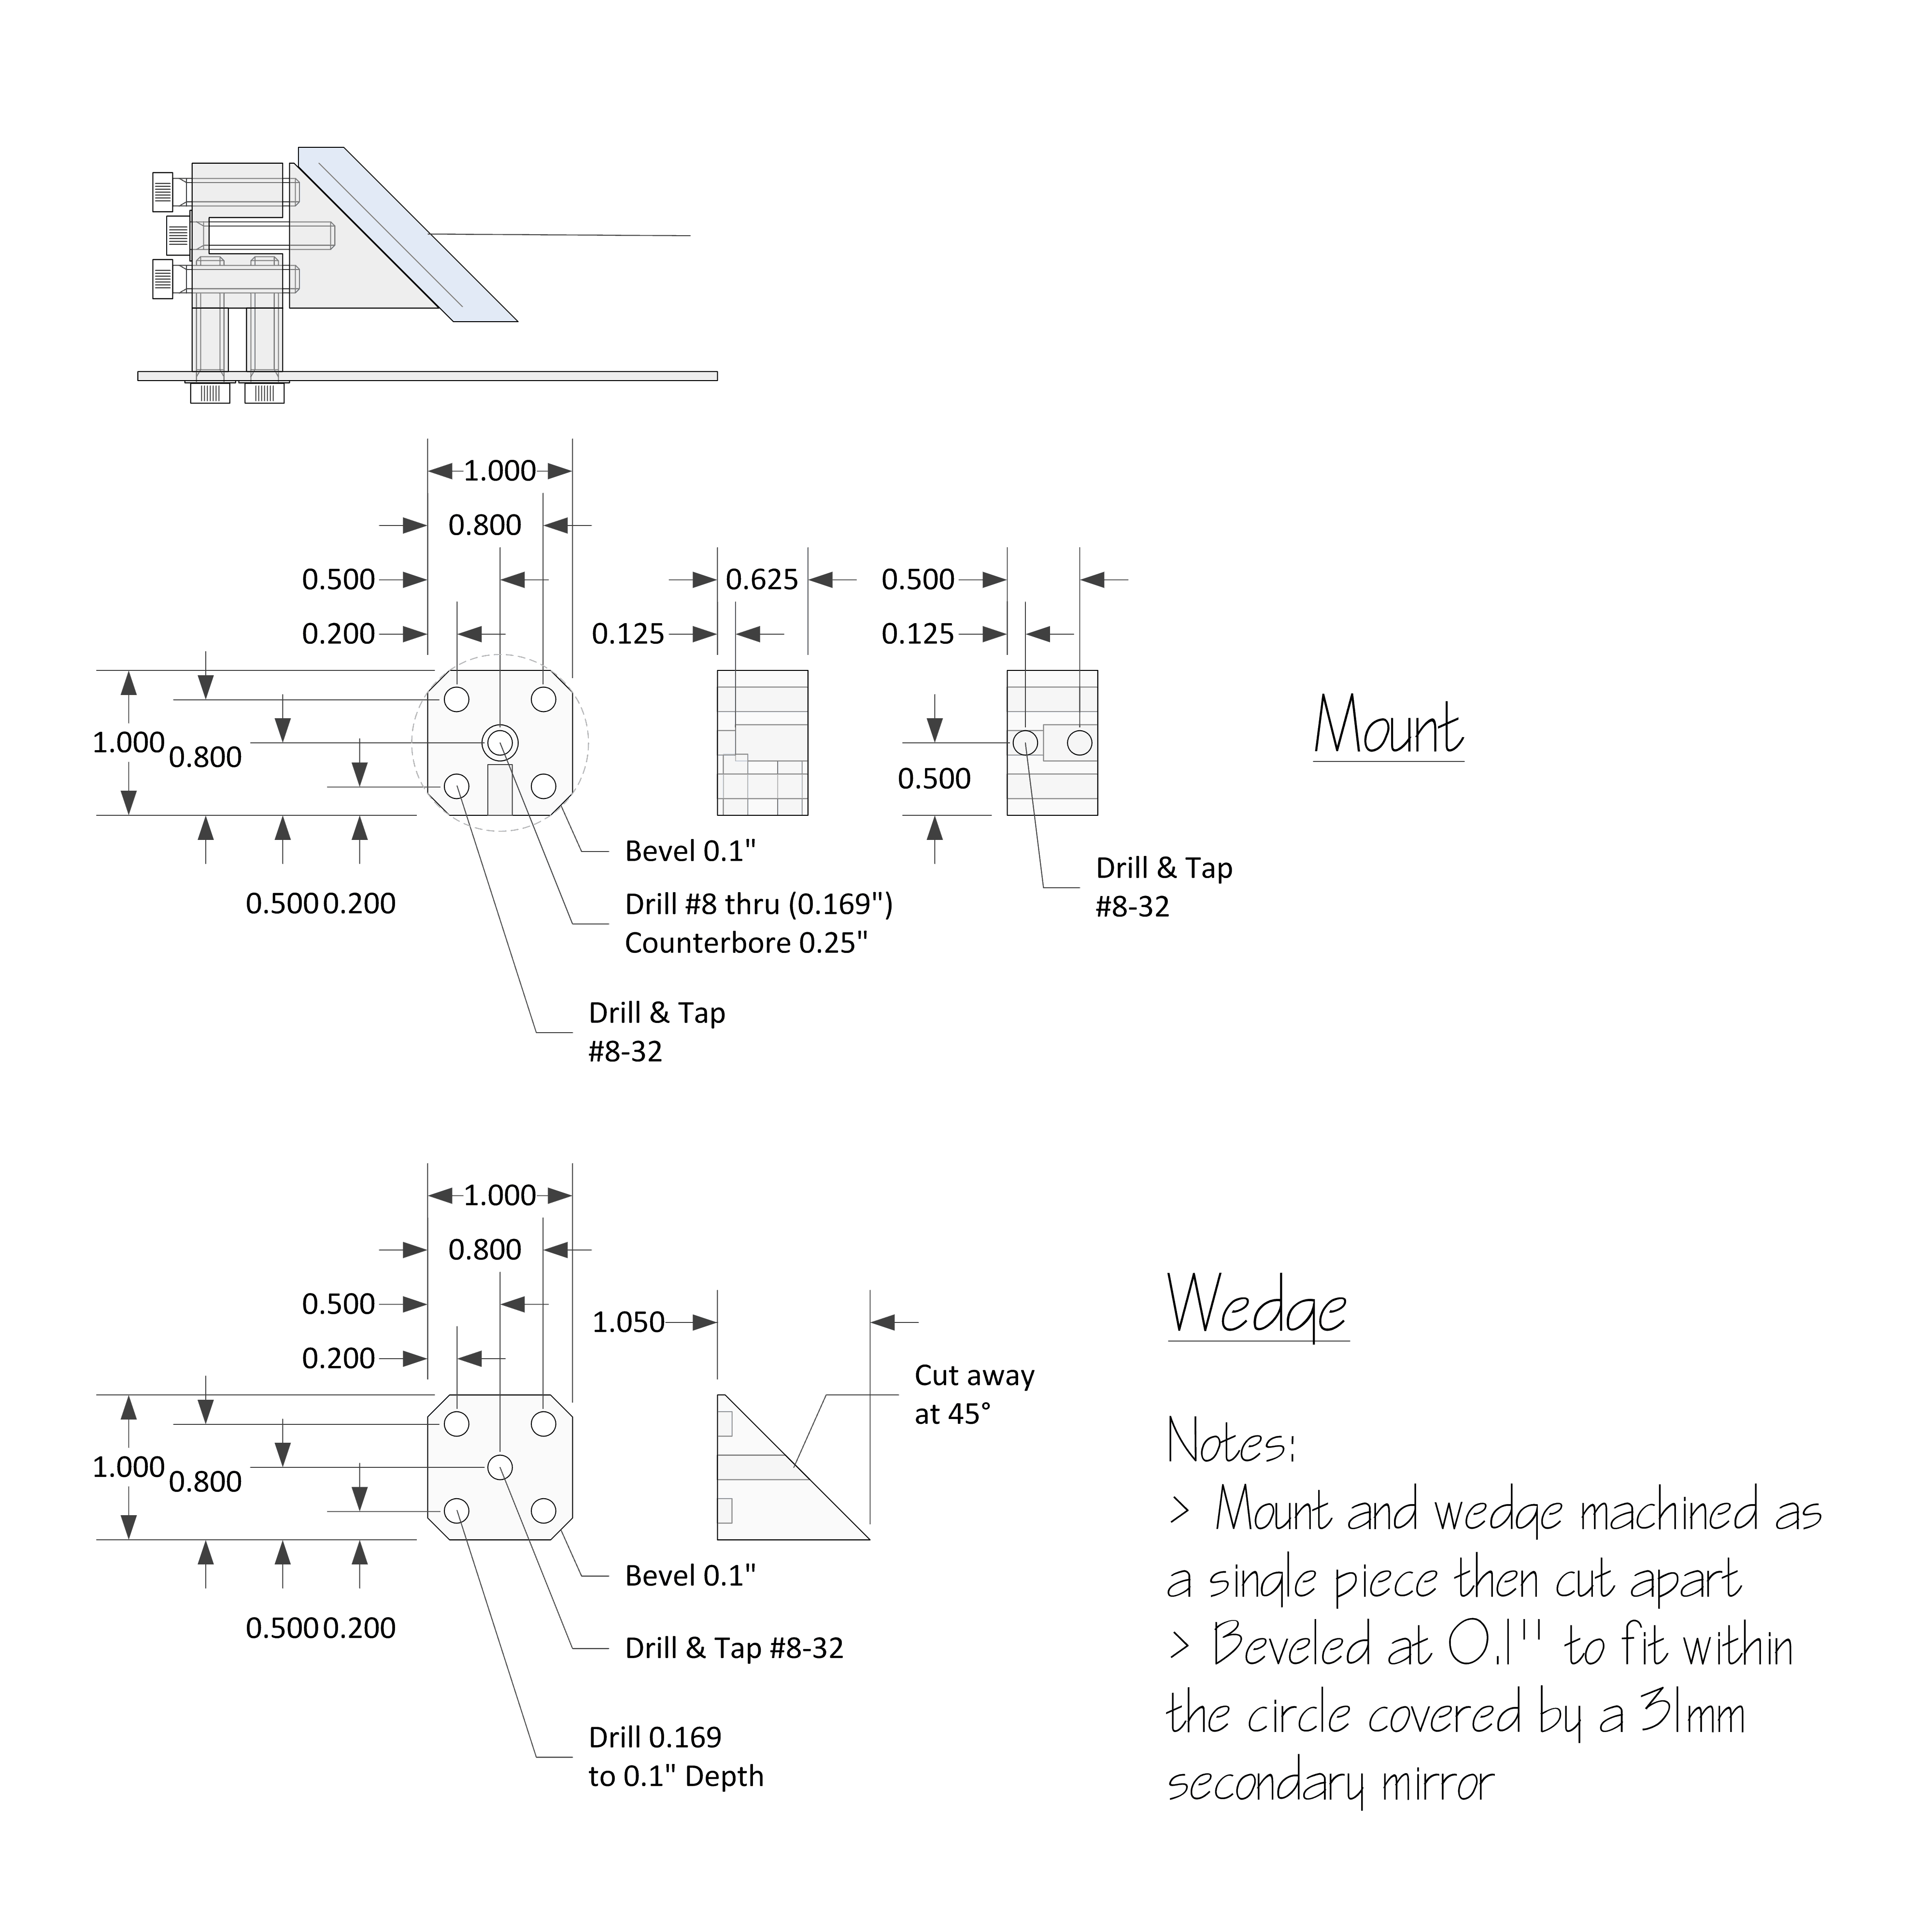
The body is square as this is easier to clamp during each of the manufacturing operations. The square is as large as possible to provide a stable mount, with the corners beveled just enough to stay behind the secondary.
The mount shown here is designed for a 31mm minor axis diagonal mirror. Thus the body of the mount is one inch square with 0.1″ beveled off each edge. This could be scaled up or down for another size diagonal mirror. The overall length of the entire mount is as short as possible. A bar of aluminum was cut to size and beveled first. A four inch bar yielded two complete mounts. I left the machined surfaces a bit rough to break up the smooth surfaces, better to hold paint and to avoid reflections.
There are four adjustment screws here. This allows for a simpler adjustment scheme than a three screw arrangement. With three screws adjustments are often made using all three screws at once. A four screw scheme allows the screws to be adjusted in pairs to effect moves in one axis at a time.
Mechanical drawing for the Travel6 secondary mount
I have made mounts with spring loaded screws in the past. They are easier to adjust, no need to loosen and tighten opposing screws. But they are not as rigid, the careful adjustment more likely to drift. This mount uses pusher screws that must be loosened and tightened in pairs.
Shallow pockets are drilled into the rear of the wedge for the tip of each adjustment bolt. this prevents any rotation of the wedge as long as the adjustment bolts are tight.
Top view of the Travel6 secondary mount
Vertical adjustments will be made by adjusting the height of the standoffs used to mount the secondary, or perhaps by shimming with a washer or two. The two mounting screws will sit in slotted holes allowing the secondary to be aligned with the focuser.
The center screw sits in a counterbored hole, only a small section of the shaft near the head is constrained. This allows it to tip slightly and allow the adjustments. A split lockwasher keeps some back tension during adjustments.
The secondary will be attached with RTV adhesive. The corners of the mount line up with the edges of the secondary making alignment quick and simple. All that is needed is a coat of flat black paint on the sides to prevent odd reflections in the optical path.
One of the more sublime sights seen from Mauna Kea is the shadow of the mountain rising through the mist and haze at sunset. One of the more sublime sights in the heavens is the Earth’s shadow crossing the face of the Moon, a total lunar eclipse. It is possible to combine these two phenomena if the timing is right, the Earth’s shadow seen twice.
The eclipsed moon rising in the shadow of Mauna Kea, February 20, 2008, photo by Alex Mukensnable, used with permissionThe moment of totality in a lunar eclipse occurs when the full Moon is directly opposite the Sun in the sky. By simple geometry this same anti-solar point is where the tip of the mountain’s shadow will be projected for an observer standing near the summit of the same mountain. If the eclipse is in progress at sunset, and you are standing on the summit of a suitably prominent mountain, you will see the Earth’s shadow both in the sky and obscuring the Moon.
Back on Feb 20th, 2008 the timing was right. A friend of mine, Alex Mukensnable, noted the timing and set up to catch the eclipsed Moon rising in the shadow. The result was a great set of photos. The photo is nice enough as a still, be he did more than that, he shot the event as a timelapse and assembled a video of the rising Moon.
There are several possible variations depending on the timing with this sort of event… If the Moon was at the height of totality rising it would also be right at the tip of the mountain shadow as it rises. This is a relatively rare event as the timing requirements are tight. Unfortunately it would also be quite dim, darkened by the shadow, and not easily seen as it rose.
As lunar eclipses are long events, taking several hours to complete, the likelihood of the Moon being in at least the partial eclipse phase at sunset is fairly good. Still a rare event, but not extraordinarily so. Thus for a single site, the summit of Mauna Kea this even happens in both 2008 and 2015.
As the Earth’s shadow is about 2.6° across at lunar orbit, the closest a partially eclipsed Moon will be seen from the the very tip of the shadow is about 1.3°. This is a bit less than three lunar diameters. Of course these numbers will vary a few percent depending in the distance to the Moon which changes as it makes its elliptical orbit.
The Moon moves slowly across the sky from west to east, thus before totality the Moon would be above the tip of the mountain shadow. After totality, with the eclipse ending, the eclipsed Moon will be in the shadow. Placing the Moon in the shadow also makes it easier to see, the bright crescent a better contrast to the dark shadow. This is the case for the 2008 eclipse captured by Alex.
Of course you could reverse all this timing and watch the event at moonset and sunrise. If the eclipse was just starting at dawn it would again place the eclipse in the mountain shadow.
Another important point to remember is that the shape of the mountain’s shadow has little to do with the shape of the mountain. The shadow will always be a neatly conical form due to the effects of projection.
What brings this event back to the fore is that the timing will soon be correct to see this same event again. The total lunar eclipse of Sept 27th, 2015 will be a bit of a dud for Hawaii, most of the eclipse already over as the Sun sets and the Moon rises over the islands. However, this event will feature very similar timing to the 2008 eclipse. The Moon will still be in partial eclipse when it rises. As it rises a short time after full Moon it will again be deep in the shadow of Mauna Kea as it comes over the horizon.
You know where you will find me on the evening of the 27th. Now I just need some clear weather that day.