Living in the islands provides excellent observing for an amateur astronomer such as myself, but there are drawbacks. I do miss the large star parties, getting together with hundreds of other observers to see other telescope setups, to learn, and to share the sky.
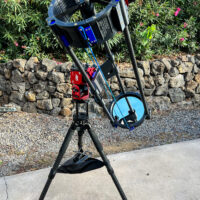
The 10″ f/4.5 travel scope Holoholo
Thus I have made a habit of traveling to the mainland once in a while to attend one of the larger star parties. This year I will again attend Oregon Star Party. It has been a while, the last time was 2017, the year of the total solar eclipse.
Traveling from the islands to a star party makes it a challenge to bring a large telescope. Last time I borrowed an 11”, not a bad solution, it worked, but it was not my ‘scope. This time I was determined to realize a long considered idea, to build a substantially sized travel telescope. Thus Holoholo was designed and built, a 10.1” f/4.5 travel ‘scope.
A large star party is an experience worth seeking out… Hundreds of people, hundreds of telescopes, all under a dark sky.
A large dobsonian set up at Oregon Star Party 2023
A star party is a meeting of geeks. Technical talk of optics, electronics, and fabrication techniques like 3D printing abounds. In the afternoon and evening you will find small conversations in the shade, pull up a chair and join the discussion.
The plan was something I had executed successfully before… Fly into Portland, spend some time with my folks, then borrow the family camper for the trip out to the Ochoco Mountains for the star party.
Due to a plan that failed I ended up with a borrowed astro camera for a couple weeks. Since I have it I may as well play with it a bit.
The Orion Nebula M42
The camera is the ZWO ASI2600MC Pro, a one-shot color camera specificaly for astrophotography. I have the ASI1600MM Pro a monochrome camera set up with a filter wheel, but have never really had a chance to use one of the modern one shot color cameras.
A 3D printed Bahtinov focusing mask for a Televue 76mm telescope
For this mask I used a public bit of OpenSCAD code from Jens Scheidtmann to generate the mask pattern, just tuning it for the correct sizing and performance with the TV-76. I added my own version of the support collar, making it a bit neater with fillets and properly sized to slip over the TV-76 glare shield.
The part is one of a half dozen parts I have designed and printed over the last few weeks to reassemble the photo rig. A new guide camera mount, a mount for the ASI Air computer, a new glare shield for the guider, etc., etc… The utility of 3D printing a game changer for me.
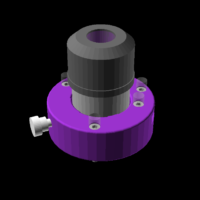
This has been a bit of a design challence for me… Just how small, how simple, can I make a focuser and yet still provide excellent usability. My latest Helix 1-14 design is my best yet.
A simple helical crayford focuser
As my 3D printer design skills improve I applied lessons learned and the unique capabilities of an FDM printer to the problem of a focuser. After a bit of a journey I have arrived at a design I can consider finished. Is it the final design? I may tinker some more, but I am satified for the moment.
The design is based on a few ideas from here and there, products I have seen or used, internet postings from others faced with the same challenge. I am not one for just printing someone else’s design, I rarely do that, I want to do my own, and maybe make it better.
For the last couple years I have been exploring 3D printed telescope designs. The latest result of this oddessy is Kinipōpō, a 4.5″ f/4 Newtonian using a entirely 3D printed ball mount design.
Kinipōpō ball telescope 3D model
The Hawaiian word kinipōpō translates as ball or sphere.
A ball telescope offers a number of advantages, the first of which is ease of use. It is simplicity itself to aim at a target, no odd controls, no weird angles, just freely push the ‘scope to the target. As the tube can be freely spun the eyepiece can always be positioned for easy viewing.
The design is an RFT, or Rich Field Telescope. This type of ‘scope is designed to be a low power, wide field ‘scope ideal for enjoying sweeping the sky and providing views rich with innumerable stars. It is not a good ‘scope for planets, the magnification is far too low. It’s prey is large, bright targets, star clusters, bright nebulae, or even the dark nebulae silhouetted against the rich starfields of the Milky Way.
Another ideal target is bright comets. My prototype providing pleasing views of comet C/2022 E3 ZTF a month before preihelion and maximum brightness.
The short focal length does create coma issues around the edge of the field, stars near the edges of the field smear a bit and will not focus. The problem does not seem too objectionable, but it is there.
The design is inspired in part by the classic Edmunds Optics Astroscan telescope, in being both small, portable, and simplicity to use. On the other hand the design offers a number of improvments over the Astroscan. Primarily the ‘scope offers an increased aperture of 114mm compared to the Astroscan’s 105mm, while being very close to the same overall size.
The scope costs about $200 to assemble, the largest chunk of that being the primary mirror. While the needed plastic filament for the 3D printer is cheap, it does take quite a bit of time to print. The largest part, the spherical shell requires over 60 hours on the printer, with many of the other parts being overnight prints. Assembly is not difficult, mostly cleaning up the plastic prints, heat setting a number of brass threaded inserts, and a bit of epoxy here and there.
Three of these little telescopes have been built, and three have been given away. I get photos of them every now and then, fun little telescopes under a dark sky.
As I have observed lately, most of the small telescope mirrors available right now are out of China, most of those produced by one company, Guan Sheng Optical or GSO. If you want a small mirror, say a 6″ or 8″ mirror, there is not a lot of choice, the mirror makers in the US generally do not do anything smaller than 10″.
A textbook Foucault knife edge test image on a 6″ f/4 mirror
The GSO mirrors range from decent to pretty bad, with no way of knowing what you will get when you order, just luck of the draw.
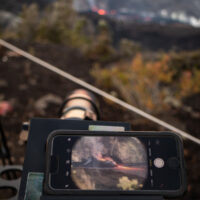
A couple weeks ago at the volcano I let quite a few folks take imagery of the lava using the afocal technique, simply holding the phone up to the eyepiece. This works rather well as the phone uses a lens much like the human eye, about the same aperture.
Shooting afocal with an iPhone and the TV-76mm ‘scope
The only real issue is holding a phone in just the right spot. Folks wanted video, but holding the phone steady is a real challenge. I had thought of making something to do this many times, last weekend I did it.
A session of playing around in 3D CAD resulting in a couple bits of clever plastic printed with the 3D printer… Done.
There are commercial solutions for this available, quite a few actually. But most of these are intended to adapt to a single phone, using some sort of clamping arrangement that you have to setup for a particular phone. I envisioned something that was more universal, quickly adapting to any phone.
The method I chose was a sliding magnetic platform that holds the phone. Just a simple shelf actually, set the phone on it and slide until you get it lined up. The base piece is printed with a recess into which a steel plate is set. The slider has three 8mm x 2mm neodymium magnets to securely grab the steel plate.
It took a bit of work to cut and file the steel plate to neatly fit the base, a bit of inlay work. Otherwise making the piece is quite easy. The only design issue is that this adapter is setup to fit a single eyepiece, a Televue Panoptic 27mm, and cannot be easily adapted to others.
The 3D CAD files are linked below. I have included the SCAD source file to allow tinkering with the design, possibly adapting to a different eyepiece. Both parts should be printed with support on, the pockets for the glued bits will have to be cleaned out, the resulting rough surfaces just right to recieve epoxy.
At the Keanakakoʻi Overlook I was able to test the adapter with a variety of different phones, both iPhone and Android, graciously lent to me for my experimentation. OK, the owners may have wanted a few lava photos. There was no difficulty using the adapter other than a moment or two needed to line up the camera with the exit pupil of the eyepiece. The result was more than a few smiles.