
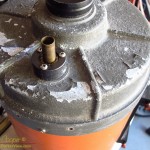
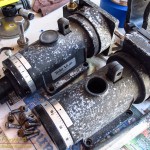
It looked horrible! The paint was coming off everywhere with heavily corroded aluminum underneath. Most of the screw heads were small balls of rust, with hopefully enough remaining to fit a screwdriver to and remove. For a precision optical instrument this small telescope was not very encouraging.
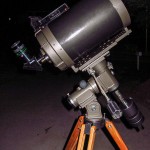
The telescope in question is an old orange tube Celestron C8. Thousands of these little telescopes were manufactured in the 70’s and 80’s. It was the C8 that set the standard for amateur telescopes at the time. The C8 is still in production forty years later, but the tubes are no longer painted orange as they were originally. Compact, yet offering decent performance, these telescopes were well regarded and hold a special place in the memories of many amateur astronomers. I have seen these little orange telescopes at dozens of star parties, even bolted to the side of huge professional telescopes for use as finders.
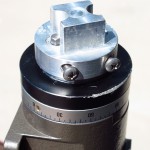
Dismantling the ‘scope is pretty easy. Just set to with a screwdriver and the corrector comes out along with the secondary mirror. A few taps with a mallet were needed to free the front ring. After the front is gone you can remove the primary, just remove the focus assembly and then remove a clip from around the central tube that retains the mirror. A few more screws and the rear cell comes free. It does not appear the central tube and rear threads can be easily removed from the cell. No problem, leave in place just tape over the for painting. The anodized parts appear as good as new, no need for restoration, just a little cleaning.
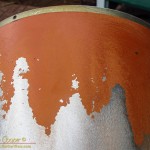
The orange tube took even more effort. First soaking to remove the last of the flocking paper and Goo-Gone to remove the adhesive. I then hit the tube with an vibrational sander loaded with 80 grit paper. Chips of orange paint everywhere! The orange paint had almost no adhesion to the metal underneath, it just flaked away when under the sander. In a matter of five minutes there was a pile of orange underneath my work stand and a shiny tube of bare aluminum ready to be painted. The orange tube was no longer orange.
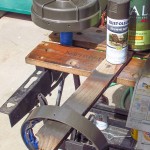
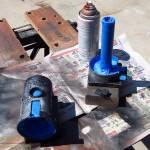
The hammered paint looks particularly good on aluminum castings. The chips and flecks of older paint that remain simply become part of the paint texture. Once fully cured it is tough and durable, ideal for a telescope that will see rough handling. It dries to the touch in fifteen minutes, but remains soft for a day or two. I have learned to wait up to a week before assembly as it can remain slightly tacky for days and stick if pressed against another surface.
I thought for a bit on the choice of color for the tube. Blue is right out, this is a Celestron, not a Meade telescope. I did not find anything that would reasonably match the original orange at my little rural Ace hardware store. I considered some form of black, that would look good and resemble a modern Celestron ‘scope. In the end I chose to stick with the Rust-Oleum Hammered finish and use a bright red for the tube. No luck, I can not find the red anywhere, back to the original plan, metallic black it is! This will be an outreach telescope, it needs to look a little sexy.
All of the hardware has been replaced with stainless steel bolts and screws wherever possible. A few of the original screws were stainless, perhaps replaced over the years? I also needed to machine a new focus knob, the original had gone missing.
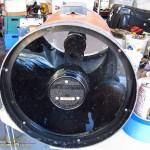
Cleaning the optics reveals good news. The primary is nearly flawless, no damage and no apparent degradation of the coatings during the three decades since its manufacture. There are a few small spots of coating damage on the secondary, about a millimeter in diameter each. The corrector is in very good shape as well, some minor coating damage near the edge of the secondary. All looks good for making this a working telescope again.
Reassembly of the optics worried me a bit. While I had taken out SCT corrector plates before, mostly for cleaning, I had never stripped an SCT down all the way like this. As I disassembled things I made a few discrete marks here and there for alignment. I anticipated that a complete collimation would be required on reassembly.
The mount is taking a bit longer but is well underway. While the optical tube is complete and mount has a few items remaining, it is reassembled and roughly operational. The worm gears need adjusting, one is too loose, the other too tight. A few screws need replacement yet, the best of the rusted ones used for a first assembly. Need to refinish the counterweight shaft and do something about the clutch knobs before I can call the job complete. Rebuilding the mount will be the subject of another post.
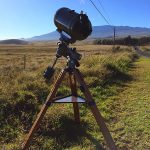
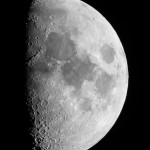
I can confirm that the new telescope curse applies to refurbished telescopes as well. I shared a few quick looks at the Moon with a neighbor waiting for dark. It was enough to establish that the optics had taken no major harm during the dis-assembly and reassembly. Indeed the craters were pleasingly sharp! Then the clouds rolled in. By the time it was full dark there was not a star to be seen, the Moon just a glow in the clouds. Collimation and final adjustments will await another evening.


I would have thought you would have zinc coated the allum first?
aloha
This is not a marine product Dan! Good primer and paint should do the job.
Great job, Andrew. This telescope looked good and performed nicely at the Keck outreach event last night. It is amazing to see what a mess it was when you received it! Very nicely done!