I have already posted about the restoration of an orange tube C8. That was only part of the story, the telescope is paired with a TeleVue Renaissance mount that was in the same poor condition as the optical tube. The mount required the same treatment, a complete tear down and restoration to reverse the ravages that tropical humidity had wrought upon the metal parts.
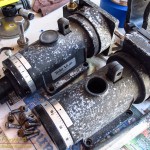
Corrosion was the issue. While the mount was mostly functional, it was looking horrible. The aluminum under the paint was corroding into a fine white powder. Most of the screws were quite rusted along with the counterweight shaft where the chrome was flaking away and the rust spreading. If allowed to continue the mount would soon be the piece of junk it looked like. There was something wrong with the clutches as well, they do not lock firmly and needed to be inspected.
The mount was sold by TeleVue in the 1980’s paired with their APO refractors. The mount is actually a re-labled unit manufactured by the Japanese firm Carton Optics as the model Super Nova or RSM2000. Well regarded by amateur astronomers you can find postings of well used and beloved mounts still in use thirty years later. Examining the mount I find I agree with those who like it. There is much to love in the solid smooth motion, this looks to be worth the effort of restoration.
Thus I set about the task of stripping down the mount into component pieces… Of the rusted hardware only one screw required drilling out, the hex drive head stripping when I tried to remove it. Fortunately I again had the proper tools, a set of easy outs to remove the remains of the screw after I had drilled the head off. I was able to remove the screw without any damage to the aluminum castings.
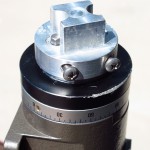
The real challenge was getting the right ascension and declination axes apart. The grease in the worms had turned to wax, I expected to find the same in the bearings. I also needed to get the axles out to repair the clutches. These are held in with slotted lock rings threaded onto the shafts, a few probes with a screwdriver showed that they were not going to come apart easily.
Instead of attempting to take these apart with the tools on-hand I manufactured two custom tools to disassemble the bearings. Basically these were custom spanners, each an aluminum disk shaped to fit into the axis. A pair of standard hex bits are secured into each disk to catch the slots. On the back of each disk I machined a 1″ square lug to fit a wrench.
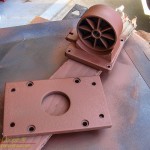
It is on using these devices that I realized that the custom tools had been a good idea, no half measures would have worked! With the housing clamped in a vice I strained at the end of a large 1″ crescent wrench to break the lock ring free. Begrudgingly it began to rotate, bit by bit as I struggled for each quarter turn. With both axis disassembled I knew I could finish this job and completely restore the mount.
The clutches were an issue as well. These are a band clamp arrangement that clamps the shaft to the worm gear. This prevents any motion of the axis other than rotating the worm. Two metal tabs protrude from the housing, squeeze them together with a screw and the clamp tightens. Unfortunately the thick tabs are slightly bent, tightening them all the way still allows a bit of movement. To solve this I filed a way just a little bit between the tabs to give them a few thousandths more adjustment.
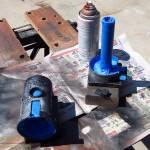
Most of the work was simply wire brushing, sanding, and scraping the aluminum castings and preparing the parts for painting. Again I used the Rust-Oleum hammered finish paints I used on the optical tube in matching colors. The scheme is a two toned black and dark bronze that is quite attractive. Things need to look good here as this telescope will be used for outreach.
After painting assembly went quickly. I ordered some grease specifically for the job, MD-50 a heavy petroleum and moly grease ideal for this sort of mechanism. Liberally applied to each bushing surface and the worm gears it should do the job nicely. It took some fiddling to figure out how to adjust the bearing compression set by those difficult to remove lock rings.
The tripod was a fair amount of work, but offered no real difficulty. A few screws here and there and the entire assembly was quickly reduced to a pile of parts, it was only a matter of wire brush and sandpaper to strip the metal for repainting. The wooden legs were sanded and lightly refinished with a wood preservative and sealer. I love the look of these wooden tripods, so classic. Functional as well as looking good, the wood damping any vibrations quickly. A set of new stainless steel hardware and everything went back together easily.
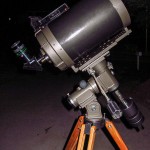
Over valentines weekend I assembled the mount and optical tube for the first time. After a month of work it was gratifying to see the entire telescope as a functioning unit. Moving the ‘scope into the driveway I pointed to the Moon. The scene was beautiful! Crisp craters with lots of detail in the eyepiece, surprising as I had made no attempt yet to realign the optics after reassembly. The mount moved smoothly and balanced easily, the clutches worked properly.
Not that the mount is finished, a punch list of little items remains. A few items of hardware still require replacement, the best of the old rusty screws used for assembly. The scale for altitude needs replacement. The pointers used to indicate position on the setting circles likewise need to be replaced. The counterweight shaft is still covered in rust, what to do about the failed chrome plating? Still need to come up with a neat solution for the damaged clutch knob. There will be another evening in the machine shop to make a few new knobs. Also need to disassemble and clean the polar alignment telescope!
Just a few details to complete before turning the telescope over to our outreach group at the observatory. And perhaps a good night spent out under the stars to test everything.


I recently purchased a used Televue RSM2000 mount. The mount is in good condition except for the clutches. The clutch knobs are broken and it is not clear to me how the screw tightening mechanism works as it is threaded trough the two tabs of the clutch band clamp. Did you find a solution for replacing the clutch knobs and tightening bolt?
I found a this vintage mount in Brazil but I do not know any technical specification on the web about it. Do you have an idea about the payload of that?
The mount was designed to handle small and mid-sized refractors, and was sold with 101 & 102mm TeleVue refractors here in the US. Based on this and my experience using it with a C8 I would put the payload at about 6kg comfortably. It may handle more, but will get harder to use, particular as it uses bushings not bearings.
thanks for reply. I intended to use it with a 200mm OTA for astrophotography. With all accessories the total weight would be something about 11kg, but according to the information I think I would have problems. Although it looks to be more robust than an EQ5.
Without bearings and not being originally designed for motorization I would not recommend the mount for photography. It works fine for visual.
thanks for reply.