
Giving motion to timelapse photography adds a dynamic element that is visually interesting. There are a few ways of doing this. Adding some motion in production with keyframes and panning, or using some sort of device to physically move the camera slowly during the time lapse sequence.
Note: This article was edited after I figured out where the manual was wrong, see below.
Still, the effect of actually moving the camera during the sequence is often more versatile and can produce a more dramatic effect. Not wanting to lug a large rail slider system around I have opted for a slightly easier solution, a powered panoramic head. This allows a panning a time-lapse sequence to give that extra degree of motion in the resulting video while keeping the gear portable.
I have played with a smaller mechanical head suitable for small cameras. A cheap eBay unit turned out to be essentially an egg timer in a simple plastic case. It was pretty cheap, an eBay impulse buy. It also worked fairly well, as long as the camera was small and there was no gusty wind. Using the GoPro Hero 4 I used it to make some nice video on the mountain. The results were good enough to look into getting a proper solution in place.
Looking for that real solution I cast about for a decent unit. B&H carries the Revo EPH-6 which looked interesting. Built in battery and and IR remote for operation it appeared to be what I was looking for. The unit sells for just under $90, but B&H would not ship it to Hawaii because of the built-in battery. Too bad B&H, you lose.
Looking further I find some that appears to be exactly the same unit from Neewer on Amazon. Same unit, two brands, have seen a lot of this sort of thing these days. The Neewer unit was half the price and they had no problem shipping… For free!
Unpacking the unit I was pleased with what I found. The pano head comes in a very nice box with die-cut foam. Inside you find the head, a small IR remote control, a micro-USB charging cable, and a very brief manual printed in English and Chinese.
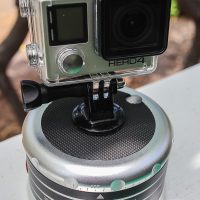
The pano head is solidly constructed and well made. The rotational platform looked to be fairly solid, good enough to support a small to mid-sized camera. The upper camera mount is standard 1/4″-20 thread, the lower mount is 3/8″-16 with a supplied adapter for 1/4″-20. As the unit is about 3.5″ in diameter it is fairly large when sliding into the camera bag, but that size offers better stability.
The unit is charged using a standard micro-USB cable with any 5V USB style adapter or from a computer. As I have more than a few of these around and this is standard kit when travelling, the USB solution is quite convenient. A blue LED beside the connector indicates charging, going out when fully charged.
The remote is simple and a few settings are offered to adjust the operation. Rotation rate can be set at 15, 30, or 60 minutes per sequence. You can also set the unit for 90, 180, or 360 degrees of motion, moving clockwise or moving counterclockwise. The settings are confirmed with a simple set of LED’s on the side of the unit.
What you have to remember, as it is not obvious from the LED’s, is to select the speed and amount of rotation, then to select clockwise or counterclockwise to begin motion. The setting LED’s on the head then begin flashing to indicate the unit is running.
The unit is supposed to be settable with bluetooth from a phone application. It does identify itself and I can pair it with the iPhone, but where to go from there? The instructions are not very clear in how to use the bluetooth, it appears all you can do is use the remote controller to trigger the shutter on a phone camera.
The unit can be leveled using a small but functional built in spirit level, an important feature for a panoramic head. The manual notes that the pano head should not be rotated by hand as damage to the gearing may result. No matter, just rotate the tripod head to set the starting position.
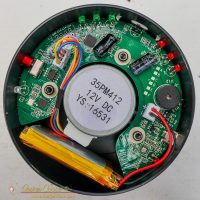
Examining the PCB things get more complex. There are two microprocessors installed with an unoccupied place for a third! One processor looks to handle to IR remote controller, LED’s, and motor while the second handles the bluetooth communications. The unoccupied place is clearly a communications processor as well judging by the nearby PCB antenna. The third missing processor may very well be the ubiquitous ESP8266 WiFi controller based on the package and layout.
Also visible is the motor driver and a LiIon charge control IC. The unit would be very hackable if one wanted to come up with their own controller for a different application. As it seems to meet my current needs I will leave it alone…For now.
Two small issues with the unit I received… The bubble level was useless, it was not properly filled with fluid. As it is a standard 10mm level I simply pried it out of its hole and ordered a pack of ten identical levels on eBay for $1.49 with free shipping, problem solved. The other issue was even more minor, the first time I removed a camera from the top of the unit the 1/4″-20 screw came with it. I needed a few moments with a small pair of pliers to free the screw from the base of my GoPro and return it to its proper place in the top of the pano head. I added a droplet of laquer in the threads to insure it stays put next time.
Some Usage Notes
Even after reading the manual (Yes, I actually read it) I had a number of issues with using the unit. The manual can take some creative reading to understand, it is clearly a translation from Chinese. My favorite is “Please to not spill or paint acidity medicament on the head.”
There are also some small differences between the production unit and the manual, such as the charging indicator LED being blue instead of red as the manual indicates.
The manual clearly states that the rotational speed is set as “rotate one circle by 15 minutes” for the 15′ setting. I would expect that any reasonable person understand this means you are selecting a fixed rotation rate of 24°/minute any time you set for 15′. Nope, in practice I quickly found out this is wrong. The 15′ setting means that your selected angle will be completed in 15 minutes. Select 90° and 15′ for your setup and that 90° will take 15 minutes. Select 360° and the unit will go all the way around in 15 minutes. This provides a far wider range of speeds, but can make planning more difficult when you consider the step size and exposure interval.
One item not in the manual is the use of the rotational direction buttons on the remote. This one got me the first session out. The direction buttons are opposite what I would have expected. To sweep the lens to the right, a left to right panorama, press the left pointing button on the remote!
Using the Pano head
There is the question of correct settings for high quality timelapse. My daytime rule of thumb has been two second intervals for nearby motion, particularly clouds. Five second intervals work well if the motion is more distant, more than a few miles.
Testing was pretty easy. Just carry the rig to the roof of the observatory and let it run for an hour as I go back to work downstairs. I had to wait into the afternoon a bit to get some convection forming along the back ridge, otherwise time-lapse of a plain blue sky would be truly boring!
| Angle | Time | Interval | Step | Frames | Video |
|---|---|---|---|---|---|
| (°) | (min) | (s) | °/frame | (s@24fps) | |
| 90 | 15 | 0.5 | 0.05 | 1800 | 75 |
| 15 | 1 | 0.10 | 900 | 37 | |
| 30 | 1 | 0.05 | 1800 | 75 | |
| 30 | 2 | 0.10 | 900 | 37 | |
| 60 | 2 | 0.05 | 1800 | 75 | |
| 60 | 5 | 0.12 | 720 | 30 | |
| 60 | 10 | 0.25 | 360 | 15 | |
| 180 | 15 | 0.5 | 0.10 | 1800 | 75 |
| 15 | 1 | 0.20 | 900 | 37 | |
| 30 | 1 | 0.10 | 1800 | 75 | |
| 30 | 2 | 0.20 | 900 | 37 | |
| 60 | 2 | 0.10 | 1800 | 75 | |
| 60 | 5 | 0.25 | 720 | 30 | |
| 360 | 30 | 0.5 | 0.10 | 3600 | 150 |
| 30 | 1 | 0.20 | 1800 | 75 | |
| 60 | 1 | 0.10 | 3600 | 150 | |
| 60 | 2 | 0.20 | 1800 | 75 | |
| 60 | 5 | 0.50 | 720 | 3 |
A major consideration in constructing the table is the step size between frames, measured in degrees per frame. In practice I have found that steps larger than 0.2°/frame can result in choppy video. I try to keep around 0.1°/frame in my final video. Rendering the video at higher frames rates like 60fps can help alleviate that, but only modestly, best to have smooth video to start with.
Thus you see in the table above practical rate I chose to keep the step size about 0.1 or 0.2°/frame. Notice that I did not even try to shoot at the fastest speed of 15’/360°, at this point you may as well just shoot standard video, the SD card usage will be lower.
Why do I like 2 and 5 seconds? Odd actually… These were my standard recipe shot intervals from many years ago, determined by experiment shooting time-lapse on the mountain and watching the clouds. Clouds animate quite nicely at 2 and 5 second intervals, just about right for the amount of movement. I was surprised to find that these intervals are also the available settings in the GoPro firmware, which allows 0.5s, 1s, 2s, 5s, 10s, and 30s.
Once the programmed motion ends, 360, 180, or 90 degrees, the unit stops rotation and beeps to indicate the end of the sequence. This may be nice for some applications, but it would be nice if it kept going. The beep may also be an issue as this may attract undesirable attention to a hidden camera running time-lapse.
So far I like the unit! I have set it up in a little kit with the GoPro Hero4, everything fits in a small nylon pouch I had lying about. I expect it will get a few more trips to the summit and maybe a few shots from Waimea or the Saddle. I am accumulating material for new video’s so I need to do more shooting! This pano head gives me another tool for creating engaging video.

Hello! I need to speed up the device because I want to use it as a turn table for products instead a panorama head. Do you know how?