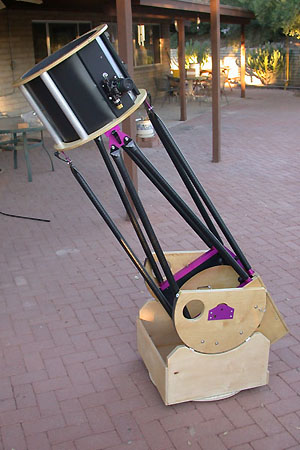
Deep Violet, an 18″ f/4.5 Dobsonian

In April 2001 I realized a dream that had been many years in the dreaming and a year in the making, a large aperture dobsonian.
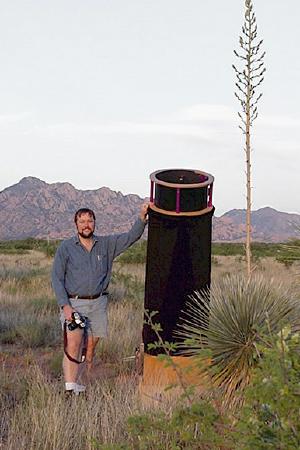
Deep Violet
Deep Violet set up near the Dragoon Mountains in Southern Arizona
The decision process that eventually settled on the 18″ f/4.5 design was a long one. As a very active amateur I had had many opportunities to examine other scopes. To see where they excelled or where they fell short. With this experience I eventually decided on a list of requirements.

  • The scope had to have sufficient aperture to take advantage of the dark skies available near Tucson. I wanted to see spiral arms in galaxies.
  • The design was to be visual only. No drives, but provisions for an equatorial platform at a later date.
  • The mount would be a no compromise rigid structure, capable of allowing good optics to perform at their best.
  • The scope had to fit through a standard doorway.
  • The scope had to fit in the cargo compartment of a Ford Explorer Sport without dropping the seat for safety during transport.
  • The eyepiece must not be an excessive distance above the ground, allowing use while standing on the ground much of the time. (But then, I’m 6’2″ tall)

Over a decade of engineering experience has taught me that a well defined set of specifications can make all the difference at the end of a project. With these design goals in mind the plan then progressed rapidly.

Continue reading “Deep Violet, an 18″ f/4.5 Dobsonian”

A Red LED Desk Lamp

Need a red lamp to provide soft red illumination around the telescope? Described here is an easy way to do this. Take a commonly available desklamp and convert it to LED’s. This is a single evening project, taking just a few hours to accomplish once the parts have been obtained.

Observing Table
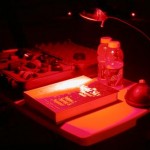
A red LED desk lamp in use on the observing table

I have found the resulting light extremely useful when observing. No more holding the flashlight in your mouth when reading charts or making observing notes.

Because the light can light up a whole area when turned fully on it can be used as a worklight when breaking down gear and packing it into the vehicle without bothering other observers at a dark observing site. Or you might build the 120V version for a personal observatory.

I have also found that these lights also make great gifts for fellow astronomers.

To accomplish this we will disassemble the lamp, remove the 12V bulb and replace it with an array of LED’s. To control the brightness we will install a variable regulator to allow dimming of the lamp from completely off to very bright. An option is to install another connector to allow DC power to be supplied from a battery for field use.

Before embarking on this project be sure to read this entire article. Having the entire task in mind will help you plan ahead. It is important to use safe electronic assembly techniques to avoid any risk of damage or injury when making the modifications or when using the lamp. We will make no modifications to the high voltage side of the transformer to insure the lamp remains safe to use.

One secret to the lamp is the LED’s. These wonderful devices convert a small trickle of electricity into a very bright red light. Be sure to get ‘Ultrabright’ or ‘Superbright’ types that put out at least 3000mCd (millicandela). I found some that put out 6000mCd that I use in my lights at All Electronics. Perfboard, regulators and many of the other parts can also be purchased there.

Continue reading “A Red LED Desk Lamp”

Rebuilding a 12.5″ f/5 Truss Tube Dobsonian

12.5" Dobsonian
 
Some time ago my friend Bill Lofquist bought a dobsonian telescope from Roger Ceragioli. Roger had built the ‘scope to provide a home for a beautiful 12.5″ f/5 mirror he had made. The mirror is gorgeous, as is typical for Roger who is one of the best opticians I know. I have an APO triplet of Roger’s that is a prized possession.

Mechanically the scope had a few problems. The truss tubes were attached with separate hardware top and bottom, so that setup required over 20 minutes of sorting through screws and futzing with eight separate truss tubes waving around the whole time.

The elevation bearings had been set about 1/8th inch off from each other leading to a side to side twist when the scope was moved in elevation. This was not a major problem when using the scope visually but would make the use of digital setting circles impossible as DSC’s require orthogonal axis in the scope.

The ground board was a bit undersized, making the scope prone to tipping when used at low elevation.

The rebuilt scope is essentially finished with the usual tweaking and small adjustments remaining. Things are coming out very well and a few of the changes are worth passing along to the ATM community. In the sections below I will concentrate on practical details in hope of conveying some of the finer points in telescope making.

Continue reading “Rebuilding a 12.5″ f/5 Truss Tube Dobsonian”

A GPS Observing Clock

Observing Clock
A hand made GPS clock for the observing table
For years, when observing, I found myself wanting a clock on my observing table when recording observations. I have used either a wrist watch or a cell phone, but looking at these was uncomfortable as these modern devices use bright backlit LCD displays, not a nice night-vision friendly red. The cell phone also has the additional problem of using up its battery quite quickly when out of range of a digital cell tower at some remote observing site. I needed a simple desk clock for my observing setup.

Accuracy was also a question, accurate time is always important when observing. Asteroid occultations, lunar and solar eclipses, iridium flares, twilight, jovian moon transits, the list of things where accurate time is useful is long in astronomy.

The Specs

Of course being a electrical engineer makes designing and building a clock a fairly trivial exercise. But why stop there? Why not build in a few extra features…

  • Use red 7-segment LED’s and build in some type of selectable dimming mechanism.
  • Why bother setting the clock each time you set it up? Make the clock self setting and very accurate.
  • Since the clock is accurate add a serial port to allow the clock to supply accurate time to a laptop when taking astrophotos.

Continue reading “A GPS Observing Clock”

Improved Rocker Box Pads

A small design detail in a dobsonian telescope is a method to restrain the mirror box in the center of the rocker box, to keep it from sliding side-to-side in the elevation bearings.

Rocker Box Pad
A standard carpet pad embedded into the wall of the rocker box
A common solution is to use a couple carpet pads to provide a lateral support that keeps the wood from rubbing. The pads do not add any friction that would keep the scope from tracking smoothly at high power. These pads are available in most hardware stores in both sheet form as well as pre-cut circles, usually one inch in diameter.

I have had trouble with these pads in Deep Violet. They do not stay put! Sometimes when inserting the heavy mirror box into the rocker I would catch a pad and simply shear it away from the wood. I ended up using a larger pad and using small wood screws to secure it instead of the adhesive.

Continue reading “Improved Rocker Box Pads”

Primero

Every astronomer has a first telescope, mine is a 6″ f/5.1 Newtonian I first built as a teenager. As life progressed I was forced to dismantle the telescope and it dwelt for a time as a pile of parts in a box. Eventually I had an opportunity to rebuild the telescope, but as both my technical capability and my financial means had increased I was able to do a substantially better job.

Primero
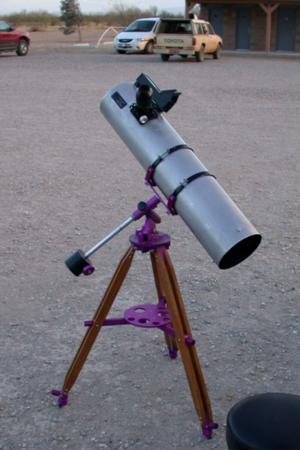
Primero setup at TIMPA outside of Tucson
The result is the instrument you see to the right, Primero, or simply ‘first’ in Spanish. The original mirror was used but little else from that first telescope was reused. A completely new mount, a new tube and all new fittings. The only purchased parts are the focuser, the Telrad and the secondary mirror. Several parts of the mount were removed and reworked from a previous mount, this includes both the bearings, shafts, counterweight and saddle. The entire tripod, tube, mirror cell, spider and secondary holder were produced by hand for this scope.

The optical design of the telescope is standard Newtonian with a f/5.1 primary mirror of 6.0 inches giving a focal length of 777mm. The mirror was hand ground when I was a teenager and thanks to expert help during figuring is an excellent mirror.

The RFT design is deliberate and has proven to be a good choice, particularly with modern eyepieces that perform so well in short focal length scopes. With a 35mm Tele-Vue Panoptic eyepiece the scope provides a 22x image with just over a three degree field.

Continue reading “Primero”

A Box ‘O Broken Telrads

The Telrad finder is one of the most useful telescope accessories ever invented. A set of glowing red rings showing you, at a glance, exactly where your telescope is pointed in the sky. I have one on each of my telescopes. The Mauna Kea VIS also equips each telescope with one of these simple devices.

They do not work so well after hitting the ground a few times.

As I have mentioned in the past, the equipment at the Mauna Kea VIS gets used hard. It is setup every single night of the year. Thousands upon thousands of people use these telescopes to see the wonders of the night sky, the first time for many. The wear and accidental damage in the darkness takes a toll.

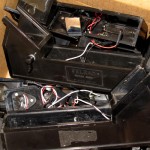
Broken Telrads
A box full of broken Telrad finders awaiting repair
When Deb and I were last at the VIS we spent the day cleaning eyepieces and making other repairs to the ‘scopes. One of the things I found in the storeroom was a small pile of broken Telrads. Some were missing windows, many had broken battery holders, mirrors were missing and reticle holders hanging loose. Many had been patched back together with tape or hot glue, attempts to keep them working for another night.

Quite a few had reticles that were missing or melted by exposure to sunlight. The lens that focuses the reticle’s ring pattern, projecting it into the sky, will also focus sunlight on the reticle, quickly melting the thin film if a Telrad is left in the sun.

Gathering up partial and scattered parts I collected a box of finders that I can work on later. It made quite a pathetic sight, a box of broken Telrads. A couple evenings later, five of the Telrads are now rebuilt and ready to return to duty. Four more are awaiting replacement reticles before I can call them completed. I will take them back up next time we are on the mountain, but I expect we will find something else that needs to be fixed.