Apparently the purple refractor was quite the hit on yesterday’s webcast. Not only did it provide beautiful imagery of the Transit of Venus for everyone to enjoy, but caught the attention of many viewers. There we many comments… “Where can I get one?”, “How much?”, and my favorite… “…paint Keck purple!”
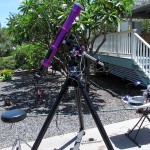
Violet Haze really is a great telescope, an entirely hand-made instrument, with the exception of the focuser. The lens set is a full apochromatic triplet by Roger Ceragioli, a true expert in refractor design and manufacture. The purple optical tube is my own machine work. The result is a truly unique telescope that is a joy to use.
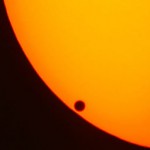
Imaging Venus in the daytime a mere 12°44' from the Sun.
Transit is over, an exhausting and exhilarating day! I am headed to bed, but still totally jazzed with the experience. Keeping the webcast going for seven hours was a huge effort. Given the comments from our viewers it was worth it. I will have to more fully write up the experience for a later post.
The best visual for the day was the few minutes just before second contact… A beautiful, razor thin arc of light coming through the Venusian atmosphere, connecting the two horns of the occluded Sun. It was delicate and sublime, one of the most memorable sights I have ever seen through a telescope. With the excellent seeing of Mauna Kea, and the wonderful optics of my TV-76 telescope, the sight was clear and steady. I have yet to find a photograph that captures what I saw through the eyepiece.
I will post a quickly processed version of one of the frames from the second camera…
The June 2004 Transit of Venus, image credit Jan HeroldThe gear is tested, packed and ready. All of the arrangements have been made. It is time for the 2012 Transit of Venus!
We will be webcasting the transit live from the Keck telescopes at the summit of Mauna Kea. Tune in for images of the transit, and a lot of information about the transit. Larry O’Hanlon and I will be talking about the transit, the science, the history, and just generally enjoying the experience. You are invited to join us. Expect the broadcast to start about 11:45HST, or about 25 minutes before first contact.
Want to see for yourself? There are multiple locations around the island where you will find solar telescopes and volunteer guides to answer your questions about this event. Not on the Big Island? Check you local paper or look up your local astronomy club to find public events. Science museums, colleges, astronomy clubs and other astronomy organizations are organizing public events wherever the transit can be seen.
Please exercise caution when viewing the Sun! Use appropriate eye protection or indirect observing techniques to project an image of the Sun. The link at the start of this paragraph leads to a great discussion on viewing the Sun safely. As always the single best source on the web (or anywhere) for eclipse and transit information is Fred Espenak’s eclipse website at NASA. Stop by whenever you have a question on upcoming events as well as viewing and photography tips.
Tomorrow we will witness an astronomical spectacle that will not be seen again by anyone currently alive. The gear has been double checked, packed and loaded. Telescopes, cameras and computers are ready, with the exception of a few camera batteries awaiting their turn in the charger.
Testing gear for the Transit of Venus.It is an odd sense of anticipation I feel. I have had the transit marked in my mental calendar for eight years, since I was unable to see the first transit of this pair. I have had a blog post written and scheduled for June 5th, 2012 ever since I moved to the island five years ago. Every time I logged into the administrator page, there it was, at the top of the list, ever so slowly growing closer. That day is here.
After a great deal of work, the gear is ready, a big source of apprehension has been dealt with. There is some doubt about the weather, with both high winds and possible clouds an issue. But there is nothing I can do about that. I can go into tomorrow and have fun with this event. It will be a very long and tiring day at the summit. Whatever happens, it will be a day for memories.
There is a new blog post entered now, for August 17th, 2017, another five years from now. On that day a total solar eclipse will sweep across the Pacific Northwest. We amateur astronomers schedule our lives a bit further ahead than most. I plan to be there.
Mercury is beginning an evening apparition this week. Look directly above the sunset for a starlike object shining at -1.3 magnitude. The planet will be over 10° from the Sun today, rising a little further each day until maximum elongation on July 1st.
Aiming a telescope at the Sun is deceptively difficult. You can not use a optical finder for risk of eye damage. Unit power finders, like a Telrad, are of little use as you can not see the projected image. Telrads can also be damaged by sunlight. In a pinch you can simply use the shadow of the telescope, positioning for a minimum shadow. This at least gets you close.
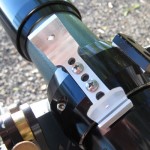
A Sun Finder mounted to a TeleVue 76mm 'scopeThe best solution is to build a finder designed just for the Sun… A Sun Finder.
There are many plans for Sun Finders posted to the web. Most use a shadow or projected point of light. The version I built is no exception, using a pinhole to project a point of light on a translucent screen. The trick is to make such a device simple and accurate.
With simple metal working capability a Sun Finder like this one can be made from sheet metal, or machined from solid aluminum. I chose the latter as I had the capability. This design uses a pinhole that projects a similarly sized dot of light at the rear of the finder. The front face or the finder, through which the pinhole is drilled, creates a shadowed area for in which the projected dot can be seen.
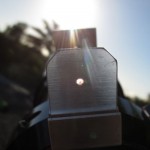
A Sun Finder in use with the projected dot visibleA longer distance from the pinhole to the screen will increase the sensitivity in aiming. In practice I have found that at least three inches is sufficient for most telescopes while keeping the device compact. Experimentation with the design can be entertaining and educational. No need to stick strictly with this design, just borrow the basic ideas, a lot of variations will work.
This design is based on an aluminum extrusion, a 3″ x 1.5″ channel. This save a good deal of machine work in creating the finder. As much of the machining is done along the length, a number of finders can be made at the same time. I made six finders from a seven inch scrap of extrusion out of the shop scrap pile.
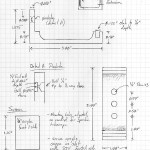
Plans for the Sun FinderThe screen is made from a small piece of 1/8″ thick acrylic. Common 0.1″ thick material will work as well. One side is frosted with sandpaper to create a translucent screen. Use of a clear screen allows the solar dot to be seen from front or behind while aiming the telescope. The screen is simply secured with a glue, preferably RTV. The frosted side should be mounted towards the pinhole.
To keep the device simple there is no adjustment in aiming. If the finder is mounted reasonably well, the dot of light will be on the screen. The first time out it is necessary to first get the Sun in the field of view. You can then mark the position of the projected dot with a permanent pen (Sharpie or similar). After that aiming is simply a matter of positioning the dot on the mark. If the mark is made on the smooth side of the acrylic screen it can be easily erased and re-marked if necessary.
Done, a simple and reliable Sun Finder to work with just about any small telescope.
It was a full dress rehearsal. Both telescopes, two cameras, the entire streaming rig set up on the lanai. No less than three computers with cables all over the driveway! Surprisingly enough, everything went pretty well!
The Sun on June 2, 2012If you had been watching the Keck Transit of Venus stream, you would have been looking at a live image of the Sun for several hours. The seeing from my driveway was pretty poor, but there is a nice collection of smaller sunspots across the disk.
Everyone wandering by the house noted the telescopes. I gave peeks to our mail-lady and a couple young women who stopped by, intending to read me a bible verse or two (that was fun;)
Two technical issues were key today… Using thirty feet of active USB extension cables to run the streaming camera remotely, no problem. Co-aligning the two telescopes to aim at the same point, no action needed, aligned from the start. I had thought I might need to shim the mount for the piggyback ‘scope. I was also able to play with the streaming camera further. The Baader film filter gives a blue-white image. Adjustment of the camera white balance will restore a little yellow cast. I do not have much problem with the white, but a hint of yellow will allow people to instantly realize they are seeing the Sun. The same reason I adjust my processed photos for a golden orange hue.
We are all swapping gear around to get the set-up ready. Chris was nice enough to loan me a Canon T-ring and some Baader film. I built a battery pack and some sun-finders for several telescopes. Last night I picked up a whole solar rig from Cliff for delivery to Olivier. Olivier lent a 40mm eyepiece to Keck for the public telescope that will be setup at HQ. The list goes on…
I was not the only one doing a dress rehearsal. So far today I have been on the phone to other folks setting up and using a sunny Saturday to check gear. Some of the guys over on Maui even posted a video of their test run. I should have thought to do the same thing! Will have to time lapse the summit setup.