
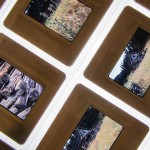
The problem is several thousand color slides stored in containers in a closet. These slides range in date from my earliest forays into photography as a teenager, through years of living in Europe on active duty with the US Air Force, to many years of traveling the desert southwest with a camera. I have carried a camera for my entire adult life, as a result there is a photographic treasure in my old photos.
The digital archive is also quite easy to duplicate for safekeeping. A two terabyte hard drive can hold the entire collection. A couple hours to copy and every image is safely stored, preferably at a remote location in case of disaster. There are several copies, one in my office at work, another at my parents house in Portland.
These arguments are obvious, the collection needs to be digitized, but the effort of scanning those slides is enormous. I really need a way to perform this task with a minimum of effort and cost. I have started this project several times over the years, only to be discouraged by the effort needed and quality issues.
Scanning
Many authoritative sources recommend scanning as the method of conversion and various scanners are recommended, usually the Nikon CoolScan or Plustek units.
Why do so many recommend scanning as the preferred method of digitizing slides? Certainly professional photo lab scanners are the best possible method, offering resolution far in excess of any scanner generally available at any reasonable cost. I suspect that one factor is decisive… Until the latest generations of digital cameras the resolutions of scanners were far higher than cameras could offer. the linear CCD’s used in scanners offered very high resolutions at a very affordable price point.
A few years back I purchased a manufacturer refurbished unit direct from Plustek, the OpticFilm 7600i. Featuring 7200dpi, infrared dust mapping and multiple scans to allow a better dynamic range, the unit should be up to the task. While the unit is not bad it it fails to meet my expectations. I have not completed any mass scanning with it, only using it to convert the occasional slide.
The scanner is also quite slow, taking several minutes to scan a single frame when used at the highest quality settings. I use the SilverFast software with the unit, a software package I find frustratingly clumsy with a poorly designed user interface. Unfortunately there is little option on the software side.
I have explored the possibility of commercial scanning of the slide collection. I have sent some slides out for scanning. While the costs are high, I think the collection is worth it, it was quality issues that again gave me pause. The quality was inconsistent, particularly in the preparation and dust removal.
The issue continues to nag me, every time I am reminded of all those photos sitting in boxes. Thus I am going to try again, this time using a slightly different approach. The result of this effort is in the notes found in this post. I am exploring a process that promises several advantages, including the production of calibration references and personal quality control that should address my concerns.
Duplication
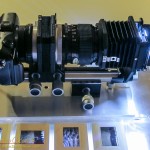
What is this other way? What I do have available is a number of very good digital cameras. Why can I not use a camera to simply photograph the slide? This is how photographers often duplicated slides in the days of film.
The equipment to do this is still available in used form. It may be decades old, but this sort of old photo gear does not age like modern electronics. This old gear is also of very nice quality, solid construction to hold the slide, lens and camera with the precision needed. Professional level gear from decades ago is still pretty nice gear.
The resolution of a modern DSLR or mirrorless camera is generally twenty to thirty megapixels, give or take a bit. This is comparable to the resolution of a good quality slide film. While it it difficult to directly compare the analog film grain media to digital pixels, in most comparisons I have read it appears that 35mm slide film may be the equivalent to somewhere around 20Mpix. With a 20Mpix sensor, the resulting frame is about 5,500 x 3,600 pixels, enough for all but very, very large prints. The requirement is to use all of those pixels well, with a good, high resolution, sharp image. This last point requires special attention.
I already had part of this method on-hand, an old Canon Bellows FL unit in perfect shape, bought years ago at a photographic flea market. I only needed to obtain the duplicator accessory to this, something that is readily available despite not having been manufactured for decades. An eBay purchase netted me a nearly perfect unit for less than $40. I do mean perfect, the unit appears to never have been used and the flexible bellows show no wear or damage from age.
Initial Concept Testing
With the gear on-hand I sat at my kitchen table and did some initial testing before this whole effort got too far along. The results were encouraging, the light source would require work, some experiments with different lenses would be required. The first images had some issues but showed that I was on a track that could meet my requirements.
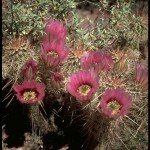
After setting up a better light source I had real results to examine. The first processed image is shown at the right. I chose an image with a wide dynamic range for testing, regions of bright and shadow, and a lot of texture.
I will break out the lessons of this first trial and discuss each separately below.
Light Source
The duplicator has a nice opal glass diffuser. To this I wanted to add a white LED light source for a steady and controlled source. I purchased a flat plate style LED assembly from an Asian supplier on eBay for this. The form factor is ideal, an array of LED’s embedded in a phosphor. The active, light emitting area is about 18mm by 32mm, almost as large as a 35mm transparency.
To evaluate the light source the diffuser is imaged directly. The setup is first focused with a slide in place, then the slide is removed to image the light source without an original transparency in position. The results are seen at the right side.
Light distribution is good, examination of the flat field image shows no hot-spots or difficult to correct artifacts. It is not perfect, both color and illumination distribution will require correction, but these are correctable with a thought out calibration procedure.

White Balance
White LED’s are actually blue or UV leds with a phosphor used to convert the blue to a full spectrum source. As a result they can be notably heavy on the blue end of the spectrum. This will show up as a heavily blue weighted histogram. Indeed, the first shots taken using daylight white balance show a lot of blue in the the resulting frames.
Creating a custom white balance seems to nicely correct this. Using the cameras built in white balance function seems to be fairly accurate. Careful examination of the resulting frame with the histogram tool shows a well color corrected result. Testing with several slides representing different color casts likewise shows a pleasing color balance with no visible bias.
What I need to consider getting is some sort of color reference slide for use with this duplication setup. It should be possible to more properly characterize the color rendition of this system.

Illumination Correction
The second issue easily seen in the test flat is uneven field illumination. The corners are notably darker than the center. This is no surprise and was expected, this sort of issue is present in most optical systems.
Fortunately this issue is also easily corrected. The flat field reference taken without a slide in the duplicator can be used to correct the final image. It is just a bit of pixel math that scales the final values in the image according to the reference flat.
There are some complications. The reference image must be processed to reduce noise, usually by blurring the image by averaging adjacent pixels. There must also be safeguards in the software to warn of clipping the dynamic range. These are all just extra care that must go into the programming.
Examination of the flat field also reveals dust in the system, either on the diffuser or on the camera image sensor. This can then be cleaned prior to using the duplication setup. Minor dust on the sensor will also be corrected in the flat field process.
Camera
The camera I intend to use for this process is the Canon EOS-M. This is an APS-C sensor, 18Mpix camera
the APS-C sized frame lowers the magnification requirements to about 1:2 in macro. The resulting image is about half the size of the original 35mm frame. The goal is to have the slide slightly overscanned, with the frame just visible at the edges of the image to insure everything possible is captured.
The Lens
Close examination of the first test images shows that focus is not as crisp as it should be. The Canon 50mm f/1.8 lens, as renowned as this classic lens is, was not up to the job. The MTF of the lens insufficient for the resolution of the slide original and the pixel size of the camera.
A second lens tested in the setup, a Canon 50mm f/1.4 FD lens also showed the same issues. Both falling just short of the needed resolution. Part of the issue may simply be the small pixels of the modern digital camera. These tiny electronic pixels are very demanding, more than the emulsion films these lenses were designed to be used with.
In the end I purchased a 50mm f/3.5 SSC Macro lens off of eBay. This dedicated macro lens is recommended by several sources for use with the bellows setup. This proved to be notably better, resolving both the film grain and small dust specks on the original slide.
Depth of Field and Diffraction
Getting the original slide completely into focus is a major issue in this setup. Ideally the focus should be consistent and repeatable as slides are removed and inserted during the process. A good holder for the slides is part of the solution, and the Canon duplicator seems quite good in this regard, spring clips hold the slide mount against the frame. Even positioned well, there can be variations in the position of the image on the slide. Slight variations in the film, a bit warped in the frame, variations in the thickness of the frame, or errors in the alignment of the slide to the lens or lens to the camera.
The answer is to provide sufficient depth of field that any slight variations in positions of the camera, lens and slide do not effect the image quality. The goal is to find a lens setup that provides at least 1mm depth of field, preferably twice that. With this range the tolerance for error in positioning the slide will eliminate any issues.
Pushing for a large depth of field requires the use of longer f/ratio settings in the lens. There is a tradeoff here, such high f/ratios create large errors as the diffraction limit comes into play. With a small lens opening, the airy disk due to diffraction can be larger than the pixels in the camera sensor. The result is a degradation in image quality.
Time to start plugging some numbers to insure this setup will work. A good discussion of depth of field in a macro setup can be found on Bob Atkins photography website. It is here that I refreshed my memory on these issues. There is also a very complete article on Wikipedia that gives the same information. Atkins gives an equation that can be used to calculate depth of field with respect to f/ratio. He includes a table, but uses a larger circle of confusion than I need given the pixel size of the camera. Thus a little recalculation is necessary to create my own table.
Total Depth of field = 2 x cof x f-stop x (m+1)/(m^2)
The EOS-M uses a 4.3μm pixel, or 0.0043mm, this is the desired circle of confusion (cof). The needed magnification is 0.5x or 1:2, the resulting image half the size of the original 35mm slide projected on to an APS-C sized sensor. Solving the equation for each f-stop gives the following table…

Now to consider the effects of diffraction in this tradeoff. Consulting various references on the issue, one can quickly see that f/ratios higher than f/8 will create a spot size substantially larger than the camera pixel. Ratios of f/5.6 to f/8 look to be a good tradeoff between depth of field and diffraction while providing the needed depth of field. Some experimentation may be in order here, but I expect that I will shoot at f/5.6 or f/8 for this project based on the numbers given here.
High Dynamic Range
The classic slide films are renowned for the dynamic range they could capture. This was a major failing of digital cameras for many years, and one of the reasons professional photographers continued to use film well after the advent of digital cameras. While the dynamic range of digital is vastly improved there are still cases where it can not fully capture the range of light and dark that is present in some situations.
Digital does offer ways to beat this problem. Since the image is nothing more than a set of numbers in a file it can be easily manipulated in interesting ways. One way that has become increasing common in recent years is the use of HDR, or High Dynamic Range imaging. This is simply a process of taking multiple images, each at a different exposure, and combining them later. This allows a single image to be created using the best exposed parts taken from each frame.
Experimentation with the test images has shown that a full +/-2ev is needed to capture information contained in both the highlights and shadows of the original transparency. Thus our process here will be to take three images of each slide, with a full +/-2 ev bracket. No problem, all full featured digital cameras allow this to be dome automatically.
Batch Processing
With the steps tested and understood it is time to automate the process. Python will be used to create a script to perform this process.
Intermediate steps in the processing will use an uncompressed image file format to avoid multiple compression steps and the resultant image quality loss.
- Ask for the first catalog number of the roll
- Prepare the flat field image found in the directory
- Load each jpeg image and flat field correct, save to an intermediate file
- Use Enfuse to combine the three images into and HDR file
- Rename the three raw files to the catalog number
- Delete the original jpeg images keeping three raws and the HDR jpg

Scripting
The Python script has been written with a simple Tk GUI to allow control and monitoring of the process. Entry fields allow setting of the starting catalog number, a thumbnail preview is provided, along with a log of the activity.
Flat field correcting the frames for the uneven illumination took some work to achieve the correct results. Mostly learning how to perform image math in the Python PIL library. Preprocessing the flat field reference image is done to create an image with a peak value of one at the center, where the illumination is brightest. This image can then be easily divided into each image requiring correction.
While the first generation script is operational, it really needs refinement and much better error checking. Those things will come in time as I run into problems and fix them.
Enfuse
To correctly perform the HDR process is not trivial. This is a complex task that is far beyond the effort I wished to expend, you could spend a year doing this single element of the project correctly. I did find one quick and dirty process written in Python. but I did realize there is another option.
There is an open source package for HDR called Enfuse, this is not in Python or PIL, rather is setup as a command line utility. Better yet, as I use Hugin to do panorama stitching I already have Enfuse installed on my machine.
The first samples were HDR processed in Photoshop, including the one above. The results showed this approach would work, but were far too heavily toned mapped, resulting in an over-processed appearance. The Enfuse results are far more natural, quite pleasing and appear to be good source material for further processing.
Workflow
Thus I can now sketch out a workflow that looks reasonable.
- Set up the duplicator insert the first slide and focus, this should be done at a wide aperture and then stopped down to f/8 for final shooting
- Remove the slide and shoot a single image, this will be the reference for white balance
- Set the camera white balance on the reference image
- Shoot a single image, this will be the flat field needed for illumination correction
- Insert each image and shoot a +/-2ev bracket on each image, this gives three raw and three jpg’s for each image, usually doing one roll of film at a time 24 to 36 images
- Copy the resulting images from the SD card to the processing directory
- Rename the white balance reference frame “white.jpg” and the flat field reference “flat.jpg”
- Run the batch script, this will rename the raws and then flat field correct and process the three jpeg’s into an HDR result
- Output will be one white reference and one flat field image for the roll, for each frame there will be three raws for archival use and a single processed jpeg for preview and lower quality needs
Storage Requirements
Each processed image, stored as three raw frames and one jpg image, appears to take 70Mb on average for the set. this means that less than one terabyte will be required to store the entire collection. This is entirely acceptable with the storage devices currently available, without undue costs.
Summary
For the first time I feel I have a method of digitizing these old slide that meets my quality standards. The test frames look pretty good. It really remains to run some batches to see what other issues will crop up.
Simply using a camera is stunningly faster than the scanner, taking a few seconds to capture each slide. Processing a roll used to take an entire evening with the scanner, with the camera it takes about half an hour to fully capture and process the roll into the archive. This has made a seemingly insurmountable task far more possible.
Now to do a few hundred and see how it goes.

Wow thats a lot of work to get a digital copy. Well thought out tho. Would this work with my old
pentax macro bellows unit I have?
I nteresting
Does the Pentax bellows have a slide duplicator attachment? That is what made the Canon unit so easy. I only had to rig a light source, that was 30 minutes of sheet metal work and two soldered junctions for a connector. I have done hundreds of slides now, quite happy with the results.
I did a whole notebook of slides, half a dozen rolls, in about an hour last night. A 1987 trip to Switzerland. Call it two hours of effort after processing, and adding keywords to the photos to properly archive them. There are about 30 notebooks and two plastic file bins full of hanging pages full of slides to do. I need another hard drive 🙂
I too wanted to use my existing digital camera setup along with a Canon FL bellows. Unfortunately, I’ve run into the issue of crop factor on my APS-C sensor Canon (T5i). The bellows, it seems, is just not long enough using a Fotodiox FL adapter + 50mm f1.4, all hooked up to my camera. The most of the film/slide I can capture is approx 85% due to the 1.6x crop factor, I suppose. How did you overcome this limtation?
The difference was the use of the mirrorless body EOS-M with a much lower back-focus requirement, this allow the camera to use a simple adapter (without optics). Normally the older FD lenses have a smaller back-focus and will not mount on an EOS body without optics. Using the Fotodoix FD to EOS-M (no optics) adapter on and EOS-M mirrorless body gives nearly full frame coverage of the 35mm frame. You usually see the just a trace of an edge of the 35mm slide mount on one side or another when taking the images. I would like just a touch more to catch the entire edge of the frame, but I think it is enough, capture is somewhere around 95%-98% of the original.