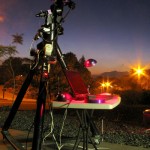
Astrophoto gear takes a while to setup. A lot of little bits and pieces are required that make up the mount, the telescopes, and the cameras. This is all connected with cords and cables, a computer, an autoguider, extension cords for power and more. Coming up with a way to minimize the setup is a big advantage. The best solution is to build a personal observatory where the telescope can be setup and remain setup. Since I am not likely to have that solution available any time soon I use the next best thing. I assemble all of the gear and simply roll it out of the garage to use and roll it back when I am done. This reduces the setup time to about 10-15min, in place of almost an hour if done from scratch. The computer and support gear sits on a table small enough to pick up and carry out intact. connect an extension cord for power, connect three cables from the table to the telescope, turn it on and go.

A number of provisions have been put in place that make setting up the telescope easier. An outdoor power receptacle has been added to the side of our front lanai that is in easy reach of the telescope. A wireless access point is available that allows high speed internet from the laptop in the driveway. The large ironwood tree that blocked much of the southern sky was removed.
One of the problems is accurately polar aligning the telescope each time I set it up. I had been using thee little divots drilled into the driveway concrete with a ½” masonry drill bit. It was difficult to get the drilled divots located with the accuracy needed, the masonry drill bit wanted to wander to the side during drilling. As a result the hole locations were very slightly off. It is also difficult to spin the jackscrews as the tips ground against the concrete. I found it best to lift the scope and then adjust the screw.
The simple divot did get me close each time, with Polaris at least within the field of view of the polar alignment telescope. And this solution had persisted for two years of use. But I knew a bit of effort could improve the solution.

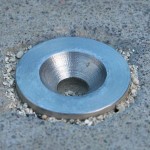
The top of the cup is a deep v-shaped receptacle created with a countersink. This precisely aligns the tip of the jackscrew in the same position each time. Setup is now even faster than with the little divots, the telescope now only requiring leveling to be very close to polar alignment. In practice these cups have performed as designed and provide exactly the advantages hoped for. For wide angle photography or non-photographic uses, no additional alignment is required.
The only issue now is dealing with the neighborhood streetlights, including one right across the street from my driveway. Fortunately those are low pressure sodium that can be filtered (another article on that later). In addition to filtering I have put a plan into motion to mitigate the bright streetlight adjacent to my driveway… a strategically located royal poinciana tree planted directly between my telescope and the light. Give this tree another year or two and it will begin to block the light nicely.

