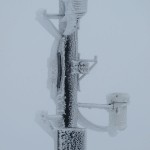
One of the miscellaneous systems in the observatory that I have inherited is the weather station. A critical set of gear that has been neglected far too long. Neglected to the point our telescope operators had been complaining, loudly, about a system that frequently gives erroneous data or provides wildly oscillating readings.
The Keck weather mast covered with several inches of iceThe weather station is critical in protecting the all important optical surfaces of the telescope. The mirrors that gather light from distant galaxies depend on a thin coating of aluminum that is easily damaged. Snow, ice, fog or even simple dew can damage the coating and require the mirror segments to go through a laborious re-coating process. Thus the operators monitor the weather closely, when fog and humidity roll in, alarms go off, and the great shutters are closed to protect the telescope.
The first part I have replaced is the humidity and dew point sensor. In many ways the most important part of the system. The new unit is a modern sensor with a direct ethernet interface, simple to link into the observatory network. This is the same sensor used by the National Weather Service in their remote weather stations. All I had to do was spend a little money, and spend a day hanging off the weather tower on the observatory roof installing it. It was a beautiful, warm, sunny day up there, I got the job done, and got a slight sunburn in the process.
Walking through the room I somehow fail to notice just how much equipment is there. At night, with the lights off, the sheer quantity of LED’s and other indicator lights underscore the number of servers and other equipment the room contains. Every direction you look, the room is filled with equipment… The telescope control computer, network switches, terminal servers, instrument servers, the ACS controller and the telescope drive system itself. All necessary to keeping the telescope on-sky…
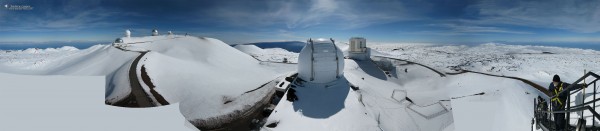
I have so many photos sitting on the hard drive, projects and ideas that remain un-realized. But every now and then I get around to completing one of those ideas and putting together something worth the effort. A couple winters ago I had an opportunity to shoot an entire 360° panorama from the top of Keck 2. I had set the camera on top of a toolbox and took photos steadily as the dome was moved through one complete rotation. A couple other photos were also taken that I could stitch into the result. The whole project made possible with the panorama features of Photoshop CS5. Twenty images were used to make the pano, resulting in a 105Mb image 26,000 pixels wide. The image shown here is downsized slightly…
It was a great day, on top of the dome after a heavy snowfall, simply stunningly beautiful. Hard work as well, shoveling snow and chipping ice off the dome at nearly fourteen thousand feet. The fellows in the image are Bill Bates (top) and Mike Dahler (below), some of the great guys who keep Keck on-sky. Bill has since retired and is sorely missed on the summit.
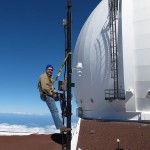
The author working on the Keck weather mastI had expected it to be a day of 20mph winds and freezing temperatures. What I got was a balmy 11°C (52°F) and just a gentle breeze. All for the good as I planned to spend several hours hanging off the weather mast installing wiring to improve the new dew point sensor. A cold wind can quickly turn the roof of the observatory into a miserable place.
The original sensor housing had proved to be vulnerable to heavy icing. The new housing should be more resilient, as well as providing better daytime temperature readings. This is due to changing to a different shelter design that uses a fan to move air through the housing past the sensor. I also modified the housing with the addition of a heating element to allow de-icing.
The Keck weather mast covered with several inches of iceTo make the heating element I needed heavy nichrome wire. Not having any on hand I took a trip to the thrift shop. There I bought a used toaster for a couple dollars and spent an hour dismantling the toaster to remove the heating elements. I took the wire and wrapped it through the interior of the instrument housing, creating a heating element that should work quite nicely with a 12V supply, gently warming the housing and melting any ice.
A beautiful day on the summit, nice to spend a few hours atop the roof, hanging in a safety harness from the weather mast. I even remembered to put on some sunscreen to avoid frying in the high altitude sunlight. A new cable pulled through the conduit, the instrument shelter replaced, a little further wiring inside and the job was done. I will have to await another round of bad weather to see if the changes work, but given the trend this winter, I will not have to wait long.
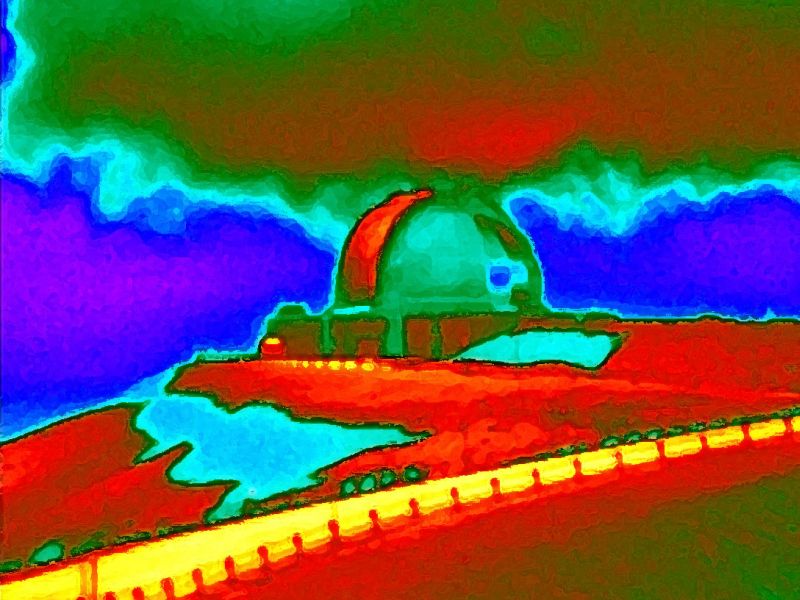
A somewhat different picture of the NASA Infrared Telescope Facility. Appropriately enough this image of an IR telescope was taken with an IR camera by Mark Devenot, a fellow engineer and photographer in the Keck Operations Department.
Since this is a thermal infrared image, the colors map directly to temperature. In this image the warm asphalt of the road glows bright yellow and the cold patches of snow a cool aqua. Note how well the telescope building and dome are designed, emitting very little infrared, a good feature for an infrared telescope.
The IR camera in question is fairly low resolution, a mere 256×256 pixels, fairly typical in handheld IR cameras. Mark found a way to make an impressive image even with the low pixel count by using some of the artistic filters in Photoshop to process the image. I saw the image and had to share it with my DarkerView readers…
NASA IRTF in an in a thermal infrared image taken with a FLIR PM250 camera, with artist effects added in photoshop, image by Mark Devenot
Until the phone rings… The caller ID shows K1 Control.
Noooo!! It is Christmas Day!
What is wrong now? Time? 4 pm, daycrew should be doing final checks before releasing the telescope, just the time things usually go wrong. ACS?!? It has been creating a lot of trouble lately. Autofill? My usual problem child… No, I checked that already today. HIRES? Tonight’s instrument that I really know nothing about. Nothing to do but answer the phone…
Just Robert calling to say everything is fine and Merry Christmas.
I am actually rather surprised it had not happened to me before. Given the number of times I have dodged animals along Saddle Road. Pigs, sheep, mongoose, feral cats, francolins, quail… I had hit a turkey a few years back, but this was my first encounter with a larger animal.
I really prefer to avoid killing, but luck was not with me or the poor mouflon sheep this time.
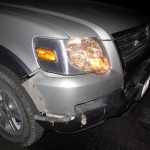
It came into the headlights from the side at a full run, I had no real chance of avoiding the collision. Fortunately it did not hit square on, as it was a fairly big ram. It struck a glancing blow under the passenger side headlight, with a dull thud I can still remember vividly.
Damage on the front quarter of a Ford Explorer due to a Mouflon SheepThe results were pretty ugly, bits of sheep across the road, blood and guts sprayed down the side of the vehicle. What was left of the unfortunate ram was left wrapped around a fencepost, thrown well clear of the collision. Yes, I have a photo. No, I am not posting it here. It is rather gory.
I did have one bit of luck, there was no critical damage, allowing me to continue on to headquarters in the middle of the night. I was a bit concerned when I found fluid leaking from under the vehicle, but it didn’t look yellow enough to be antifreeze. Further inspection showed it to be wiper fluid, the reservoir is just above the wheel and had taken a hit. In my flashlight beam it was slowly draining onto the road.
I inspected the tire, the brake line and everything else in the impact zone before continuing my journey. As I pulled out there was a chime and a message in the dash… “Wiper Fluid Low”… as if I was worried about wiper fluid!
Mike, our company mechanic, places the damage at about $4k in a quick guess. I suspect he is about right. Given the size of the ram and the speed I am really surprised it was not worse. I did do Mike a favor, I hosed the vehicle down before leaving it parked it in front of our little shop. With the contents of the sheep all down the side, it was pretty rank!
I always feel bad about killing a wild animal like this. My only solace is that feral mouflon are a species that represent a problem, with a population that is growing to the point it is damaging the mountain. I recall a few years ago when sighting sheep was a rare occurrence along Saddle Road, for the last year it has been difficult not to see them, with large herds a common sight.
I am not the first to hit a sheep in an observatory vehicle lately. This will not save me from the inevitable ribbing I will receive. There will be jokes, and I will just have to laugh along.
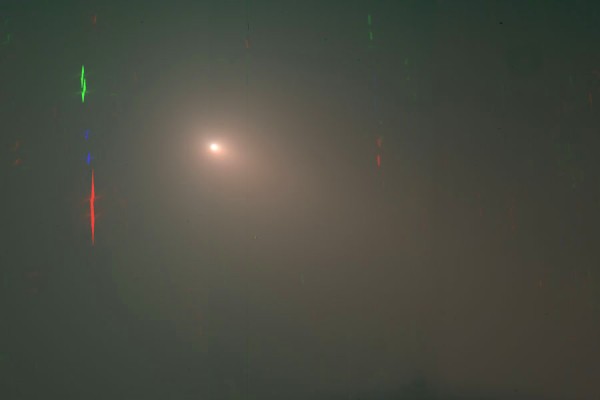
I am waiting for the Moon to leave the evening sky before shooting the comet again. In the meantime I am processing more of the material obtained earlier in the month. In this case a photo of Comet 103P/Hartley 2 taken October 6th with Keck 2 and DEIMOS. The image marks the first time I have attempted to take and process an image with a 10m telescope. Just a wee bit larger than the 76mm refractor I usually use to take astrophotos!
The image is notable for its complete lack of any interesting structure. There are no jets, shells or other inner coma detail visible. The tail is simply a general brightening to the southwest (lower right in this image).
The comet is moving very quickly across the sky, even more so with the high magnification lent by a large telescope. Even short exposures turn the stars into long streaks. In this case multicolor streaks as the camera cycles through the filters needed for a color image.
Comet 103P Hartley 2 with Keck2 and DEIMOS 6Oct2010 @ 7:27UT, 3x60s, 3x60s and 3x120s with standard BVR astrometric filters, credit: Cooper/Wirth/W.M. Keck Observatory
Visual astronomy is the practice of pushing our built in optical detectors to the limits of performance. Our eyes are surprisingly good optical instruments, and until the advent of film about a century ago were the only means we had of observing the universe. Even now, in the age of sensitive electronic detectors there are those who appreciate the view of the heavens through our own eyes.
The edge on spiral M104 photographed with a Collins I3 Image IntensifierThis does not keep some from trying other ways to improve the view. Night vision technology, devices pioneered by the military that amplify the available light, offer intriguing possibilities. Available in compact packages these amplifier image tubes have been incorporated into an eyepiece sized package that can replace a standard eyepiece and offer an amplified image.
The image tube operates by charging a grid to a high voltage inside a small vacuum tube. Incoming light (photons) strike this grid and create a shower of electrons that continue onwards to strike a phosphor screen at the rear of the tube. A single photon can create a shower of hundreds of electrons, a very large signal gain. The phosphor screen glows where struck by photons, creating a image of the amplified signal.
A bright image is seen on the screen of the object, hundreds of times brighter than the original. The image is green, as result of the phosphor, this amplification is a monochromatic process. There is some noise in the image, random “sparkles” called scintillation that result when electrons leave the charged grid in a random fashion.
The images shown here are taken with the Collins I3 eyepiece or I3piece. The device is a very nicely built unit that is about the same size as a modern high quality eyepiece. Actually it is much smaller than some of the large designer eyepieces seen on some telescopes. An internal battery means there are no cables resulting in a neat package. The intensifier has a standard 1.25″ or 2″ nose piece threaded to accept standard astronomy filters.
The image intensifier is not a panacea, there are some objects where the intensifier works well, and others where it does not perform. Globular clusters and planetary nebulae are quite dramatically represented in the intensified view. It is faint, low surface brightness objects like galaxies and extended nebulae that are often better appreciated with a normal eyepiece. Switching back and forth is generally a poor idea as using the intensifier decreases dark adaptation.
The edge on spiral M51 photographed with a Collins I3 Image IntensifierDuring personal observations of galaxy views in two large telescopes side by side, I noted more detail in the un-amplified images compared to those using the intensifier, particularly where subtle detail was concerned. I have had opportunity to observe the same galaxy in my 18″ f/4.5 followed by the view in a 24″ with the intensifier. The images in the intensifier were much brighter, but the contrast range seem compressed, such that HII regions and similar low contrast details disappeared.
One place where the value of the intensifier is undeniable is in public outreach. The live views of bright galaxies show far more detail to the inexperienced observer that they would otherwise have missed in the eyepiece view. A spiral galaxy is clearly a spiral galaxy, even to a first time observer. In addition the intensifier can be used to provide views of faint objects under less that ideal conditions. Addition of a narrowband filter can increase the signal to noise and allow viewing of emission nebulae even with substantial light pollution from natural (e.g. the Moon) or artificial sources.
Unfortunately the Collins intensified eyepieces are no longer available from the manufacturer, though the website still appears functional. There is an equivalent product from BIPH which uses the same technology. At nearly four thousand dollars these devices are not for everyone. they can be used to good effect under the right conditions.
A telescope relies on the quality of the primary mirror. The shape must be exquisite perfection, with errors measured in millionths of a meter. The reflective coating must also perform to high standards, reflecting well over 90% of the light across a wide region of the spectrum.
A Keck mirror segment after stripping and cleaning, ready to place in the chamber to receive a new reflective coatingKeck observatory carefully monitors each primary mirror to insure it is performing accurately. Instruments can detect small variations in the shape, indicating where there may be trouble in the support structure and active positioning of the segments. The coating is tested for reflectivity, to insure as much precious starlight goes to the instrument as possible.
Keck uses pure aluminum to coat the surface of each mirror segment, chosen for its excellent reflectivity in the visible and infrared parts of the spectrum. It takes only 20.5 grams of aluminum to coat an entire Keck primary mirror. This thin layer of aluminum degrades with time, losing several percent of it’s reflectivity each year. Eventually it must be replaced.
Re-coating a mirror is a painstaking process of stripping the old coating, carefully cleaning the mirror, the placing the mirror in a vacuum chamber to deposit a new metal coating onto the glass. The process takes about a week per segment, with one full time technician dedicated to the task, with a little help to handle some of the more intense parts of the process.
An advantage of a segmented telescope is that individual segments may be swapped in a single day. Telescopes utilizing monolithic mirrors must shut down for weeks to remove the primary mirror, strip clean and re-coat. With spare segments available the maintenance crew can perform the task of re-coating on a reasonable schedule, without taking the telescope off sky for an extended period.
At Keck there is a special storage facility for segments awaiting re-coating and those that are ready for installation back into the telescope. The process is continuous, once the last segment is finished, it is time to start the rotation again.
Glow discharge cleaning the mirror surface prior to aluminizingThe first step in replacing the old coating is to chemically strip the old coating. This is done in a special bay used only for this purpose. An acid solution dissolves the aluminum revealing the glass below. The mirror is the extensively cleaned to remove any remaining contamination. If the mirror surface is not perfectly clean, the new aluminum coating will not adhere properly. All of the chemicals used are caught in a closed system for proper disposal off the mountain.
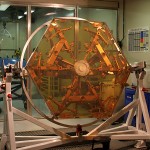
Once cleaned the mirror is moves to a large vacuum chamber where the new coating will be deposited. Here the mirror is positioned face downwards. With the cover reinstalled on the chamber it will take most of a day to pump out the air and ready the chamber for coating.
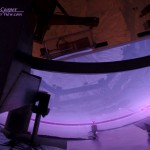
Glow discharge is a method of cleaning a surface prior to vacuum coating it. A high electrical charge is placed on an electrode just below the mirror in a partial vacuum. The result is something like creating a storm of electrons to blow any remaining impurities off the surface of the mirror. It is also a very beautiful process, looking through the ports one can see a brilliant violet haze around the electrode with sparks flickering along it’s length.
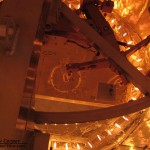
The bright glow of coils of aluminum vaporizing in the coating chamberThe final step is to vaporize the aluminum itself. In the bottom of the coating chamber are arranged a number of electrodes, each made of pure aluminum. By electrically heating these electrodes a few ounces of metal is vaporized. In the vacuum this aluminum forms a cloud of metal that coats everything in the chamber, including the mirror segment positioned above the electrodes. An instrument measures the buildup of the layer and shuts off the current when the deposited layer reaches the desired thickness of 100nm.
The coating process takes only a few minutes once the electrodes are turned on. Peering in through the small view port a cheery red glow is seen from each of the electrodes at the bottom of the chamber. The view only lasts a few moments as the cloud of vaporized aluminum soon reaches the view port and the glow fades as the window is covered by a layer of deposited aluminum along with the mirror segment.
What emerges from the chamber is a mirror with a beautiful, reflective metal coating. A few tests will be performed to insure the coating meets specification. If all is well the mirror segment will be prepared for installation in the telescope. It will await another segment exchange when it will replace another segment that has become dull with years of exposure to the elements. That segment will then receive it’s turn in the coating chamber.