A Red LED Desk Lamp

Need a red lamp to provide soft red illumination around the telescope? Described here is an easy way to do this. Take a commonly available desklamp and convert it to LED’s. This is a single evening project, taking just a few hours to accomplish once the parts have been obtained.

Observing Table
A red LED desk lamp in use on the observing table

I have found the resulting light extremely useful when observing. No more holding the flashlight in your mouth when reading charts or making observing notes.

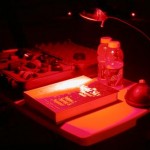
Because the light can light up a whole area when turned fully on it can be used as a worklight when breaking down gear and packing it into the vehicle without bothering other observers at a dark observing site. Or you might build the 120V version for a personal observatory.

I have also found that these lights also make great gifts for fellow astronomers.

To accomplish this we will disassemble the lamp, remove the 12V bulb and replace it with an array of LED’s. To control the brightness we will install a variable regulator to allow dimming of the lamp from completely off to very bright. An option is to install another connector to allow DC power to be supplied from a battery for field use.

Before embarking on this project be sure to read this entire article. Having the entire task in mind will help you plan ahead. It is important to use safe electronic assembly techniques to avoid any risk of damage or injury when making the modifications or when using the lamp. We will make no modifications to the high voltage side of the transformer to insure the lamp remains safe to use.

One secret to the lamp is the LED’s. These wonderful devices convert a small trickle of electricity into a very bright red light. Be sure to get ‘Ultrabright’ or ‘Superbright’ types that put out at least 3000mCd (millicandela). I found some that put out 6000mCd that I use in my lights at All Electronics. Perfboard, regulators and many of the other parts can also be purchased there.

Continue reading “A Red LED Desk Lamp”

A GPS Observing Clock

Observing Clock
A hand made GPS clock for the observing table
For years, when observing, I found myself wanting a clock on my observing table when recording observations. I have used either a wrist watch or a cell phone, but looking at these was uncomfortable as these modern devices use bright backlit LCD displays, not a nice night-vision friendly red. The cell phone also has the additional problem of using up its battery quite quickly when out of range of a digital cell tower at some remote observing site. I needed a simple desk clock for my observing setup.

Accuracy was also a question, accurate time is always important when observing. Asteroid occultations, lunar and solar eclipses, iridium flares, twilight, jovian moon transits, the list of things where accurate time is useful is long in astronomy.

The Specs

Of course being a electrical engineer makes designing and building a clock a fairly trivial exercise. But why stop there? Why not build in a few extra features…

  • Use red 7-segment LED’s and build in some type of selectable dimming mechanism.
  • Why bother setting the clock each time you set it up? Make the clock self setting and very accurate.
  • Since the clock is accurate add a serial port to allow the clock to supply accurate time to a laptop when taking astrophotos.

Continue reading “A GPS Observing Clock”

Repairing the Broken

There are some devices that folks still try to repair if possible, camera gear seems to be at the top of the list. I suppose this should not be a surprise, the gear is expensive, and seems to get damaged from hard use. Particularly on this island, where cameras see a wide range of harsh conditions, from tropical heat to salt water.

A month back I repaired a Pentax waterproof camera for a co-worker. Salt water had penetrated around the shutter button and corroded the switch. The camera, rated to 10m (30ft), had probably experienced pressures even higher. Her teenage boys can easily exceed that depth while free diving the island reefs. It was necessary to completely disassemble the camera to get at the button. Well over an hour of tiny screws and gaskets to replace a $1.35 switch.

There have been other items this year… A classic chrome stand microphone that required a little rewiring to work with a modern computer. A pair of very nice computer monitors now found on my desk. A toy RC aircraft with broken motor leads. I do appear to have gained a reputation for fixing this stuff.

Last week it was an underwater video camera case brought to me. None of the external controls were working, no way to hit record once in the water. The repair turned out to be fairly simple, a broken conductor in the LANC cable used to control the camera. A bit of scrounging around in my spare parts to build a replacement cable was all that was required to put everything right. Most repairs are that sort of simple, just the effects of wear and tear taking their toll.

After the repair J sent me a link to his YouTube channel and I spent a lunch watching video. Well edited, nicely crafted videos of the local paddling sport community. Canoe races and special events covered with a personal touch, with respect for the people and traditions. I was very happy to see I had done a bit to help someone who was producing such excellent material.

The repairs serve me as well. Each time I take apart an unfamiliar device I learn, I refresh my skills, I experience the simple joy of using those skills. Each device is a challenge, to successfully disassemble the gear, find the fault, and put it all back together properly. On occasion I fail in that challenge, either I do not have the skill, or the repair is impractical, or the device too badly damaged. There is often little real risk, if it is broken the attempt to save something useful from the trash is an easy choice, the only thing lost is the effort. The reward is seeing the gear returned to useful service and knowing you prevented that little bit of waste.

I wonder what will come my way next time?

An example of J’s Videos

Passing of an Icon

My first computer was an Apple II+, I left home with an Apple IIe, and for a few years used a Fat Mac then a Macintosh LC. I carry an iPhone, my little iPod Nano looks quite worse for wear, and I am typing this on an iPad 2. Few people have had the impact on my personal life as Steve Jobs.

We constantly receive news of deaths… newsmakers, celebrities, sport heroes. Most mean little or nothing to me. Today’s news connects in a very unexpected way. Steve Jobs was a geek like me. One of the first icons of my generation to go. The products made by Apple have impacted my life in so many ways. While typing this I am taking stock of what he meant to me, and to our technological society. It is difficult to understate his impact. I hope that Apple can continue to innovate without his vision.

He will be missed.

Laser Susan

The old saying “Necessity is the mother of invention” has a certain truth to it.

In this case the necessity is created by the conditions. Sub-freezing temperatures, bone chilling wind, and the need to be outside under these conditions. The summit of Mauna Kea can be downright miserable for mere human beings. Yet, in order to operate the laser, someone has to watch and insure we do not illuminate some passenger aircraft on the way to Australia.

Thus we have laser spotters, a hardy crew indeed. Braving the conditions, spending hours watching the sky to insure we operate safely. We are attempting to introduce technological solutions to the problem. The FAA however is an extraordinarily conservative organization, rightly so when hundreds of lives are at risk on any given flight. It takes time, many years, to approve another method of insuring safe laser operation.

It is a cold job. I have done it for a few hours, just enough to instill a real respect for the guys who do it all night. You bundle up in many layers of insulation and attempt to get comfortable in a position that allows observation of the area of sky around the beam. Given the heavy clothing it is a pain to simply sweep the sky, and completely reposition each time the telescope changes target.

Given the problem, Doug Macilroy, one of our intrepid Keck crew, saw a solution. It took time, and a number of prototypes to get it right. But he now has a neat way to stay comfortable and warm while scanning the sky. Now we have the “Laser Susan”!

YouTube video for the Laser Susan

It’s Fixed

A long frustrating day.

With four days of observing scheduled starting tonight, the pressure was on. Both Keck telescopes, four nights, lost for something I am responsible for? Not an attractive prospect. Everyone in the department has a helpful hint or two, some of them even made sense, most we had already tried. Phone calls and emails fly as everyone chimes in, even the guys at JPL who built the cameras get involved.

It was not until three in the afternoon that I found it. Comparing oscilloscope traces between the two FATCAT instruments I note something amiss in the video signal. Most of the waveforms makes sense, even look OK if viewed alone. The colored trace on the screen isn’t the same as the working camera. Now I recall a couple other waveforms I had looked at earlier and wondered about, even to the point of making some notes about. Realization dawned with an enormous sense of relief. Those clock edges are not supposed to be rounded like that!

I pull the clock driver board out of the working camera and install it in the problem child… The noise goes away!

I stole a spare clock drive card from the instrument guys, from the spares for LRIS. I suppose I will hear about raiding their precious stash Monday when they find my note.

I need both cameras and two good clock boards. The spare has to be configured correctly, which takes another hour of logic and good guesses in the absence of decent documentation. Only two hours before dark we perform the final checkouts on the system, the mood notably lighter as we realize it is going to work.

As I write this the FATCAT cameras are on-sky, detecting fringes of interfering light from some distant star.