
Squash
When you want to see the stars, find someplace dark

A leak in my wife’s sewing room? She is not happy with water dripping on her sewing machine.
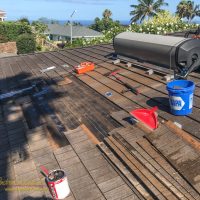
The leak is right under the solar hot water panels. Hmmm, is one of the mounting points leaking? This might be a PITA to fix.
Getting up on the roof and inspecting reveals this is not likely the case, there is another likely cause… ants. Just under the panel I find that a few shingles are in bad shape, and there are Hawaiian carpenter ants scurrying about when I break away a bit of the failed shingle.
It appears that the cooler environment under the solar panels was to the ants liking and they moved in. A downside to solar panels I had not considered.
Continue reading “Fixing a Hole Where the Rain Comes In”The labor day weekend project? Replacing a few more rotten boards in the lanai.
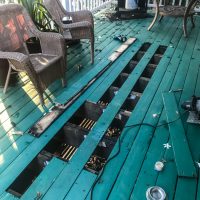
This has been an ongoing project for years, including a few more boards to replace this summer. Over the last few weeks I have replaced half a dozen boards in the lanai.
I write this as I wait for paint to dry. There are three more big gaps in the lanai waiting for new boards. Those boards have been cut to size, drilled, and are almost ready to screw into place. Deb bought me another box of decking screws last time she was in Kona, should have this done shortly.
Unfortunately the original builders scrimped a bit when building the lanai. No paint on the ends of the boards, no paint underneath, and no paint on the joists. Where the lanai is undercover that has not been a problem, where it is exposed to the weather that has resulted in a fair amount of damage.
Unlike the carpenters who did the original work, I am painting each board on all surfaces before installation. I also clean and paint the top edges of the joists underneath while they are exposed. This should slow down the damage due to exposure.
The last challenge is to get the gaps right. Much of the lanai is nicely spaced between the boards. There is a zone where the gaps are all wrong, the boards right against each other. This is also right where the drip line is from the roof and most of the damage is. The result is a lot of careful measurement and ripping the boards to get the gaps looking good again.
I have two or three more boards identified as needing replacement, but not in any great hurry. They can wait for another weekend. Just need to wait for the latest round of paint to dry and I can screw the next three boards into place.
For weeks now I have been digging. Pickaxe, shovel, wheelbarrow, hard manual labor, and it just gets harder.
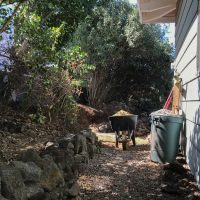
I am digging away at the slope behind the garage, solving longstanding drainage issues, creating a nice level walkway, building a small retaining wall.
The first stage was digging out all along my garage, reworking the slope, pulling the soil away from the foundation, giving the water somewhere to go other than right along the wall. This involved a couple dozen wheelbarrow loads of soil and rock removed and about thirty feet of two foot retaining wall… Done!
Continue reading “The Last Load”Some carpenter years ago thought that two nails would be enough to hold the stairs up. They did, for a decade or two, but they would eventually fail when the stringer began to split around the nails.
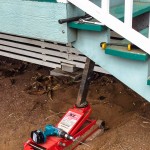
Remove the old nails to free everything up. Use the 3.5 ton floor jack to push the stairs back into place. An aluminum plate and wood glue to splice together the split stringer. Quite a few new bolts, not nails, to hold everything together. A bit of 3/8″ threaded rod on the other stringer to secure it to a joist. I think everything is secure, solid underfoot again. I just need a little paint to cover over the new work.
Sometimes I just take a few photos of the flowers found out the front door. My plumeria are in bloom, a pleasant bit of the tropics available for everyday enjoyment, even if just heading to the vehicle and work…