
You never frame a photo properly when taken. This is a lesson I learned long ago… In the sometimes frantic process of shooting the photo, you rarely have a chance to frame the subject correctly. That moment when the whale surfaces, or the bear looks right at you, there is little time to adjust the photo for best impact, you just shoot.

Rotation is also an issue, many photos are taken handheld, often hastily in the moment. These will have small errors in rotation. Do not even mention shots taken from a pitching boat! A modest crop of the photo will also allow correction on the image rotation.
The choice of crop is critical, it is the first step in my processing of the photo. Either the crop works, or move on to the next photo in the folder. Almost all photos can be improved by cropping in a little, to cut away the extraneous areas and to concentrate the viewer’s attention on the primary subject. Much of the time I will throw away 10-25% of the photo, not cropping a lot, just tightening up the composition.
Adobe LightRoom acknowledges this fact of photography, the crop and rotate tool is on top, first on the left of the processing tools. Crop it in, perhaps straighten the rotation, then you know if the photo is worth any further effort.
The art is in choosing the crop… How much to crop. How to position the major elements. This decision is an aesthetic choice of the photographer, and as with many such choices, there is no single best answer. There are some rules that can help. These are rules that can help, but are not ironclad, they can be broken if the composition calls for it.
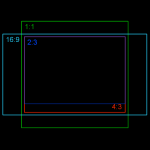
Crop Ratio
The first choice is the cropping ratio, the ratio of the dimensions in the final image. Many cameras, including most DSLR’s use a 2:3 ratio, in that the width of the image is half again the height. Thus an image 3000 pixels wide would be 2000 pixels high. Crop ratios of 4:3, 16:9, and 1:1 are also common.
The ratio is usually chosen simply for aesthetic reasons, what fits the subject of the photo. The crop may also be dictated by the chosen media layout, either on a web-page, the magazine layout, or the frame size for a print.
All major post-processing tools, such as Photoshop or Lightroom make controlling the crop ratio very easy.
Off-Center
One lesson learned quickly by photographers is that placing the primary subject in the center is rarely the best choice. Placing the subject off-center creates a far more interesting photo. It can create a sense of space or motion that makes the space around the subject far more interesting.
Photographing a vehicle or aircraft? Try placing the object a little to the side, with more empty space in the direction the vehicle is moving. An off center portrait with more space in the direction your subject is facing is likewise often the better choice.

Rule-of-Thirds
When placing the subject off-center the most common solution is to place it one third of the way from one side of the photo, or one third of the way from the top or bottom of the image. This is true for an image with hard horizontal or vertical lines, such as the horizon. Placing this line at a third point often creates a more visually appealing image.
Many cameras provide for the rule-of-thirds by offering a feature to overlay lines on the LCD display showing where the thirds points are while composing the image. Likewise these lines can be made to appear when using the cropping tool in the post processing software.
The “Right” Answer?
What is the right answer? There often is none. That is the power of digital post processing, just try it. If you do not like the result simply hit undo and try something different. Choosing the crop is as much an artistic decision as taking the photo in the first place. You will have to experiment and find out what does and does not work for your own photos. The rules above will help, but they are just guidelines, not always the right answer for every photo.
My usual default answer is quite traditional… I use a 2:3 crop ratio with primary subjects on a third point. Most images that appear here on DarkerView are cropped to 2:3 with the subject on a third point. In this I am a bit of a traditionalist, using the same crop ratio I have been used to since the days of 35mm film. But, when the mood strikes, or the image demands, I am ready to use a different crop ratio.
Just try it.
