Another quick project to solve a little equipment issue. I realized I had a problem the morning before I was planning to spend a night shooting astrophotos up on the mountain. The batteries for my 20Da are old and do not hold a charge, no way I was going to be able to use the camera through the night.

I have the AC power supply for the 20Da, this is what I have been using for some time now. Shooting astrophotos in the driveway allows access to AC power. For field use this will not do, I need to operate fully from battery power. The camera batteries that I do have for the camera are now at least six years old, and do not hold enough charge to last.
Without AC power available I needed something that could plug into one of my 12V field battery packs. I really did not want to cut up the existing AC power supply to create a version to be used with an external battery. Plus, Canon used odd, proprietary connectors on the supply. (I really hate it when they do that!) I can not even use parts of the AC supply without modification.
With only a few hours available I came up with a plan. A little digging showed I had all of the needed components on-hand. Off to the work bench!

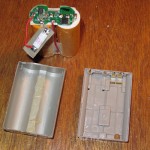
I carefully cracked open the case with a small flat bladed screwdriver. It was necessary to work slowly along the seam and break the glue line that welded the clam-shell case together. There would be a little cosmetic damage from the break-in, but nothing to compromise operation. Once open I unsoldered the battery contacts from the safety PCB and removed the cells. The whole goal here was to preserve the case, since the guts would be discarded.

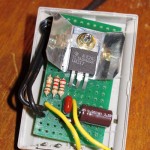
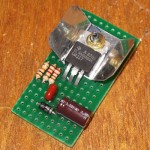
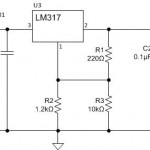
The regulator circuit is a simple LM317 based design. No great secrets here, it just needs to be set for the correct voltage. As this will be used with and external battery a polarity protection diode on the input is in order. A simple 1N4001 does the job, there is plenty of headroom for the diode and regulator when using a 12V gel-cell battery and dropping to 7.3V output.
The LM317 can be set to a wide range of voltage through selection of appropriate resistors. The combination shown in the schematic sets the device for 7.33V. Better yet, when the external battery pack begins to approach discharge, the camera will shut off when the external pack falls below about 9V, a good place to stop using a lead-acid cell. (7V camera shutoff + 1.5V regulator head room + 0.6v diode drop = 9.1V)
I ended up getting the voltage slightly low, the camera shows only a single bar on the battery when in use. No matter, this battery will not ‘discharge’ any further. As long as the voltage is not so low that the camera shuts off.

The cord is reinforced with a bit of heat-shrink tubing where it leaves the case. At the other end of the cord is an Amp CPC series connector, the connector I chose to use on my field gear long ago.
The adapter works well, keeping the camera going all night long. A single well used 12V 5Ah battery just starting to show signs of reaching the limit as dawn appeared.
I probably need to do the same thing for my new camera, a Canon 60D. At the moment I do not have a battery I wish to sacrifice to make an adapter for the 60D, the packs I have are fairly new and working well. Probably need to order a cheap battery pack and gut it for the shell and contacts.

