A Universal Afocal Adapter

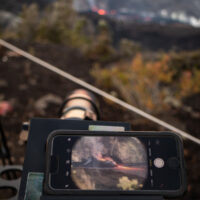
A couple weeks ago at the volcano I let quite a few folks take imagery of the lava using the afocal technique, simply holding the phone up to the eyepiece. This works rather well as the phone uses a lens much like the human eye, about the same aperture.

Shooting afocal with an iPhone and the TV-76mm 'scope
Shooting afocal with an iPhone and the TV-76mm ‘scope

The only real issue is holding a phone in just the right spot. Folks wanted video, but holding the phone steady is a real challenge. I had thought of making something to do this many times, last weekend I did it.

A session of playing around in 3D CAD resulting in a couple bits of clever plastic printed with the 3D printer… Done.

There are commercial solutions for this available, quite a few actually. But most of these are intended to adapt to a single phone, using some sort of clamping arrangement that you have to setup for a particular phone. I envisioned something that was more universal, quickly adapting to any phone.

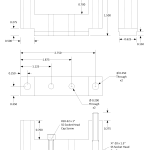
The method I chose was a sliding magnetic platform that holds the phone. Just a simple shelf actually, set the phone on it and slide until you get it lined up. The base piece is printed with a recess into which a steel plate is set. The slider has three 8mm x 2mm neodymium magnets to securely grab the steel plate.

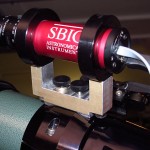
It took a bit of work to cut and file the steel plate to neatly fit the base, a bit of inlay work. Otherwise making the piece is quite easy. The only design issue is that this adapter is setup to fit a single eyepiece, a Televue Panoptic 27mm, and cannot be easily adapted to others.

The 3D CAD files are linked below. I have included the SCAD source file to allow tinkering with the design, possibly adapting to a different eyepiece. Both parts should be printed with support on, the pockets for the glued bits will have to be cleaned out, the resulting rough surfaces just right to recieve epoxy.

Afocal adapter 3D CAD files

At the Keanakakoʻi Overlook I was able to test the adapter with a variety of different phones, both iPhone and Android, graciously lent to me for my experimentation. OK, the owners may have wanted a few lava photos. There was no difficulty using the adapter other than a moment or two needed to line up the camera with the exit pupil of the eyepiece. The result was more than a few smiles.

TeleVue-76 to STi Autoguider Mount

A rigid mount to adapt the TeleVue-76 to the SBIG STi autoguider? I need such a solution, I have both of these bits of kit that need to be wed together for the minimal astrophoto setup. As I am unlikely to find such a part commercially, I would have to make it myself.

Another couple hours in the machine shop were in order, another small pile of aluminum chips. This actually went pretty quickly, these are easy cuts to make. No tapping is required, the four holes are simply drilled through. The two hours included design and cleanup for a quick project.

STi to TV-76 Mount
The SBIG STi to TelevVue TV-76 mount
TeleVue Autoguider Mount
Mechanical drawing for a mount to attach an SBIG STi autoguider to a TeleVue refractor
I came up with the design on the fly. A piece of aluminum from the scrap bin and a couple quick measurements of the ‘scope and guider. I simply cut aluminum until it seemed about right. It was only after the fact that I produced a drawing of the finished item.

The TV-76 has a rather non-standard mounting point on top for accessories like this. A pair of #10-32 threaded holes, 0.75″ apart and located in a slot 0.625″ wide milled into the mounting ring. This seems simple enough. An adapter made for the TV-76 should work with any of the TeleVue refractors that use this mounting. Another concern is that the solution must also be very rigid, any flexure between the autoguider and the telescope will result in smeared stars.

The design assumes that you have the additional guiding kit sold by SBIG for the STi autoguider. This provides the mounting rings that clamp the camera body.

The hardware required will be two ¼-20 x 1½” socket head cap screws, and two #10-32 x 1″ socket head cap screws. A pair of plastic press on caps convert the #10 screws to knobs. All parts you can find in a neighborhood hardware store.

The mount is 1.5″ high to set the autoguider away from the main OTA, as to not encounter any vignetting. This also allows space to get fingers onto the mounting knobs. The dimensions are chosen so that standard screws protrude by just the right amount. I messed this up on the one I made, machining the center to far. As a result a few washers are needed for the screws that mate with the refractor. This is fixed in the mechanical drawing.

To co-boresight the TV-76 with the autoguider it was necessary to slip a 1/4″ washer between the mount and the rear ring as a shim. With that in place the same object is centered in both fields of view. The STi has a 2.7° x 2.2° field when used with the 100mm lens supplied in the SBIG accessory kit. With this wide field of view it also serves as a finder to locate and frame the photographic target.

It assembles nicely, a good start. The true test will be the quality of the images produced by the rig.

A Dummy Battery Adapter for the Canon 20Da

Another quick project to solve a little equipment issue. I realized I had a problem the morning before I was planning to spend a night shooting astrophotos up on the mountain. The batteries for my 20Da are old and do not hold a charge, no way I was going to be able to use the camera through the night.

The Regulator Installed
The regulator circuit installed inside the battery shell and connected to the existing contacts
The camera is an older model that remains quite valuable to me as it has been adapted to shoot astrophotos. The 20Da model differed from the standard 20D in having live focus and a re-tuned red cutoff filter that allows the glowing red of nebulae to reach the sensor. After seven years I still use the camera regularly.

I have the AC power supply for the 20Da, this is what I have been using for some time now. Shooting astrophotos in the driveway allows access to AC power. For field use this will not do, I need to operate fully from battery power. The camera batteries that I do have for the camera are now at least six years old, and do not hold enough charge to last.

Without AC power available I needed something that could plug into one of my 12V field battery packs. I really did not want to cut up the existing AC power supply to create a version to be used with an external battery. Plus, Canon used odd, proprietary connectors on the supply. (I really hate it when they do that!) I can not even use parts of the AC supply without modification.

With only a few hours available I came up with a plan. A little digging showed I had all of the needed components on-hand. Off to the work bench!

Continue reading “A Dummy Battery Adapter for the Canon 20Da”