We were all ready to view to eclipse from Keck HQ in Waimea. The gear was ready to go, our astronomers setup to answer questions, the public invited…
It rained.
Not to be deterred I grabbed my little telescope and headed for the Sun. The satellite showed a reasonable possibility of clear skies in Kawaihae. As I rolled into the parking lot at Pu’u Kohala Heiau National Historic Site I found the hole in the clouds needed for eclipse photography.
I was not the first there, I met another gentleman setup with a 70mm Meade ETX, we chatted as I set up beside him. I found out later that a couple of the gals from CFHT were setup at Spencer Beach just below the heiau. For clear skies this was about the only reliable place on the island other than the summit.
I quickly setup my little TV-76mm and got the images I was looking for at maximum. We only got to 47% here on the big island, but still worth the effort to see.
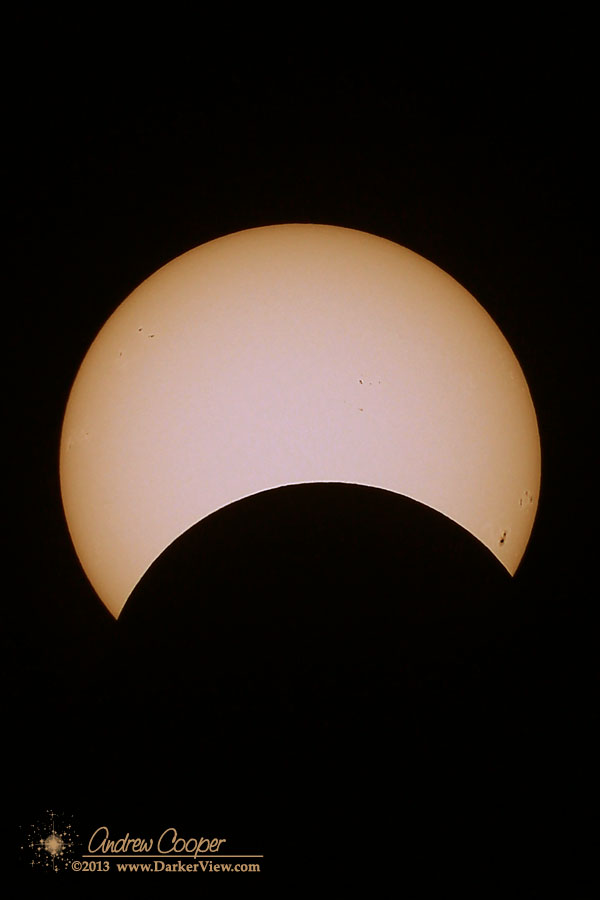
Jan 15th, 2010 annular solar eclipse, photo by Dan BirchallA reminder that this afternoon we will have the opportunity to see a partial solar eclipse. For viewers further south, in Australia and across the South Pacific, this will be an annular eclipse. For viewers here in the Hawaiian islands this will be a deep partial solar eclipse, with well over 40% of the Sun obscured by the Moon. This is enough to produce a noticeable drop in the Sun’s brightness at mid-day.
Please exercise caution when viewing the Sun! Use appropriate eye protection or indirect observing techniques to project an image of the Sun. The link at the start of this paragraph leads to a great discussion on viewing the Sun safely. As always the single best source on the web (or anywhere) for eclipse and transit information is Fred Espenak’s eclipse website at NASA. Stop by whenever you have a question on upcoming events as well as viewing and photography tips.
During a deep partial such as this one check out the shadows under nearby vegetation. Small gaps in leaves can act like pinhole cameras projecting small crescent images of the Sun.
Jan 15th, 2010 annular solar eclipse photographed from Kampala, Uganda by Dan Birchall, used by permissionMay 9th will see a solar eclipse sweep across the Pacific. For viewers in Australia and the southern Pacific Ocean, this will be an annular eclipse, not a total eclipse. With the Moon near apogee and further from the Earth, its apparent size will not be quite enough to cover the entire disk of the Sun, resulting in a ring of light surrounding the silhouette of the Moon.
For viewers here in the Hawaiian islands this will be a deep partial solar eclipse, with well over 40% of the Sun obscured by the Moon. This is enough to produce a noticeable drop in the Sun’s brightness at mid-day.
Please exercise caution when viewing the Sun! Use appropriate eye protection or indirect observing techniques to project an image of the Sun. The link at the start of this paragraph leads to a great discussion on viewing the Sun safely. As always the single best source on the web (or anywhere) for eclipse and transit information is Fred Espenak’s eclipse website at NASA. Stop by whenever you have a question on upcoming events as well as viewing and photography tips.
As our Sun continues through the current solar maximum we should have plenty of opportunities to view one of the most sublime of all natural spectacles, the Aurora Borealis.
A strong auroral display over St. Johns Harbor, Alaska on the evening of September 4, 2012While traveling in Alaska and other northern regions there is always a possibility of a good showing. To make the most of the opportunity a little information cane be useful…
Solar Activity
Solar activity waxes and wanes in an eleven year cycle. When active there are increased numbers of sunspots and solar flares. It is this activity that can have such a dramatic effect here on Earth. A strong solar flare can be accompanied by a release of enormous quantities of material from the Sun. Called a coronal mass ejection (CME) this material streams outwards from the Sun. If the Earth happens to be in the path this material will strike the Earth’s magnetic field, causing the field to distort and reverberate with the impact. Charged particles are channeled into the atmosphere along the magnetic field to create a glowing spectacle.
Our current solar maximum should run through 2013 and into 2014 providing excellent auroral viewing conditions for the next year or two.
This trip to Alaska offered an opportunity that I had not experienced on previous trips due to the confluence of two conditions… I would be visiting later in the year than usual, it would actually get properly dark. When visiting Southeast Alaska in June and July the amount of darkness is dramatically limited by long summer days. The second condition is even less easily arranged… Our Sun is near the peak of its eleven year solar cycle. This results in more solar activity including large sunspots and energetic solar flares.
Put the two of these factors together and there is a good possibility of seeing the Aurora Borealis.
It is only a possibility, not a certainty by any measure… This was not a trip to the far north, where the auroral circle usual sits. If one were to travel north of Fairbanks into the true arctic one is almost guaranteed to see the aurora during solar max. I would be traveling between Juneau and Anacortes, from 58 to 48 degrees north latitude. At these latitudes it would take a strong geomagnetic storm to bring the aurora south into view. The chances of such a strong storm were relatively good, we are currently experiencing an active Sun near solar maximum, averaging a decent storm every month or two. In any case the odds were a bit better than seeing the aurora at home in Hawai’i.
At least there would be no light pollution to deal with, significant outposts of civilization are sparse along the route we would be traveling. One complication would be weather… Of the twenty days I would spend in northerly latitudes, about half were clouded over, thus the odds of seeing a good auroral display were modest, maybe even unlikely.
It was a full dress rehearsal. Both telescopes, two cameras, the entire streaming rig set up on the lanai. No less than three computers with cables all over the driveway! Surprisingly enough, everything went pretty well!
The Sun on June 2, 2012If you had been watching the Keck Transit of Venus stream, you would have been looking at a live image of the Sun for several hours. The seeing from my driveway was pretty poor, but there is a nice collection of smaller sunspots across the disk.
Everyone wandering by the house noted the telescopes. I gave peeks to our mail-lady and a couple young women who stopped by, intending to read me a bible verse or two (that was fun;)
Two technical issues were key today… Using thirty feet of active USB extension cables to run the streaming camera remotely, no problem. Co-aligning the two telescopes to aim at the same point, no action needed, aligned from the start. I had thought I might need to shim the mount for the piggyback ‘scope. I was also able to play with the streaming camera further. The Baader film filter gives a blue-white image. Adjustment of the camera white balance will restore a little yellow cast. I do not have much problem with the white, but a hint of yellow will allow people to instantly realize they are seeing the Sun. The same reason I adjust my processed photos for a golden orange hue.
We are all swapping gear around to get the set-up ready. Chris was nice enough to loan me a Canon T-ring and some Baader film. I built a battery pack and some sun-finders for several telescopes. Last night I picked up a whole solar rig from Cliff for delivery to Olivier. Olivier lent a 40mm eyepiece to Keck for the public telescope that will be setup at HQ. The list goes on…
I was not the only one doing a dress rehearsal. So far today I have been on the phone to other folks setting up and using a sunny Saturday to check gear. Some of the guys over on Maui even posted a video of their test run. I should have thought to do the same thing! Will have to time lapse the summit setup.
With the Transit of Venus looming on the calendar, a discussion of solar photography is in order. Taking good photos of the Sun is not that difficult, but can be aided with a little information. There are some unique challenges in solar photography.
A solar filter mounted on a refracting telescopeThe one obvious problem is dealing with the sheer intensity of the Sun. An intensity that can easily damage a camera if placed behind unfiltered optics. A proper solar filter is the easiest way to reduce the light to a safe level.
A solar filter will also produce the most pleasing images of the Sun. Indirect techniques like projection can be used. But for good solar photos, a proper filter in front of your optics is the single best method.
Solar filters for optics are constructed with a thin film of metal such as aluminum or stainless steel vacuum deposited on a substrate. This substrate is usually glass or a thin mylar film. The resulting filter allows only a small fraction of the light through, about 0.01% or 1/10,000 of the unfiltered value. Importantly, the filter blocks the ultraviolet and near infrared part of the spectrum as well. The result is a safe filter than can be used on a telescope or telephoto camera lens.
Sufficient magnification is needed if details of the Sun’s surface are to be well recorded. A few hundred millimeters focal length, found in common telephoto lenses will produce a reasonable solar image. The image will still be fairly small. To fill the sensor requires more. For an APS-C sized sensor (Canon T2i, 60D, 7D, Nikon D5000, D3200 or similar) a telescope with 1,000mm focal length will create an image filling a good portion of the image.
Image sizes for APC-C Sensors
Focal Length
Image Size (arcmin)
100mm
760×510
400mm
190×128
800mm
95×64
1000mm
76×51
1500mm
51×34
2000mm
38×25
The table to the left shows the resulting images sizes, in arc-minutes, given various focal length lenses, on an APC-C sized sensor. Recall that the Sun is about 30 arcminutes across as seen in our sky. With 100mm the resulting image is 510 arcminutes from top to bottom in the frame. This is 17 times the width of the solar image, a pretty small image indeed. With 400mm this improves to about 4, thus the Sun will reach about 1/4 the height of the image. At 1000mm this is about ideal, the Sun will reach more than halfway across the frame.
1500mm will just fit the solar image. While this may seem ideal, there is an issue. A small amount of drift will put part of the Sun out of the image, cutting off part of the disk. Sizing the image to fit in the frame with a good margin will allow some drift, while still giving a good image scale.
If you have a full frame camera (Canon 5DMkII, Nikon D800, etc.) a larger image can be used to fill the larger sensor, thus a longer focal length can be used. A telescope with 2000mm focal length will produce an image 17mm across, neatly fitting in the area of a full frame sensor.
Few compact cameras can boast a lens that will zoom far enough to produce an image of the Sun filling the frame. For these cameras another technique can be used, afocal photography. This can also produce good images, but will require experimentation to find the right combination of telescope, eyepiece and camera to produce a correctly sized image.
The full frame solar image with about 1000mm of focal length and a Canon 60DIf you want to calculate the image scale for your optical combination, lens and camera, I suggest downloading the CCD Calculator from New Astronomy Press. You can enter the optical parameters and see exactly what the resulting image will look like with a sample image of the Sun, Moon or other selected objects.
Another issue is resolution. Our atmosphere usually limits the practical resolution to about one or two arcseconds, blurring any finer detail through atmospheric distortion. This can be much worse in the daytime with solar heating of the ground and air around the telescope. Thus the limit for resolution will be reached with about 1000mm focal length and a modern 10-15 megapixel camera. Any further magnification beyond about 1000mm will simply result in magnifying the blur. There are techniques for overcoming this (image selection and stacking), but if you know how to do that, you already know what you are doing.
Just a bit of summing up… You need a proper solar filter or other method of safely reducing the solar intensity. A long telephoto (400mm or more) will produce a reasonable solar image. A small telescope with about 1000mm of focal length is ideal for photographing the entire disk of the Sun with a DSLR camera.
Set up the gear again to get ready for Venus Transit. Attempting to autoguide on the Sun. No luck with the guiding, the software just does not like a non-pinpoint target. I did take a few photos in the process of messing about…
You have heard it before, but it really is true! Looking at the Sun for longer than a few brief moments with an unprotected eye can lead to permanent damage. Looking at the Sun with any sort of optical deceive that has not been properly filtered can lead to instantaneous eye damage.
Discussed below are the only safe methods I am aware of to view the Sun. There are some dodgy methods out there. Take chance with your irreplaceable eyesight? I think not. Be careful and do it right if you want a look.
For the unaided eye there are a couple options to view the Sun safely…
Solar Viewing Glasses Proper solar viewing filters are made from a thin plastic film, usually mylar, coated with metal to properly filter the Sun’s light for viewing with the unaided eye. These are widely available and quite cheap. Local astronomy organizations have been giving them away in preparation for the transit. Do not attempt to use these viewers in conjunction with binoculars or small telescopes, they do not provide sufficient filtering for optics!
Welding Glass Filters used for viewing welding offer much the same protection as solar filters. A shade 13 or darker welding filter can provide good protection for the unaided eye. Again, do not use a welding filter with any sort of optical device such as binoculars, they are not designed for such use and may not block enough light.
A much better view of the event can be seen if modest magnification is used. Do keep in mind that any soft of binoculars or telescope also concentrates much more light that the eye alone. Remember those childhood “experiments” involving a magnifying glass and ants? The best options here are the use of solar filters designed to be used on a telescope, or indirect means such as image projection.
A solar filter mounted on a refracting telescope
Solar Filters for Telescopes Filters specifically designed for telescopes consist of either a plastic film, or a sheet of glass, coated with a thin layer of metal to block the Sun’s light. These filters pass about 1/1000 of one percent of the light. More importantly, they block the harmful infrared and ultraviolet light that could so easily cause damage. The filters can be purchased in many sizes as appropriate for various models of telescopes, costing between one hundred and several hundred dollars.
Image Projection One of the simplest methods of displaying a solar image is projection. A white screen placed a foot or two behind a telescope will produce a very nice image of the Sun that can be safely viewed by a number of people simultaneously.
Keep in mind that the beam of light out of the eyepiece is quite intense, potentially hot enough to burn a careless finger placed near the exit from the telescope.
The method works best with small optical systems, binoculars or the smallest of telescopes. You do not need big optics to project a very nice solar image.
You do not have any optics? Use the simplest optical arrangement of all, the pinhole camera!
If you do not have a safe means of viewing the transit and do want a look, you can go to one of the many public events being organized. Here on the Big Island there are quite a few options, one should be close to you.
Everyone is gearing up for the Transit of Venus. Starting at just after noon on June 5th, Venus will cross the face of the Sun. This will be our last chance to see such an event in our lifetimes, as a result, many skywatchers are making an extra effort to see this transit. This includes a number of folks who are traveling to Hawai’i this June, just to be here for the transit.
The June 2004 Transit of Venus, image credit Jan HeroldThe Office of Mauna Kea Management and and Mauna Kea Support Services are making an extraordinary effort for the transit. An interesting exercise, protecting the mountain, ensuring everyone is safe, and allowing reasonable access to the summit. This is a challenge under normal circumstances. Throw in the possibility of a much larger crowd and it could be a real problem. Thus, the following extra measures will be in place…
Access to the summit will be provided via free shuttle service between the Visitor Information Station (VIS) and Mauna Kea summit.
Parking at the Visitor Information Station (VIS) is limited. Additional parking will be provided, however If parking spaces fill up, vehicles will be held below the VIS until parking becomes available.
Mauna Kea Rangers and Hawaii County Police Officers will be present to assist with parking and public safety.
There will be solar telescopes stationed at the MKVIS, at the summit, and at a number of other locations around the island. With many options to choose from, you do not need to go to the summit to get at least some view of this event.
The diehards, those wanting to see the entire transit, will probably go to Mauna Kea. I really do not know what sort of crowd to expect on the mountain. While it could be substantial, I really expect a more modest showing than some folks are predicting. In any case it will be a fun event.
Myself? I will be on the summit. I will be running the Keck live webcast of the event using one of my telescopes. From a vantage point behind the Keck 1 telescope we should be in position to witness the entire event from start to finish.