I have heard it said that the creative filter applications available for phone photography are simply a way to make bad photos look good.
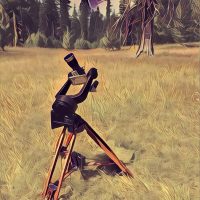
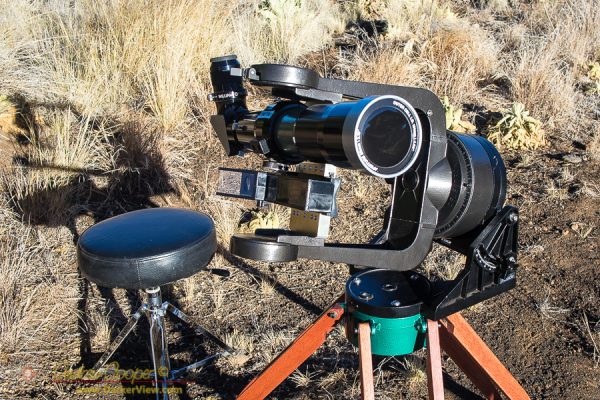
A solar telescope setup to photograph the total solar eclipse 21Aug2017
I would have to say that these filters are a way to make bad photos look worse.
The web is filled with horrible photos of pets, selfies, and dinner plates, often processed through some creative filter application to somehow make the photo look hip or cool. Sorry, a bad photo is still a bad photo. Often it is far worse for the application of the filter. Fancy colors, brush patterns or mosiacs, it does not matter, it is still just bad.
I am not telling you to uninstall the application, quite the opposite! A well composed photo can be a good photo after application of the filter. You can also use the filter to overcome some limitations of phone photography. Technical defects like color, lighting, and noise are often erased when the filter is applied.
Take a photo with a thin film solar filter and you get a blue-white image of the Sun. Correcting this to a yellow gold image is fairly simple in most any photo processing package.
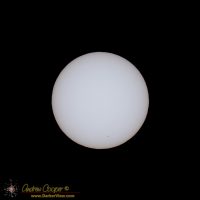
The Sun as photographed through a Baader film solar filterCorrecting is probably the wrong word here. The Sun is actually closer to white as we define color. After all, the Sun is our normal source of light, what our eyes evolved to use.
Color is a fluid subject, simply our interpretation of frequency across a very small slice of the electromagnetic spectrum. As such there is no absolute right and wrong, just a set of conventions we normally use.
The issue is that people expect the Sun to be yellow-gold. Present an image of the Sun in any other hue and it is rejected as fake, or false color. We are accustomed to certain visual cues to identify and interpret our world, color is a major part of that. Unless you want to argue with a million people or two, you are better off making your Sun photos yellow-gold.
When travelling to an eclipse, one solar filter is not enough. I need a backup!
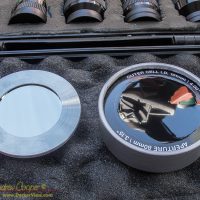
A Baader film solar filter beside an Orion Safety Film filter, both for the 76mm refractorThis is particularly true as my primary filter is a Baader film filter. While a very nice and effective filter, it is also very thin film, and easily damaged. Thus I have borrowed a second filter (Thanks Chris!), the borrowed filter being an Orion E-Series Safety Film filter.
Having the two filters available for use mean I must choose between them when the moment is critical. Which is better? Some testing is in order to find out.
The two filters appear very different, the thin silver film of the Baader quite different than the thicker black polymer film of the Orion filter. Both filters are safe to use and provide decent solar viewing. Both provided pleasing solar images using my Televue 76mm APO telescope at low and medium power.
Stepping beyond basic use I do find that they perform quite differently. So differently I felt some notes are in order.
You have heard it before, but it really is true! Looking at the Sun for longer than a few brief moments with an unprotected eye can lead to permanent damage. Looking at the Sun with any sort of optical deceive that has not been properly filtered can lead to instantaneous eye damage.
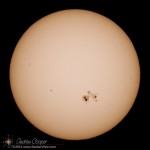
The complex sunspot AR2192 visible on 24 October, 2014
Discussed below are the only safe methods I am aware of to view the Sun. There are some dodgy methods out there. Take chance with your irreplaceable eyesight? I think not. Be careful and do it right if you want a look.
For the unaided eye there are a couple options to view the Sun safely…
Nothing serious, just a fun iPad app for a Sunday.
The many filter apps that process photos to create various effects have become ubiquitous. Old film effects, sepia, Polaroid, old time movie, painting, etc., etc., etc. There is a filter for everything. Some of these have often been accused of existing solely to make bad photos somehow cool. An accusation that probably has more than a bit of truth behind it.
The fishing boat Roedda departs the packing plant dock in PetersburgEvery now and then a filter app seems to rise just a bit above. Waterlogue is a filter that creates a watercolor style painting from a photograph. The app is available for iOS devices and can run both on the pads and phones.
The painting process uses an edge detection filter first, extracting the structure of the photos. Each of the various presets has dramatically different settings for this edge detection. The app then paints in the selected colors to fill in the painting. The process is animated, watching this can be rather fun.
Comment spam is always a problem when maintaining a blog, a constant battle. Generally one my readers do not see, as I have to manually approve any comment from a new commenter. As I have it setup now, once I approve a comment from a particular reader, any further comments they make get posted immediately. I do try to make it easy for my loyal readers.
But this does leave a list of messages in the approval que each day, until recently this was anywhere from a few to a dozen. In the last week the number has soared, to 30-50 spam comments each day. It becomes a real chore to delete them all.
Time to take the next step in the armaments race. I had two choices, disallow anything using an @gmail.com address as verification, or install a more sophisticated filtering software.
Just about every spam comment in the que is using a Gmail address for verification. So are a few of my loyal readers, folks I really do not want to cut off from commenting. These mail accounts are really convenient, for regular folks and the spammers.
Take the other choice? I will attempt to use a spam detection plugin for WordPress called Askimet. As of today it is installed and active, a test.
I do worry that legitimate comments will be lost. Please look to see your comment posts properly, if it does not, drop me a line and I will see if I can add you to the whitelist.
What to do while waiting for your plane? Fiddle with the camera?
My camera was already in-hand and I had almost an hour to wait for boarding. I may as well explore some of the little used functions and hidden menus the camera has to offer. Thus I took a few photos of a plane debarking and boarding on the open flightline of the Kona airport, playing with the camera settings. I didn’t realize just how much photos of a jet taken in black and white really do conjure up memories of vintage jet travel in the 60’s.
The SandpitOne effect that I was somewhat surprised to find was the miniature effect.
The miniature effect is just a bit of photographic fun. Something that can be used quite creatively in the right circumstance. I have been aware of the effect for some time, recently I had come across the effect in a number of online photos, and some great timelapse videos.
With the Transit of Venus looming on the calendar, a discussion of solar photography is in order. Taking good photos of the Sun is not that difficult, but can be aided with a little information. There are some unique challenges in solar photography.
A solar filter mounted on a refracting telescopeThe one obvious problem is dealing with the sheer intensity of the Sun. An intensity that can easily damage a camera if placed behind unfiltered optics. A proper solar filter is the easiest way to reduce the light to a safe level.
A solar filter will also produce the most pleasing images of the Sun. Indirect techniques like projection can be used. But for good solar photos, a proper filter in front of your optics is the single best method.
Solar filters for optics are constructed with a thin film of metal such as aluminum or stainless steel vacuum deposited on a substrate. This substrate is usually glass or a thin mylar film. The resulting filter allows only a small fraction of the light through, about 0.01% or 1/10,000 of the unfiltered value. Importantly, the filter blocks the ultraviolet and near infrared part of the spectrum as well. The result is a safe filter than can be used on a telescope or telephoto camera lens.
Sufficient magnification is needed if details of the Sun’s surface are to be well recorded. A few hundred millimeters focal length, found in common telephoto lenses will produce a reasonable solar image. The image will still be fairly small. To fill the sensor requires more. For an APS-C sized sensor (Canon T2i, 60D, 7D, Nikon D5000, D3200 or similar) a telescope with 1,000mm focal length will create an image filling a good portion of the image.
Image sizes for APC-C Sensors
Focal Length
Image Size (arcmin)
100mm
760×510
400mm
190×128
800mm
95×64
1000mm
76×51
1500mm
51×34
2000mm
38×25
The table to the left shows the resulting images sizes, in arc-minutes, given various focal length lenses, on an APC-C sized sensor. Recall that the Sun is about 30 arcminutes across as seen in our sky. With 100mm the resulting image is 510 arcminutes from top to bottom in the frame. This is 17 times the width of the solar image, a pretty small image indeed. With 400mm this improves to about 4, thus the Sun will reach about 1/4 the height of the image. At 1000mm this is about ideal, the Sun will reach more than halfway across the frame.
1500mm will just fit the solar image. While this may seem ideal, there is an issue. A small amount of drift will put part of the Sun out of the image, cutting off part of the disk. Sizing the image to fit in the frame with a good margin will allow some drift, while still giving a good image scale.
If you have a full frame camera (Canon 5DMkII, Nikon D800, etc.) a larger image can be used to fill the larger sensor, thus a longer focal length can be used. A telescope with 2000mm focal length will produce an image 17mm across, neatly fitting in the area of a full frame sensor.
Few compact cameras can boast a lens that will zoom far enough to produce an image of the Sun filling the frame. For these cameras another technique can be used, afocal photography. This can also produce good images, but will require experimentation to find the right combination of telescope, eyepiece and camera to produce a correctly sized image.
The full frame solar image with about 1000mm of focal length and a Canon 60DIf you want to calculate the image scale for your optical combination, lens and camera, I suggest downloading the CCD Calculator from New Astronomy Press. You can enter the optical parameters and see exactly what the resulting image will look like with a sample image of the Sun, Moon or other selected objects.
Another issue is resolution. Our atmosphere usually limits the practical resolution to about one or two arcseconds, blurring any finer detail through atmospheric distortion. This can be much worse in the daytime with solar heating of the ground and air around the telescope. Thus the limit for resolution will be reached with about 1000mm focal length and a modern 10-15 megapixel camera. Any further magnification beyond about 1000mm will simply result in magnifying the blur. There are techniques for overcoming this (image selection and stacking), but if you know how to do that, you already know what you are doing.
Just a bit of summing up… You need a proper solar filter or other method of safely reducing the solar intensity. A long telephoto (400mm or more) will produce a reasonable solar image. A small telescope with about 1000mm of focal length is ideal for photographing the entire disk of the Sun with a DSLR camera.