In the few days I had the camera I was determined to acquire some astrophotography test shots with the EOS-M camera. Even if it meant getting up at 3am to have some dark sky after moonset. It would have been easier a few days before, but a Pacific storm system had provided several days of overcast with occasional rain. This particular morning was just about perfect, clear skies, decent seeing and no wind to bounce the telescope around.
Astrophoto setup with AT6RC, SBIG STi autoguider and the EOS-M cameraFor testing I used the same setup I often use with my Canon 20Da or 60D. An Astro-Tech 6″ (150mm) Ritchey–Chrétien telescope riding atop a Losmandy G11 mount. A 0.8x focal reducer has T-thread at the rear allowing a Canon EOS lens adapter. To attach the EOS-M I used the Canon M Mount to EOS Mount adapter. An SBIG STi autoguider completes the setup.
The result is an f/7 optical system with 1080mm focal length. This gives a field of view of about 72×48 arc-minutes (1.2 x 0.8 degrees) on the sky when using a camera with an APS-C sensor.
Mauna Kea is simply a great place to shoot astrophotos from. Dark, clear skies with typically good seeing. Unlike some mainland locations there is a distinct lack of aircraft overhead. I am not sure how many shots I have had ruined by the bright anti-collision strobes crossing through the frame when shooting from locations in Arizona.
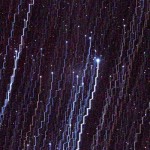
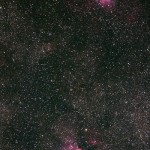
There are hazards to shooting photos here that do not commonly exist elsewhere. I was unpleasantly surprised when reviewing the take the next morning to find brilliant yellow lines through a hour and a half of exposures taken of the Cygnus region. The material is otherwise great, the makings of a nice shot, except for this one little issue. There are ways of suppressing artifacts like this when processing, but the beam is so bright I am not certain they will work all that well.
Worse, I checked the schedule, the offending laser is coming from Keck 2 AO, a system I work on.
The observatories have a system in place to deal with this issue. There are four operational lasers on the mountain, Keck 1 and Keck 2, Subaru and Gemini. Each optical observatory using a laser maintains a server that posts their laser location, status, and calculates the position of each beam in the sky. This can be queried by the other observatories to check if the beam crosses the field of view. A set of rules has been negotiated to determine who has right of way, usually who is on target first.
Obviously this computer system does not take into account my little telescope shooting photos from Hale Pohaku. If I had known I could have called Heather and asked her to shutter her laser, I was on target first. Being the kind soul she is, she would probably laugh with me.
Rough processing of a single frame, Cygnus region, with the Keck 2 Adaptive Optics laser crossing through the frame
The last time out I fitted a camera ball mount to the counterweight shaft of the Losmandy mount. This allowed me to shoot an additional camera at the same time, along with the camera attached to the telescope. The second camera can be aimed at a different target completely. With a relatively wide angle lens, tracking errors become insignificant.
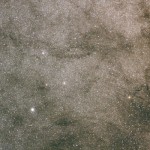
With the center of the Milky Way high overhead it made an obvious first target to test this wide-field setup. The results are quite nice, a series of one minute exposures reveal the star clouds in fine detail. The camera for this run was the Canon 60D, as the 20Da was shooting the Lagoon at the time. I need to swap places and try the shot again with the 20Da to see what the Hα sensitivity reveals, capturing more of the nebulae that is mingled with the stars.
The lens was an older Nikon 50mm f/1.8 stopped down to f/2.8, nice round star images right into the corners of the frame. Yes, a Nikon lens mounted to a Canon camera, you can do that. A very nice lens, I will be using it again for this work.
The galactic center region on the Sagittarius-Scorpius border
Another new Moon weekend, another observing outing to Mauna Kea. With some shiny new astro equipment to play with I decided to load for photography instead of visual. Disassembling the photographic mount I realized it had not been taken apart in over two years, setup in the garage and used in the driveway. I did not expect to be alone, a few other local observers had indicated plans to get out this night.
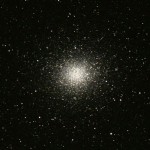
Omega Centauri, NGC5139, sum of 31 x 1min exposures, AT6RC and Canon 60DWorry on the drive up, the cloud deck seemed quite high. I was concerned that the Mauna Kea VIS, at 9,200ft, may be in the clouds. With wipers and headlights on, through the heavy fog I drove, not encouraging when you expect to use a telescope. The worry persisted until the last switchback, ascending through the last wisps of cloud just a few hundred feet below the VIS to behold a cloudless blue sky overhead.
As expected the Mauna Kea Visitor Information Station was a zoo. A dozen summit tour buses added to a heavy Saturday night crowd. The parking lot was full with even more cars parked along the road. Not a real problem, the tour buses use reserved spaces right in front of the building. They pull out about an hour before sunset, headed for the summit with their customers. We swoop in on the vacated parking spaces and set up our gear.
A trio of telescopes set up for astrophtography at the Mauna Kea VISThe crowd is an interesting experience. Well over a hundred folks waiting for dark and the evening program. There are the usual issues of headlights and camera flashes. It may not be all that dark for a while, but we gain a nice paved place to setup, and there is electrical power available. The crowd will slowly wane as the night progresses, mostly gone by 9pm, driven off by the cold. At 10pm the VIS closes and the remaining lights are turned off.
In addition to the VIS telescopes, there were quite a few local amateurs taking advantage of a moonless Saturday night. Cliff and Tony brought Cliff’s 24″ Dob, a two person job to move that ‘scope. Wayne brought photography gear. Mike was likewise set up for photography, planets instead of deep sky, using a Flea 3 and an ancient 10″ Celestron. Olivier brought his 19″ Pricilla, providing plenty of glass for visual astronomy while the cameras exposed for hours.
It was Malalo o Ka Po Lani, cultural night at the VIS, with a special lecture. This meant a large crowd, most of whom stayed to enjoy the perfect skies the mountain provided this night. They wandered around the telescopes asking lots of questions. While the photographic ‘scopes did not offer views through the eyepiece, there was still a lot of interest in the process. I chatted with many folks as I worked, fiddling with the complex equipment necessary to take photos of the sky.
It was quite the gathering of Losmandy G-11’s! Wayne brought two, Mike brought one to carry the old 10″ Celestron, I had mine setup for photography with the AT6RC. Add the three that the Mauna Kea VIS uses! A testament to these well-built mounts, some of which are two decades old.
The astrophoto gear was working nicely. There were a few issues to deal with at the beginning of the night, the usual new gear stuff. A few things I need to fix before next time… need to remount the guider so I can co-align it with the imaging ‘scope. I need to mount a real finder, and make it easier to hunt down the targets. But overall I was pleased, the new setup worked as I hoped it would.
The SBIG ST-i autoguider mounted to the top of the AT6RC telescopeI will write more about the SBIG ST-i later. The short version… Much easier to use than the ST-4, accurate, painless acquisition of guide stars, it just locked on and stayed there. The only real drawback is the inability to dispense with a computer. I recently re-built one of my older laptops for use as the astrophoto machine. But since the computer is going to be there, I may as well use it, time to integrate the DSLR with the computer and shoot tethered. I have the software, just that I had tried to keep it simple in the field.
Another pleasant surprise was the ease of focusing with the AT6RC with a Bahtinov mask. I have been wondering about the stock focuser on the new ‘scope, how well does it handle the heavy DSLR camera. One lesson is that it locks the focus quite well, I noticed no drift each time I checked focus. Indeed, at one point I pulled out the 60D, swapped the focal reducer and adapter onto the 20Da and checked focus again, it was still perfect.
While my camera took exposure after exposure, I took in the views that big glass can produce. Bouncing back and forth between Cliff 24″ and Olivier’s 19″. No surprise for a spring session, galaxies were in rich supply. We viewed a lot of the showpiece objects, from Ursa Major to Virgo and Corvus.
This night was the type of night we hope for when planning an observing outing… Not too cold, no strong wind, and no clouds. Just a dark sky to delight the imagination all night long.
Most of my astrophotos are taken with my venerable Canon 20Da, a special version of the EOS 20D that was produced for astrophotography. Normal DSLR cameras work quite well for astrophotography, with one major drawback… The filter placed in front of the sensor blocks much of the Hα light emitted by many nebulae.
NGC1976 or M42, the Great Orion Nebula, taken with the Canon 20Da and a AT6RC telescope.This light, emitted at 656mn, a wavelength deep in the red, give emission nebulae their characteristic shades of rich red. Hα is the strongest component of light produced by emission nebulae. Without this light, the nebulae will often appear bluish in photographs, as the next strongest component OIII dominates.
Specifically for astrophotography, Canon produced a special version of the 20D with a re-designed filter that allowed Hα light to reach the sensor, the Canon 20Da. The camera also featured on-screen focusing, a feature now found on most DLSR cameras, but unusual back in 2005.
The 20Da was discontinued in 2006. Astrophotographers wanting a DSLR camera with a filter that admits Hα light must buy a standard camera and remove the filter, or have it modified by specialist that offers a conversion service.
Currently passing through Usra Major, comet C/2009 P1 Garradd, is bright enough to appreciate in small telescopes. It is well placed for observation, well up in the sky through much of the night. At about magnitude 6.8 it is also bright enough to make an attractive photographic target.
I am not totally happy with the photo, I could have really used more time on target. Another issue, the exposures I used were a bit too long for this fast moving target, the coma is elongated in the frames. I will probably re-shoot the comet if I get a chance soon.
Comet C/2009 P1 Garradd taken on 28Mar2012, average of 14 x 8min frames with a Canon 20Da and the AT6RC
Last week I shot a little video of Mars and Saturn in an attempt to get some nice imagery of these planets. Mars is approaching opposition and Saturn is well placed in the sky for observation. It appeared at first as if the seeing was pretty good, but reviewing the video shows that there were issues.
The results? No so good actually. The Mars shot shows no detail beyond the polar cap, the Saturn shot is marginally better, but still nothing I am happy with. The imagery was taken with the Canon 60D in crop movie mode, and the C11 telescope operating at f/10. I spent some time tweaking the collimation, that looked looked fairly good. The video? The resulting material is not so good, I suspect the main cause of the poor results was seeing, some variant of high frequency distortion blurring the fine details.
There may also be some issues with the new version of Registax. Version 6 has some major differences in how it operates, not sure if I am doing everything right. The program may have some bugs as well, I crashed it several times while attempting to process the imagery.
Saturn, C11 and Canon 60D, best 800 of 1200 frames processes in registax
I mentioned in another recent post that astrophotography is an art of details. Dozens of little issues must be dealt with, failure to properly address even one item, and hours of work can be lost. Each technical issue must be understood, and a solution found through technique and experience.
The saving grace of modern astrophotography is that once all the equipment has been set up and the details under control, the process becomes automatic. The computer, telescope mount, and camera operating for long periods of time, often hours, with no human intervention. One of the critical functions to long exposure photography is an autoguider, a small, automated secondary camera that keeps the telescope and mount pointed at exactly the same point in the sky for the entire exposure.
An exposure of the Christmas Tree Cluster is guided into oblivion when the ST-4 autoguider loses the starLast Sunday all was going well, several hours of exposures looked pretty good, at least on the little LCD display of the camera. The astrophoto gear had setup smoothly, all systems checked out and running well in just a few minutes after rolling the rig out of the garage. Mental checklist complete I hit the button to start exposures and left the gear to do it’s thing.
The first hint of trouble was the display on the autoguider. I did not see this until I went to stop the series of exposures I had hoped was complete. The guider was displaying large guide errors each cycle, where I should see zeros, or at least small numbers, it had E’s, a bad sign with the venerable ST-4 autoguider.
Hoping for the best, but fearing the worst, I rolled the ‘scope back into the garage and setup the camera to take calibration frames. I would discover the truth later, after I got a few hours of sleep.
When I downloaded the memory card the extent of the problem becomes apparent. Much of the last sequence of photos is ruined. The guider clearly lost the star somewhere into the third exposure, reason unknown. What resulted was twelve exposures with ziz-zag star trails across them, well over an hour and a half of wasted exposure time.
All of the evening’s early exposures were fine, only the last sequence was ruined. Thus, the evening was not a total loss, and I do have some new material to process. Now to figure out what went wrong with the autoguider, probably just some small detail I missed.
Digital SLR cameras make surprisingly good astrophotography cameras on bright objects. Good sensitivity, low noise and a convenient form factor make these camera a good choice for shooting the night sky.
One useful modification to the camera is removing the standard IR cutoff filter present in cameras and replacing it with a filter that is tuned to let in more of the red. The new filter should allow light at 656nm, what astronomers call hydrogen alpha, or Hα, the light emitted by neutral hydrogen atoms, the most common element in our universe. This is the red glow that makes the emission nebulae so colorful. An astrophotographer can do the filter change themselves, send it to a specialist who can do the work, or buy an already “modded” camera. Canon has produced two special models specifically for the astrophotography market, the EOS 20Da and 60Da, with this special filter.
Below, one can see the results of using modified, and unmodified cameras and relatively small telescopes…
Baade’s Window, single 8 minute exposure at ISO 800, Canon 20Da DSLR camera mounted on a Televue-76 APO telescope with a 0.8x focal reducer/field flattener
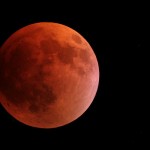
A total lunar eclipse on the night of August 27-28, 2007 with the Moon deep in the Earth’s inner shadow. A dark eclipse, this exposure shows a number of stars surrounding the Moon
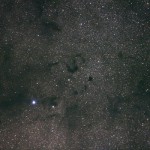
B72, the Snake Nebula, single 8 minute exposure at ISO 800, Canon 20Da DSLR camera mounted on a Televue-76 APO telescope with a 0.8x focal reducer/field flattener
Omega Centauri, NGC5139, single 2 minute exposure at ISO 800, Canon 20Da DSLR camera mounted on a Televue-76 APO telescope with a 0.8x focal reducer/field flattener
M16 and M17, the Eagle Nebula and Swan Nebula, single 8 minute exposure at ISO 800, Canon 20Da DSLR camera mounted on a Televue-76 APO telescope with a 0.8x focal reducer/field flattener
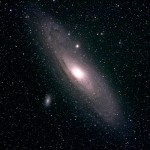
The Andromeda Galaxy, M31, single 8 minute exposure at ISO 800, Canon 20Da DSLR camera mounted on a Televue-76 APO telescope with a 0.8x focal reducer/field flattener
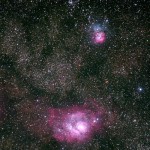
The Lagoon Nebula and The Trifid Nebula, single 8 minute exposure at ISO 800, Canon 20Da DSLR camera mounted on a Televue-76 APO telescope with a 0.8x focal reducer/field flattener