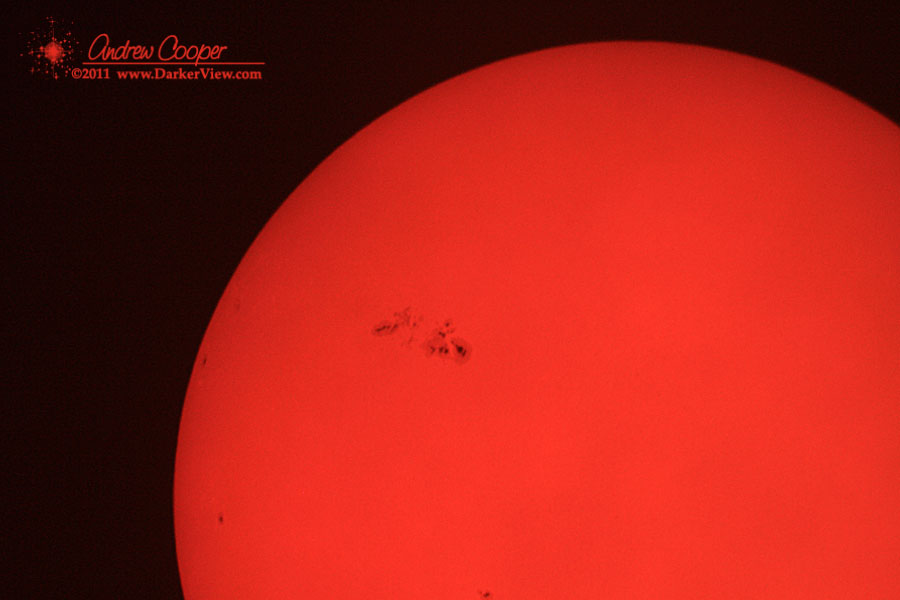
A Memorial Day Sun from Hawai’i. Another run at setting up and testing gear for the upcoming Transit of Venus. The seeing was not great, but I shot the Sun and some material of a thin crescent Venus just 12°44′ from the Sun.

When you want to see the stars, find someplace dark

A Memorial Day Sun from Hawai’i. Another run at setting up and testing gear for the upcoming Transit of Venus. The seeing was not great, but I shot the Sun and some material of a thin crescent Venus just 12°44′ from the Sun.
With the Transit of Venus looming on the calendar, a discussion of solar photography is in order. Taking good photos of the Sun is not that difficult, but can be aided with a little information. There are some unique challenges in solar photography.

A solar filter will also produce the most pleasing images of the Sun. Indirect techniques like projection can be used. But for good solar photos, a proper filter in front of your optics is the single best method.
Solar filters for optics are constructed with a thin film of metal such as aluminum or stainless steel vacuum deposited on a substrate. This substrate is usually glass or a thin mylar film. The resulting filter allows only a small fraction of the light through, about 0.01% or 1/10,000 of the unfiltered value. Importantly, the filter blocks the ultraviolet and near infrared part of the spectrum as well. The result is a safe filter than can be used on a telescope or telephoto camera lens.
Sufficient magnification is needed if details of the Sun’s surface are to be well recorded. A few hundred millimeters focal length, found in common telephoto lenses will produce a reasonable solar image. The image will still be fairly small. To fill the sensor requires more. For an APS-C sized sensor (Canon T2i, 60D, 7D, Nikon D5000, D3200 or similar) a telescope with 1,000mm focal length will create an image filling a good portion of the image.
| Image sizes for APC-C Sensors
|
||
| Focal Length | Image Size (arcmin) | |
| 100mm | 760×510 | |
| 400mm | 190×128 | |
| 800mm | 95×64 | |
| 1000mm | 76×51 | |
| 1500mm | 51×34 | |
| 2000mm | 38×25 | |
The table to the left shows the resulting images sizes, in arc-minutes, given various focal length lenses, on an APC-C sized sensor. Recall that the Sun is about 30 arcminutes across as seen in our sky. With 100mm the resulting image is 510 arcminutes from top to bottom in the frame. This is 17 times the width of the solar image, a pretty small image indeed. With 400mm this improves to about 4, thus the Sun will reach about 1/4 the height of the image. At 1000mm this is about ideal, the Sun will reach more than halfway across the frame.
1500mm will just fit the solar image. While this may seem ideal, there is an issue. A small amount of drift will put part of the Sun out of the image, cutting off part of the disk. Sizing the image to fit in the frame with a good margin will allow some drift, while still giving a good image scale.
If you have a full frame camera (Canon 5DMkII, Nikon D800, etc.) a larger image can be used to fill the larger sensor, thus a longer focal length can be used. A telescope with 2000mm focal length will produce an image 17mm across, neatly fitting in the area of a full frame sensor.
Few compact cameras can boast a lens that will zoom far enough to produce an image of the Sun filling the frame. For these cameras another technique can be used, afocal photography. This can also produce good images, but will require experimentation to find the right combination of telescope, eyepiece and camera to produce a correctly sized image.

Another issue is resolution. Our atmosphere usually limits the practical resolution to about one or two arcseconds, blurring any finer detail through atmospheric distortion. This can be much worse in the daytime with solar heating of the ground and air around the telescope. Thus the limit for resolution will be reached with about 1000mm focal length and a modern 10-15 megapixel camera. Any further magnification beyond about 1000mm will simply result in magnifying the blur. There are techniques for overcoming this (image selection and stacking), but if you know how to do that, you already know what you are doing.
Just a bit of summing up… You need a proper solar filter or other method of safely reducing the solar intensity. A long telephoto (400mm or more) will produce a reasonable solar image. A small telescope with about 1000mm of focal length is ideal for photographing the entire disk of the Sun with a DSLR camera.
Set up the gear again to get ready for Venus Transit. Attempting to autoguide on the Sun. No luck with the guiding, the software just does not like a non-pinpoint target. I did take a few photos in the process of messing about…

After years of a nearly blank solar disk, we have a beautifully active Sun. Any time you have a chance to see the Sun through a telescope this year, do so. The view is replete with sunspots, or if you have a Hα filter, prominences and more…


First up? just setup the ‘scope in the driveway and take a few photos of the Sun. Just checking the photographic setup, the necessary parts and pieces. Nothing misplaced? Where did I store the solar filter? A nice focus on the camera? Perhaps take some nice photos of the large sunspots that current grace the surface of the Sun while I am set up. I hope we have some nice spots during the transit, they make focusing so much easier!
Next step is to get autoguiding operational, this will be a seven hour event and I really do not want to manually guide for the entire duration. Particularly with a telescope that was setup in the daytime and is not properly polar aligned.
A couple other steps remain in the preparation. Automate the camera to take photos at a regular interval. Insure I can provide a good video feed to the computer sending out the webcast. I do have a few more weeks to accomplish this. I am certain those weeks with speed by surprisingly quickly. Time to get ready!
This is your last chance this lifetime to witness a Venus transit! On June 5th the Earth, Venus and the Sun will line up correctly so that earthbound observers will see Venus cross the disk of the Sun.

To witness this event you only need to be on the daylight side of our planet when it occurs. The 2012 event favors the Pacific, Australia, Japan and eastern Asia.
For Hawai’i the event will begin at about 12:10pm with the Sun high in the sky, mid-point will be about 3:26pm and will end about 6:44pm, just before sunset. These times are only approximate, exact times will depend on the observer’s location and can vary by several minutes across the islands.
As always the single best source on the web (or anywhere) for eclipse and transit information is Fred Espenak’s eclipse website at NASA. Stop by whenever you have a question on upcoming events as well as viewing and photography tips.
Keck Observatory will be making an extra effort for this transit as Mauna Kea is perfectly positioned to observe the event. We will be webcasting the transit from a small telescope located at the summit. The webcast can be seen on your computer, or come over to our headquaters in Waimea to see the webcast and a live view in a solar telescope if the weather cooperates. there will be extra staff on hand to answer your questions.
Stay tuned to DarkerView for further details as the transit draws near.
1) Transit of Venus, Wikipedia Article, retrieved 8 Feb 2009
2) 2004 and 2012 Transits of Venus, Fred Espenak, NASA/GSFC, NASA Eclipse Website, retrieved 8 Feb 2009
The CME from yesterday’s solar flare struck at about 01:00HST, not as strongly as predicted. Right now there is a geomagnetic storm going on, but only at a moderate intensity, Kp=5. It takes something with a Kp>10 before aurora become a likelihood at low latitudes. Expect some nice photos from the folks up north as they get to enjoy the show.
The sunspot responsible for the flare, AR1429, is still there, pointed directly at our Earth. It harbors the energy for more X class flares, stay tuned!

At 00:28UT March 7th (14:28HST March 6th) our Sun let loose with a X5-class solar flare. This is the largest event in many years, and the impact will be felt here on Earth later today. We can expect a major geomagnetic storm when the mass of charged particles strikes the Earth’s magnetic field sometime around 0625UT (±7hr) on March 8th (2025HST March 7th).
Skywatchers at all latitudes have a chance of seeing aurora.
Yes, this means a chance of seeing aurora here in Hawai’i. I have seen aurora in southerly locations, including Tucson at 32° latitude. It is possible given a strong enough event. Fortunately the tropical storm we have experienced for the last few days appears to be clearing out. I will have to check the northern skies this evening.
The culprit is sunspot group AR1429, an enormous magnetic disturbance on the face of the Sun. An enormous amount of energy stored in the twisted magnetic fields of AR1429 was released when the fields ruptured. The result was a powerful solar flare. This event was recorded by several spacecraft at a number of wavelengths. The resulting imagery and movies are worth checking out.
For updated info on the event you can check in with dedicated solar monitoring websites like SpaceWeather or the NOAA Space Weather Prediction Center
Today the Earth is closest to the Sun, a point called perihelion. We will be about 147,098,290km (91,402,639miles) from the Sun. Compare this to the 152,098,232km (94,509,459miles) we will be at aphelion on July 4th, a difference of about 5,411,169km (3,362,344miles) occurs throughout one orbit.
It may seem odd that we are actually at the closest for the middle of northern winter, you just have to remember that proximity to the Sun is not the cause of the seasons. The seasons are caused by the axial tilt of the Earth, creating short and long days throughout the year, with a resulting change in the angle and intensity of the sunlight.
| 2012 Solstices and Equinoxes | ||||
|---|---|---|---|---|
| UT | HST | |||
| Perihelion | Jan 5 | 03:59UT | Jan 4 | 17:59HST |
| Spring Equinox | Mar 20 | 05:14UT | Mar 19 | 19:14HST |
| Summer Solstice | Jun 20 | 23:09UT | Jun 20 | 13:09HST |
| Apehelion | Jul 4 | 23:59UT | Jul 4 | 13:59HST |
| Fall Equinox | Sep 22 | 14:49UT | Sep 22 | 04:49HST |
| Winter Solstice | Dec 21 | 11:12UT | Dec 21 | 01:12HST |
| Source: USNO Data Services Website and the NASA Sky Calendar | ||||
As we approach solar maximum, large sunspot groups have again become a common sight. The last few years have seen an unusually quiet solar minimum, long stretches of time when not a single sunspot appeared. that has certainly changed, the Sun is now dotted with sunspots, with the occasional monster. At it’s peak, AR1339, seen above, was over 100,000km across. That is larger than 15 Earths, side by side. I mean monster!
The photo was taken with the Canon 60D, a 0.8x TeleVue adaptor, a C-11 and a Thousand Oaks full aperture solar filter.