Taking star trails is one of the easiest forms of nighttime photography. it requires less equipment than full out astrophotography, only a camera that can take a long exposure and a tripod. In a pinch you can do without the tripod.
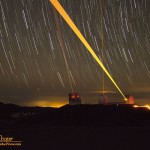
Three lasers in operation, Subaru, Keck 1 and Keck 2, 23 x 4min with a Canon 60DIn star trail photography a long exposure is used to reveal the scene. With illumination provided by starlight the needed exposure will be minutes long, during which time the rotation of the Earth will cause the stars to trail. Each star will trace a short streak on the camera detector as it moves through the field of view.
For a number of reasons taking one very long exposure is a problem with digital cameras. Without getting into a technical discussion of noise, dark current and hot pixels we will simply advise taking short exposures. You can always try a twenty minute or half hour exposure and see for yourself. Thus the technique is to take a series of short exposures, usually one to five minutes long, and add these together in processing. By taking a series of short exposures, the final exposure length is limited only by the camera battery or the arrival of dawn.
If the camera is sensitive enough, and you have a fast lens, you might try starscape photography, where the stars are not trailed by the motion of the Earth. In contrast, star trail photography can be done by almost any camera that can take a long exposure. The difference is in the length of the exposures, long versus short, star trail or starscape.
The flowing stream. An easy and fun shot that should be in any photographers skill set. Not only a pretty shot that captures the feel of a flowing stream, but a shot that teaches a little basic photography in the taking.
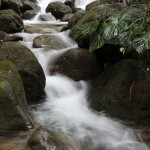
A stream tumbles through boulders on the Hamakua CoastThis shot was taken at the Hawai’i Tropical Botanical Gardens at Onomea Bay north of Hilo. Several typical rainforest streams tumble through the gardens flowing to the cove below. This is a shot that can be taken thousands of places on this rainy coastline, there are hundreds of streams and waterfalls to choose from. This one happens to have a little bridge to keep your feet and tripod dry.
While I was taking this shot another couple was taking the same photo beside me on the bridge. They wondered what I did to get the shot they saw on my screen. I offered them a turn on my tripod for a moment and talked them through the steps needed to create the flowing stream look. The Canon Rebel T5i they were using was perfectly capable of achieving the same effect. A minute later they had succeeded, happy with a very pretty photo. I suspect they learned a little in the process.
Starscape photography is becoming increasingly popular. Dramatic photographs of a starry sky over a scenic landscape. Properly done the results can be truly impressive. The photo is a beautiful landscape with a glorious display of bright stars overhead. For those who have long enjoyed the night such a photo captures a sense of being there, of standing beneath those brilliant stars. This is starscape photography, a relatively new type of photography made possible by improved photographic technology.
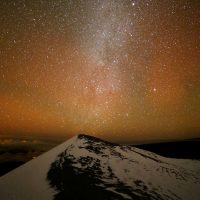
The winter Milky Way over the summit of Mauna Kea, Canon 6D and Samyang 14mm f/2.8 lens, 30s at ISO 6400
We will define starscape photography as shooting traditional landscape photographs with only starlight and skyglow for illumination. The exposure is fast enough to keep the stars from trailing. The result is a recording of what the scene would look like to a person standing under a starry sky.
There are a lot of caves on this island. Much of the island of Hawaiʻi is riddled with lava tubes. Hiking or riding the trails or back roads of the island often offers a mysterious opening into darkness. Not that I explore too far, I am not a hard core spelunker. But I do often poke my head in to see what the cave has to offer.
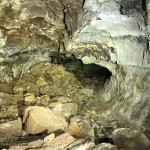
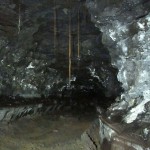
The interior of Goat House Lava Tube near Waikoloa, 15 second exposure painted with a flashlightOften when I reach a cave I am not carrying the necessary equipment to explore or photograph the cave. There are a few things I always have with me… A camera of course, I am rarely found without one. There is always a good flashlight in my pocket, a bright little LED light with a lithium battery. These two things are all one needs to get a photo of a cave.
Unless the cave is quite small the camera flash will provide unsatisfactory lighting of the cave. The flash will also tend to light up nearby parts of the cave and leave anything at any distance poorly lit. I generally do not use a flash in a cave unless I am photographing small features close at hand.
The technique is simple… Set the camera on a tripod, or a rock, and open the shutter for as long as the timer will allow, usually 15 or 30 seconds. During the exposure you paint the cave with light. Simply wave the light around in a random pattern, never letting the beam rest too long in a single place to evenly distribute the light. This simple method will allow even a large cave to be illuminated with a relatively modest light.
You will need to do this a few times and adjust your process to suit the situation. You can adjust the camera shutter timer or gain (ISO) to adjust the exposure. You can decide where to spend more or less time with the light if there are dark areas or hotspots in the image.
A classic Hawaiian lava tube, the downhill side of Kaumana cave, 15 second exposure painted with a flashlightThere are a couple tricks… The further away sections of the scene will require more light, spend more time illuminating the furthest sections of the scene. If the light is located too close to the camera there will be few shadows to provide depth and texture to the scene. during the exposure step to the side a little or keep the light close to the cave floor so the low rocks cast shadows.
Focus can be difficult. Set the camera for a smaller focal ratio, perhaps f/5.6 or f/8 to keep a good depth of field. Hold the flashlight on a feature well into the scene and focus on that. Some trial and error may be needed to get a good focus.
It can be fun too! When exploring the lower end of Thurston Lava Tube I was all set up with the camera and tripod when a group of kids arrived. Curious as to what I was doing I showed them. During the exposure I had the whole group wave their lights around as we all stood behind the camera. The kids were amazed when the photo appeared on the LCD display, they had no idea you could light up a cave and take a photo with a bunch of little flashlights.
Focus is one of the most frustrating problems when shooting in the dark. The number of astrophotos ruined by poor focus is legion. Worse, the problem is often not found until afterwards, when hours of effort have been wasted. Very slight errors in focus can spoil an otherwise great photo.
Taking photos in the dark creates a situation where the normal solutions do not work… Autofocus simply will not operate without enough light. Taking the lens off and attaching the camera to a telescope results in a completely manual focus. Simply focusing through the viewfinder is not accurate enough.
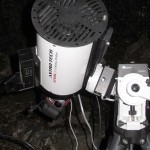
A Bahtinov focusing mask in use on the front of the AT6RC telescopeThe simplest method of focusing in the dark is to use the live view feature of the camera. By placing a bright star or distant streetlight in the view and magnifying you can achieve a reasonably good focus much of the time. This is not perfect, even the magnified image is a little mushy near ideal focus, making perfect focus difficult to judge. If you find yourself in an after-dark situation, without any special equipment along, this is the method to use.
Do remember to switch off the autofocus feature of your lens. Once you get focus set correctly you do not want to lose it the moment you touch the shutter button. Not that I have ever done that… Never? Well, perhaps maybe.