Some carpenter years ago thought that two nails would be enough to hold the stairs up. They did, for a decade or two, but they would eventually fail when the stringer began to split around the nails.
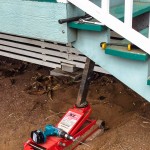
Jacking the front stairs back into place for repair.The stairs did not collapse, no one was hurt. On the other hand they had sunk about an inch and felt decidedly unstable underfoot. Another weekend project!
Remove the old nails to free everything up. Use the 3.5 ton floor jack to push the stairs back into place. An aluminum plate and wood glue to splice together the split stringer. Quite a few new bolts, not nails, to hold everything together. A bit of 3/8″ threaded rod on the other stringer to secure it to a joist. I think everything is secure, solid underfoot again. I just need a little paint to cover over the new work.
When powering up a nearly three decade old computer for the first time I should really have a video camera running…
The loud pop, and the stream of smoke issuing from the side vents was bad enough. It was the ominous orange glow seen for just a couple seconds from the same vent that really sent me the message…
Not good.
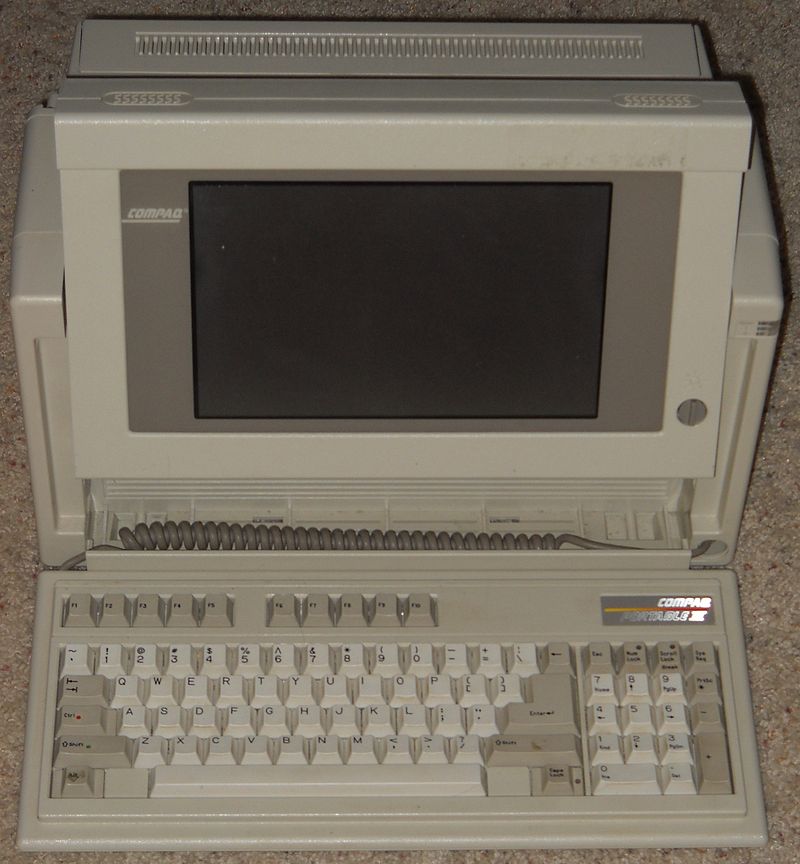
A Compaq Portable III personal computer, circa 1987, photo courtesy Wikimedia CommonsI yanked the power cord as quickly as I could, then just sat there for a moment considering the implications of disaster. A Compaq Portable III, a design first marketed in 1987. A computer that runs DOS, predating the first versions of windows. This is the computer that holds the software that operates the Keck II dome.
Without this machine it will be very difficult to program the old PLC the dome runs on. I do have a replacement for that PLC controller running in my office, but I face the challenge of verifying the design, I would like to run the old software in the test setup to compare it to the new. I would also like to have a backup in case something goes wrong during the transition, a way of putting the old PLC back into the system and programming it.
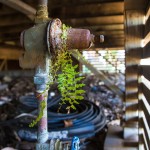
Raking leaves out from underneath the lanai I just happen to look up. The water line into the house is right there and can be seen through a opening I cut in the lattice to allow the main shutoff valve to be reached without crawling under the house. There are pretty little ferns growing on the water pressure regulator.
That is not good.A leaking household pressure regulator… Another weekend repair required.
The regulator is weeping, a steady dripping from the bottom of the assembly. A closer look shows that the valve body is badly corroded. This is not something I want to mess with until I have replacement parts on-hand. It is likely to come apart when disturbed, leaving the house without water.
Thus a mid-week trip to HPM is made. No matter, a lunchtime trip is an excuse to stop in Big Island Brewhaus and try some of the new menu items, the burgers are great! I note that the cherry trees are also beginning to bloom nicely, all good for the Cherry Blossom Festival next week.
A new regulator, a water pressure gauge, a handful of copper fittings. I have the rest of the needed tools on-hand already… Torch, propane, pipe cutter, flux, solder and pipe compound. I make sure I have everything before I shut off the water. I also warn my wife that the house will be without water for a few hours.
The old regulator is in bad shape, but not that bad. Failure was not imminent, maybe in a few months, but not tomorrow. It was leaking quite a bit, a steady drip. Water shut off at the street and at the supply to the solar water heating system I can open the lines. A little struggle ensues before the old fittings yield and the old regulator can be removed.
Of course the new regulator is smaller, I can not just thread it into place. This is what the copper fittings are for… I cut away the old threaded fittings and measure some new pieces of pipe. While I am cutting and fitting copper I add a new valve above the regulator, a convenient way to drain the household system and a place to attach a pressure gauge when adjusting the new regulator.
Yes, I raked out the pile of old leaves caught in the corner before lighting up the propane torch. No need to burn the house down to do a little plumbing repair.
All done I open the valves and return water pressure to the house. The gauge reads just below 50psi… good, just what the manual stated for the setting from the factory. This is not, of course, satisfactory for Deb, not enough pressure! Adjusting upwards to 60psi and my wife is happier.
The job cost a bit over $100 in parts. All good, and vastly cheaper than calling out a plumber for an easy job. Never mind that Hawaii law requires a licensed plumber to do such a job. Another weekend repair completed. What would I be doing else-wise? Probably painting or cleaning the garage.
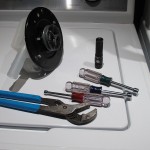
A broken pump in a washing machine… No problem.Appliance parts have always been an interesting game. In thankfully bygone days the various companies would restrict access to parts, selling only to licensed repair shops. Some parts were available from more enlightened companies, many were not. Still, there are companies I will not buy appliances from, no parts, no deal.
The problem… A washing machine that will not spin, making a horrible racket instead. The pump bearing was shot, shutting down the whole drive system.
These days the parts game has been broken open by website based suppliers that will sell just about anything. Parts are still an interesting game, if not nearly as bad as before. Making sure you get decent parts from a website supplier. A bit of online research shows who has been around for a while and is recognized by the major online services. I bought the parts from AppliancePartsPros.com. Nice website, complete mechanical diagrams of the washer with cross indexed part numbers, no fuss, no muss. Real Whirlpool parts show up in the box.
Consider that the cost of getting an appliance repairman here in Waikoloa is hundreds of dollars. And that is just for the visit, the parts would have been additional. My total cost for this repair? $80.45 after I added a new belt and shipping to Hawaiʻi.
It did take five days for the part to show up, FedEx home delivery. Fortunately we had enough clean clothes to get by without a trip to the laundromat. Meanwhile the machine was shoved back into the puka on its front and a sheet of cardboard, feet stuck out past the door, a pile of tools on the back. The cats though this was quite interesting and investigated thoroughly.
The most difficult part of the job? Disassembly? Diagnosis? Those were quite easy, it took about 15 minutes to get the washer out of its home, turned over and find the problem. The most onerous part was cleaning up the pile of lint, dust and cat-hair found behind that machine when I pulled it out of the closet.
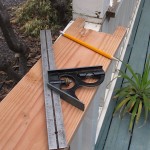
I really have been putting off the repairs too long. There are several boards that have had dry rot set in. One deck board is right next to the usual route of travel, much more rot and it will become a safety hazard.
Replacing a section of railing cap that has been destroyed by dry rot.The lanai is all exposed woodwork, protected only by paint. Paint that is beginning to fail. The first step will be to replace or repair several bits of woodwork that really need attention. That process is now started.
After the repairs a full coat of paint is in order. That is going to be a major job. the latticework of the shaded area will require power-washing. Repainting all of those detailed bits will also require a lot of work. I do have an air compressor, perhaps a spray rig is the right way to go.
I have a quart of exterior white paint to try out. The first item painted will be the first replaced board. I need to see how the paint looks beside the older trim paint used around the entire house. I long ago learned just how many variations of white exist in paint.
It will be a lengthy chore to complete the entire lanai. It is something I can do in stages, a few hours here, a few hours there, it will get done.
No good fish tale is without peril, and this is a good tale. We were retrieving our crab pots across the channel from Ketchikan. There was a gale bearing down with those terrible words coming from the Coast Guard on marine radio “Small Craft Advisory, repeat Small Craft Advisory”.
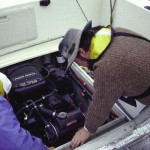
Repairing an alternator belt on the Amber DawnNo problem. Just get our pots and scoot back to harbor. A couple of hours tops! It is a beautiful Ketchikan day in advance of the storm. Beautiful for Ketchikan, which as any local knows means pouring rain. It had been pouring all week, more rain than I had seen in a long time. The rain had not stopped the fishing and we had done quite well. It had been a trouble free fishing trip, ’til now.
This is when our alternator belt broke.
We were in trouble.
Well, maybe not that much trouble. We were in a nice safe anchorage and the worst probable fate was that we would be anchored ten miles from civilization eating crab for two days… In the rain.
Dan, as always was prepared for anything and had spare belts on board. With a little digging under the seats and other odd compartments we locate the tools and spares needed. An hour of breaking knuckles on pulleys should have us heading home. Of course the Amber Dawn’s engine is just under a cover in the middle of the open rear deck. We just have to do this job… In the rain.
A kludged alternator allowing a belt of the wrong size to workNot quite so easy… Of course the belt that broke is the rear-most of the three, so two others must come off, to get at those the heat exchanger must be lifted out of the way. We get the new belt in place and tighten it up… and find it is the wrong size belt, too long by a couple inches. Again we are left floating… In the rain.
A little yankee ingenuity was needed, this consists of about twenty minutes of four men chewing ideas and telling each other what won’t work. Eventually I have an idea that does not get an immediate negative from the assembled wisdom. We look at each other… “That might work”.
The parts to make it work are found; a bolt, a nut, and a three-eights open end wrench. A bracket is fashioned, using the wrench as a spacer to hold the alternator away from its mount. Start the engine… The belt holds, the alternator turns and we are under way home… In the rain.
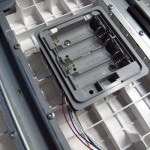
In an age of cost cutting on products to compete in a very competitive market place, some producers seem to go too far. Reducing the quality of the product to the very edge in order to shave a few pennies. One consequence of this has been more battery leaks, with Duracell being by far the worst offender. Seriously, why does anyone still buy Duracell products! This time it was a friend who brought me the latest corrosive disaster, a Wii Balance Board with a mess in the battery compartment.
The battery compartment of a Wii Balance Board after the repairAt least the balance board was easy to get apart, just a mess of screws on the back to remove, a few minutes with a phillips screwdriver. First remove the feet with three screws each, then the backplate with another ten screws. The unit is essentially a fancy bathroom scale with load cells in each foot. Rather nicely made, the engineers did a good job here.
Opening the case reveals the good news and the bad news. Good… The battery compartment is removable with just another couple screws. Bad… The damage here is severe, the small circuit board under the battery compartment is heavily corroded, traces and components destroyed. Good… The complex circuits for the unit, the processor and transmitter, are on another circuit board on the other side of the balance board and are untouched. Bad… The battery contact plating is gone, these are unusable. Even the wiring harness is damaged.
There are some devices that folks still try to repair if possible, camera gear seems to be at the top of the list. I suppose this should not be a surprise, the gear is expensive, and seems to get damaged from hard use. Particularly on this island, where cameras see a wide range of harsh conditions, from tropical heat to salt water.
A month back I repaired a Pentax waterproof camera for a co-worker. Salt water had penetrated around the shutter button and corroded the switch. The camera, rated to 10m (30ft), had probably experienced pressures even higher. Her teenage boys can easily exceed that depth while free diving the island reefs. It was necessary to completely disassemble the camera to get at the button. Well over an hour of tiny screws and gaskets to replace a $1.35 switch.
There have been other items this year… A classic chrome stand microphone that required a little rewiring to work with a modern computer. A pair of very nice computer monitors now found on my desk. A toy RC aircraft with broken motor leads. I do appear to have gained a reputation for fixing this stuff.
Last week it was an underwater video camera case brought to me. None of the external controls were working, no way to hit record once in the water. The repair turned out to be fairly simple, a broken conductor in the LANC cable used to control the camera. A bit of scrounging around in my spare parts to build a replacement cable was all that was required to put everything right. Most repairs are that sort of simple, just the effects of wear and tear taking their toll.
After the repair J sent me a link to his YouTube channel and I spent a lunch watching video. Well edited, nicely crafted videos of the local paddling sport community. Canoe races and special events covered with a personal touch, with respect for the people and traditions. I was very happy to see I had done a bit to help someone who was producing such excellent material.
The repairs serve me as well. Each time I take apart an unfamiliar device I learn, I refresh my skills, I experience the simple joy of using those skills. Each device is a challenge, to successfully disassemble the gear, find the fault, and put it all back together properly. On occasion I fail in that challenge, either I do not have the skill, or the repair is impractical, or the device too badly damaged. There is often little real risk, if it is broken the attempt to save something useful from the trash is an easy choice, the only thing lost is the effort. The reward is seeing the gear returned to useful service and knowing you prevented that little bit of waste.
The Telrad finder is one of the most useful telescope accessories ever invented. A set of glowing red rings showing you, at a glance, exactly where your telescope is pointed in the sky. I have one on each of my telescopes. The Mauna Kea VIS also equips each telescope with one of these simple devices.
They do not work so well after hitting the ground a few times.
As I have mentioned in the past, the equipment at the Mauna Kea VIS gets used hard. It is setup every single night of the year. Thousands upon thousands of people use these telescopes to see the wonders of the night sky, the first time for many. The wear and accidental damage in the darkness takes a toll.
A box full of broken Telrad finders awaiting repairWhen Deb and I were last at the VIS we spent the day cleaning eyepieces and making other repairs to the ‘scopes. One of the things I found in the storeroom was a small pile of broken Telrads. Some were missing windows, many had broken battery holders, mirrors were missing and reticle holders hanging loose. Many had been patched back together with tape or hot glue, attempts to keep them working for another night.
Quite a few had reticles that were missing or melted by exposure to sunlight. The lens that focuses the reticle’s ring pattern, projecting it into the sky, will also focus sunlight on the reticle, quickly melting the thin film if a Telrad is left in the sun.
Gathering up partial and scattered parts I collected a box of finders that I can work on later. It made quite a pathetic sight, a box of broken Telrads. A couple evenings later, five of the Telrads are now rebuilt and ready to return to duty. Four more are awaiting replacement reticles before I can call them completed. I will take them back up next time we are on the mountain, but I expect we will find something else that needs to be fixed.
At the Mauna Kea Visitor Information Station telescopes are available every clear night for the public to enjoy the wonders of the night sky. Every evening a set of telescopes ranging from 102mm to 16 inches is setup in the patio beside the VIS. The gear is used heavily, every night of the year, the wear on the telescopes does exact a toll. The abuse is constant, kids hanging on the eyepiece, volunteer operators who have never used a telescope, rain, fog, blowing cinder dust. Conditions that were never foreseen by the designers and far beyond what most telescopes encounter. Sometimes the condition of the equipment is embarrassing, dirty eyepieces, groaning mounts that refuse to track, much of the gear just looks worn and tired.
An 8" telescope mirror covered with a ridiculous amount of dustIt is hard for me to see this, but at least I can do something about it, I do, after all, fix telescopes for a living. It is not unusual for me to spend an evening repairing a telescope and I have made a point of getting some more extensive maintenance accomplished.
My first effort last year was to clean and repair the small dobsonians used by visitors every night. Two eight inch, a six and a 4.5″ Orion dob are put out for anyone to use, from adults to children. After years of use they were in horrible shape, bearings and focusers were coming apart, collimation gone, moisture dissolving the woodwork, a finder attached with duct tape, the mirrors so covered with dust it is surprising there was much of an image to see. One of the eight inch scopes and the 4.5 inch were in pieces in the warehouse after a fix attempt by another volunteer. It took a few days of work to put all to right. Stealing parts from an older scope, repairing what could be saved, cleaning and pounding out a couple dents. Clean, re-install and re-collimate the optics. Four dobs back in service and in better shape than they had been in quite some time.
Parts of a Losmandy G-11 telescope mount spread across a table topThe 16″ Meade LX200 should be the flagship of the equipment used at the VIS. But for all too long it refused to work properly, it would not track. A trip back to the manufacturer failed to correct the problem, despite nearly a thousand dollars in shipping fees for factory service the telescope still would not work most of the time. Most volunteers would not use it, having given up in frustration. Surprisingly the issue was obvious, just listening to the scope indicated gears not fully meshed and grinding on one another. An hour’s worth of dismounting the scope, opening the bottom panel and re-seating a motor mount had the telescope back on sky and slewing from target to target. The scope has failed since, but the problem was even simpler, a loose connection found after a half hour of poking around.
Currently, one of the three Losmandy G-11 mounts belonging to the VIS is in my garage, spread across the table in many parts. I spent a few hours yesterday dismantling the mount and cleaning the grease and cinder dust out of the bearings. It is in pretty good shape, a good cleaning, re-seat the worm gears and some new clutch pads and it will be ready for a few more years of service. I need to get some more grease before I can reassemble the mount, but otherwise everything is ready to put back together. Finish this one and there are two more like it in sore need of maintenance.
One thing at a time, of course by the time I get through it all it will be necessary to start over again…