The SBIG ST-i is a useful little camera, I have enjoyed using mine. I usually use the camera for autoguiding, but it can also be used for basic astrophotography and even some science. In preparation for using the ST-i with a group of students I had need to make a couple additional mounts. After I go to the effort of designing a simple solution to my problem I may as well share the solution.
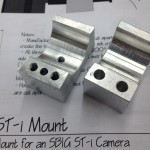
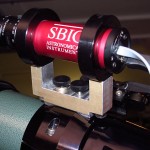
A simple mount for an SBIG STi camera for use in a piggyback setupThe ST-i camera is designed to slip into a standard telescope focuser in place of an eyepiece, as it is the same diameter at 1.25″. The camera can also be used in a “piggyback” style, mounted atop a telescope and fitted with a standard c-mount lens. Using a lens the camera will have a much larger field of view. The front of the camera is threaded for c-type 1″ threads to accomodate this. The SBIG guiding kit provides such a lens and a ring style mount. If you do not have the kit, or already have a suitable c-mount lens you still need a suitable mount.
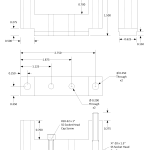
I have included the mechanical drawing for the mount in the link above. I machined this from a block of aluminum. There is no reason it could not be made of wood or plastic to allow fabrication with whatever equipment is available. For wood you may need to make the block a little longer and use inserts for the threading. Plastic could be done pretty much as drawn.
The version I made was milled from a solid chunk of aluminum, but a good version could be easily cut from wood and assembled with brass inserts. The design could also be 3D printed without much loss in mechanical robustness.
To mount a c-mount lens you will need the adapter ring sold by SBIG to convert the 1.25″ filter thread found on the camera to the 1″ c-mount thread. Still, at $40 this ring is a lot less than the $350 guiding kit. Good c-mount lenses can be found from many sources for less than $100. You will need a focal length between 75 and 150mm for a nice image scale and as wide an f/ratio as you can find. The kit includes a 100mm f/2.8 lens which I find is quite useful in guiding my Televue 76mm or the AT6RC.
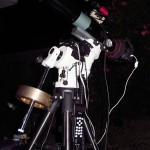
A small, light telescope mount, a small refractor, and a modern autoguider. Seems like a perfect setup! There are a few issues…
The setup is pretty straightforward. A TeleVue 76mm riding atop the iOptron ZEQ25 mount. Atop the TV-76 is a red dot finder and an SBIG STi autoguider. The guider is attached with a bit of custom machining and uses the SBIG accessory kit, including a 100mm lens giving a 2.7 x 2.0 degree field of view. With such a wide field of view the guider also functions as a finder to aid in aligning and framing the photographic telescope.
The iOptron ZEQ25 set up for astrophotography with a TeleVue-76 and Canon 60DThe arrangement is controlled by a laptop, either an older 17″ laptop, finding a second life in the astrophoto rig. Or for a more portable, and less power hungry setup, a small netbook can be used. It may be desirable to set up the iPad for telescope control, removing this function from the laptop. If it were not for guiding the computer could be dispensed with completely. The SBIG STi requires a computer to operate.
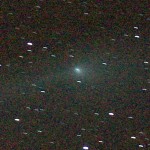
Without guiding the performance is not satisfactory. Even with a modest focal length of 380mm there are objectionable guiding errors. The frame at right shows the errors seen during a four minute exposure. Based on my first impressions I would expect to need guiding on any exposure using more than 100mm and a few minutes exposure.
Comet C/2011 L4 PanStarrs, TV-76mm and ZEQ25 mount with no guiding during a 4 minute exposureEverything connects fairly easily, a few more cables than I would like, but it is still marginally portable and not a huge chore to assemble. The challenge now is to verify the setup, configure all of the software, and to take a few photos to prove to myself that it all works properly.
A few steps here have not gone smoothly..
Configuration? There are a lot of setups to check. All of the correct software and drivers… Planetarium software, autoguiding software, camera control, ASCOM, all of the hardware drivers, etc., etc. After everything talks it is a matter of checking settings and tuning the setup with several parameters in the software and on the mount that need to be checked.
I am using PHD to do the guiding, a bit of kit I have used for a while. It works quite well with straightforward controls. It does have quite a few parameters that require checking to tune the control algorithms.
The iOptron controller has a setting for guiding speed in the menus. This is purported to be a fraction of sidereal speed by the manual, up to 100%, but the menu reads as if it is 100x on the controller. I suspect the manual is correct here, will need to test.
The first issue cropped up fairly quickly. I could get no motion from the mount while sending corrections with the STi. PHD was unable to calibrate, no motion. I attempted to use the manual controls in PHD with similar lack of motion. (See update below)
To troubleshoot I needed to make sure that the guide port on the ‘scope worked. I grabbed a Losmandy hand controller and connected it to the ZEQ25 guide port. This worked, the port was working properly and I could see what the guide speed setting on the controller really meant. It looks like 100x is 100% of siderial speed, or close enough.
A copy of Gene Nolan’s USB to ST-4 guiding adapterI have another device I could try, a USB to ST4 adapter designed by Gene Nolan. This is also supported by PHD Guide and ASCOM driver framework is always installed on my imaging computer. After some issues with finding the correct cable setup the USB to ST4 adapter worked just fine.
Parameter
Value
RA Aggressiveness
100
RA Hysteresis
10
Max RA Duration
750ms
Search Region
15pix
Min Motion
0.1pix
Calibration Step
2000ms
Time Lapse
0ms
Dec Guide Mode
Auto
Dec Algorithm
Resist
Dec Slope Weight
5
Max Dec Duration
750ms
Star Mass Tolerance
0.5
Noise Reduction
None
PHD Guiding Paramters for STi w/100mm lens and iOptron ZEQ25
At this point I can calibrate and guide with good results. I am out of USB ports on the laptop, and had to unplug the mouse, but at least it is working.
Some tuning of the parameters in PHD has started to result in very nice guiding graphs and some excellent test images. These could probably be refined a bit more, but they are working for now. The PHD help menu has a fairly good description of each of the parameters, there is also a great guide to PHD on the Rose City Astronomers website.
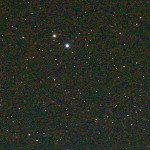
Guiding Test: 240sec with a TV-76 and 60D on a ZEQ25 mountA 100% crop of an image is included at the left, nothing exciting, just a section of starfield near Vega. What is nice about the images is the perfectly round stars. The image was taken at 384mm effective focal length. Will need to do this again with the AT6RC at 1096mm for a more stringent test.
It is really necessary to set the autoguide rate to 100% when using shorter focal lengths. Otherwise the mount does not move very far during each calibration step, as a result calibrations take a very long time and will sometimes fail.
Another observation. When guiding near the pole, shooting comet PanSTARRS at near +80° declination, I encountered very regular declination errors using PHD. Every couple minutes the dec error would deviate by about a pixel, alternating in each direction. Shutting off the declination correction worked pretty well, the mount was polar aligned accurately enough that there was very little declination drift.
I still have yet to understand just why the STi will not directly interface with the ZEQ25, something in the ratings of the photo-isolators used in the STi? The manual simply states these are good to 25mA and 25V, which seems generous for the task. It may be in the voltage levels, I did discover that the iOptron uses 3.3V on the guide port. Perhaps the STi will not pull down low enough for a valid low logic level? I built the USB to ST-4 adapter with MOSFET optocouplers, these can switch harder than standard photo transistors.
UPDATE– The interface issue was just a cabling problem. The same cable I use with my Losmandy G11 does not work, it is flipped from the pinout needed for the ZEQ25. With a corrected cable I now connect the STi directly to the guide port on the ZEQ… It works.
A rigid mount to adapt the TeleVue-76 to the SBIG STi autoguider? I need such a solution, I have both of these bits of kit that need to be wed together for the minimal astrophoto setup. As I am unlikely to find such a part commercially, I would have to make it myself.
Another couple hours in the machine shop were in order, another small pile of aluminum chips. This actually went pretty quickly, these are easy cuts to make. No tapping is required, the four holes are simply drilled through. The two hours included design and cleanup for a quick project.
The SBIG STi to TelevVue TV-76 mountMechanical drawing for a mount to attach an SBIG STi autoguider to a TeleVue refractorI came up with the design on the fly. A piece of aluminum from the scrap bin and a couple quick measurements of the ‘scope and guider. I simply cut aluminum until it seemed about right. It was only after the fact that I produced a drawing of the finished item.
The TV-76 has a rather non-standard mounting point on top for accessories like this. A pair of #10-32 threaded holes, 0.75″ apart and located in a slot 0.625″ wide milled into the mounting ring. This seems simple enough. An adapter made for the TV-76 should work with any of the TeleVue refractors that use this mounting. Another concern is that the solution must also be very rigid, any flexure between the autoguider and the telescope will result in smeared stars.
The design assumes that you have the additional guiding kit sold by SBIG for the STi autoguider. This provides the mounting rings that clamp the camera body.
The hardware required will be two ¼-20 x 1½” socket head cap screws, and two #10-32 x 1″ socket head cap screws. A pair of plastic press on caps convert the #10 screws to knobs. All parts you can find in a neighborhood hardware store.
The mount is 1.5″ high to set the autoguider away from the main OTA, as to not encounter any vignetting. This also allows space to get fingers onto the mounting knobs. The dimensions are chosen so that standard screws protrude by just the right amount. I messed this up on the one I made, machining the center to far. As a result a few washers are needed for the screws that mate with the refractor. This is fixed in the mechanical drawing.
To co-boresight the TV-76 with the autoguider it was necessary to slip a 1/4″ washer between the mount and the rear ring as a shim. With that in place the same object is centered in both fields of view. The STi has a 2.7° x 2.2° field when used with the 100mm lens supplied in the SBIG accessory kit. With this wide field of view it also serves as a finder to locate and frame the photographic target.
It assembles nicely, a good start. The true test will be the quality of the images produced by the rig.
A box in shipping and receiving with my name on it. A much awaited box. The new SBIG ST-i autoguider!
For those who are uninitiated into the mysteries of astrophotography, an autoguider is the secret to taking hours of exposures without having the manually correct the telescope position constantly. For almost two centuries, from the first time a camera was attached to a telescope, through the invention of auto-guiders, guiding was a supremely tedious task. The photographer would spend hours on end, peering through an eyepiece watching a single star, if the position of the star started to drift, he would press a button to correct the position of the telescope during the exposure. This was necessary to achieve any sort of long exposure, as the telescope, no matter how precisely made, would drift a little during the night, leaving streaks in place of pinpoint stars.
I have done this, it is no fun at all.
Then came the autoguider. A small digital camera that could take a picture of the star, then check the image for drift in the star’s position and, if necessary, send a command to the telescope to correct the position automatically. The first commercially available autoguider appeared in 1989, the Santa Barbara Instrument Group model ST-4. This little device revolutionized astrophotography, allowing far longer exposures with much less effort and much better precision.
The SBIG ST-i with the optional accessory kit including mount and lensIt is an ST-4 I have been using to guide my photographs for over a decade. Any of the long exposure astrophotos seen here on DarkerView have used this venerable little device. I have had some issues with it as of late. Trouble acquiring stars, struggling with the cryptic displays to lock onto a star, the unit does require a great deal of experience and intuition to return good results. Modern autoguiders are so much easier to use with far better performance. I have been looking at the advertisements with envious eyes for some time now.
No more, I have broken down and purchased the new ST-i from SBIG.
The newest, latest and greatest, just released model.
Unpacking the box I am happy with what I see. Everything looks good.
It does seem like a small device for the $595, smaller than most of my eyepeices. Fit and finish looks good. A nice small package that will be easy to mount to any of my telescopes.
I setup the software and drivers on the laptop with no issues, simply following the provided instructions. The SBIG software for the camera , CCDOps ran first time, connecting to the camera and taking a frame. You can hear the soft click of the mechanical shutter in the camera. The bias frames look quite nice, a smooth field of salt and pepper noise with no gradients or other artifacts.
Attaching the lens from the accessory kit I take a few images of wood-grain on the kitchen cabinets across from the table I am working at. Another task will be to properly evaluate the imaging performance of the camera. It does have a decent CCD in it, the specifications indicate a proper 16-bit A/D system. A real photon transfer test will reveal if that system lives up to the specifications. A subject for another post!
An improper fit of a button head screw into the mounting plate on the SBIG ST-i accesory kitI did find one problem. Someone in engineering or purchasing screwed up when setting up the accessory kit. The screws meant to secure the rings to the mounting plate do not fit into the provided recessed holes. The head is notable larger than the machined recess. This leaves the head of the screw above the surface preventing proper mounting of the whole assembly.
A proper fit after modification on the SBIG-ST-i mounting kitNot to be deterred in setting up the camera I quickly set about a solution… I clamped the screw into the chuck of my cordless drill and removed the outer edge of the head with a file. A minute or two per screw reduced the head diameter enough to fit into the recesses. The remainder of the assembly went well. The mounting appears to be very solid, with little chance for flexure and the resulting image issues that can cause.
The package offers a nice solution, on paper at least. With the included 100mm lens the camera should provide a 165 x 123 arcminute field of view, or a 2.7 x 2.0 degree field of view. The literature promises sub-arcsecond guiding accuracy with this setup, with the ability to use 7th magnitude stars with one second exposures. These are claims that will have to be checked as well. I intend to do a proper job of verifying these numbers, I expect to get many years of service out of the guider. The new camera has quite an act to follow, replacing my classic ST-4!
I also hope to be able to guide on the Sun for the Transit of Venus. I will be trying the included software as well as Dave Solar System Recorder in the coming week. I wonder if either package will be able to guide on a large, non-stellar object like the Sun, perhaps with a shorter focal length lens.
This leaves only one real question… How well does it work? Unfortunately that will have to wait for another day. In true astronomical tradition, the receipt of new astro toys invariably occurs when the weather precludes their use. In other words… I have clouds!
A writeup of the operation of the new autoguider will be another post, when the skies provide me a chance to use it.