One of the first binders of slides I grabbed for digitizing happened to be a trip through Switzerland that I took in 1987 with my family.
I was living in England at the time with the USAF. My parents and brother joined me there. We then crossed the channel from Dover to Calais, changed trains in Paris, taking a high speed train to Lausanne. From there my brother and I bounced around with some Swiss bus and rail passes until we rejoined my parents in Zermatt.
It was a memorable trip, there is so much I can remember from thirty five years ago. Going through these old slides certainly brought back memories!
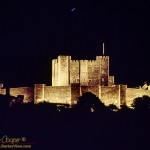
Dover Castle lit up at night
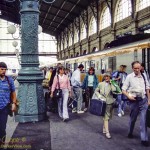
Arriving at the Paris Norde train station from Calais
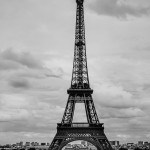
The Eiffel tower over central Paris
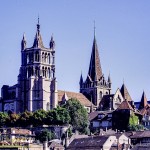
The Lausanne Catherdral looms above the city
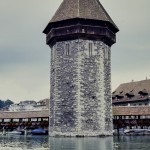
Chapel Bridge in Lucern
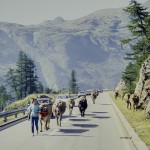
Herding cattle up a Swiss mountain highway
The Madonna del Sasso church above Locarno, Switzerland
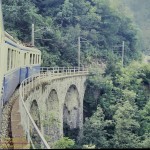
A train navigates a mountain railway on the way to Domodossola, Italy
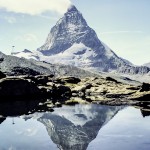
The Matterhorn as seen from near the top of the Gornergrat cable car
The problem is several thousand color slides stored in containers in a closet. These slides range in date from my earliest forays into photography as a teenager, through years of living in Europe on active duty with the US Air Force, to many years of traveling the desert southwest with a camera. I have carried a camera for my entire adult life, as a result there is a photographic treasure in my old photos.
Slide film awaiting digitizingEverything taken in the last thirteen years is digital, a record of my life and travels that is very precious to me. Before that the photos seem locked away and inaccessible, as if my life did not exist before 2002, when I bought my first digital camera. I have found my digital photo collection enormously useful, it is indexed, key-worded and instantly accessible. While locating a slide for use is a major effort, find the right box, the right binder, then I have to scan it for use in digital media. Or even remember that the photo exists!
The digital archive is also quite easy to duplicate for safekeeping. A two terabyte hard drive can hold the entire collection. A couple hours to copy and every image is safely stored, preferably at a remote location in case of disaster. There are several copies, one in my office at work, another at my parents house in Portland.
These arguments are obvious, the collection needs to be digitized, but the effort of scanning those slides is enormous. I really need a way to perform this task with a minimum of effort and cost. I have started this project several times over the years, only to be discouraged by the effort needed and quality issues.
Scanning
Many authoritative sources recommend scanning as the method of conversion and various scanners are recommended, usually the Nikon CoolScan or Plustek units.
Why do so many recommend scanning as the preferred method of digitizing slides? Certainly professional photo lab scanners are the best possible method, offering resolution far in excess of any scanner generally available at any reasonable cost. I suspect that one factor is decisive… Until the latest generations of digital cameras the resolutions of scanners were far higher than cameras could offer. the linear CCD’s used in scanners offered very high resolutions at a very affordable price point.
I have an uncle that does. He slides the saturation to eleven and publishes the results on his Facebook account. The results are… Interesting? But then it was this same uncle who is at least partly responsible for my getting started in photography when I was a teenager.
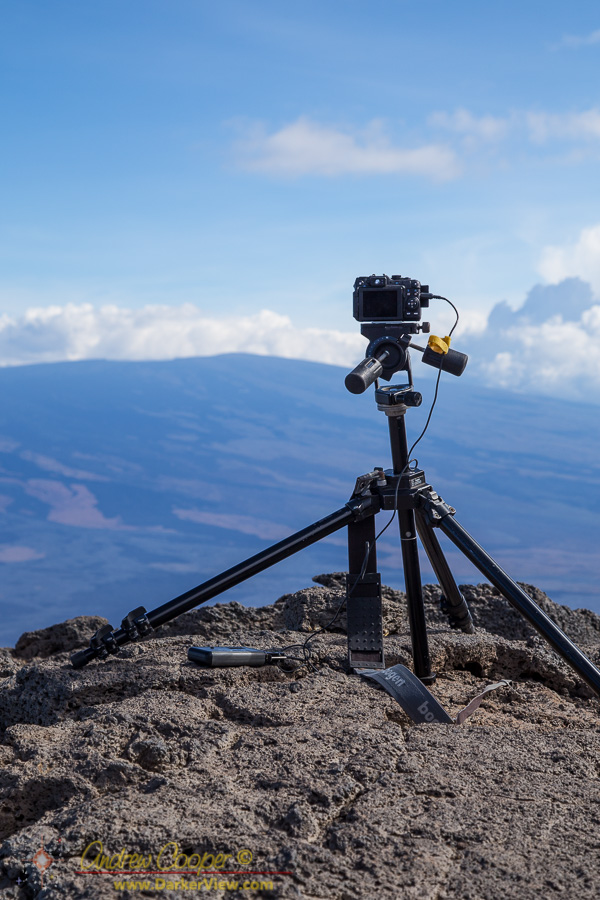
Occasionally I come up with the odd bit of happenstance. I was testing some photo processing Python code, a script intended to allow HDR processing of digitized slides. I needed a bunch of test frames so I just shot a bunch of bracketed sets at my desk and on the lanai a few feet away to create a whole directory of test material.
I did not intend any of these frames to be kept. HDR sets taken with a handheld camera? Nothing would align correctly!
A couple of them were… Interesting?
A test exposure that was interesting enough not to simply delete.
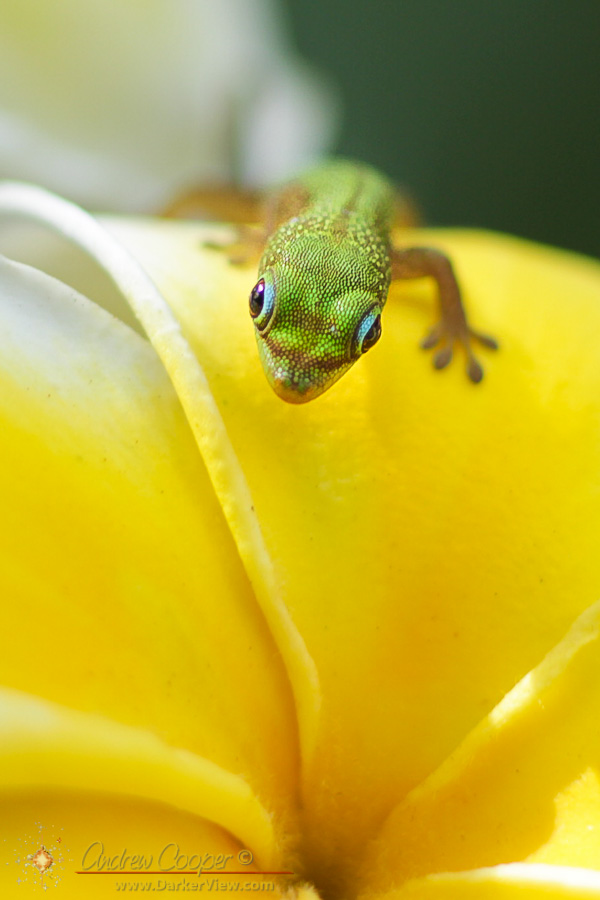
This little guy was not afraid of me in the least. Indeed he had no problem hopping on and off my fingers as I sought to pose him on the flower. It was a warm afternoon and he was quite active, more interested in the ants on the flowers than in sitting still for a portrait.
Shot with an old Canon 100 f/2.8 FD lens (manual focus) and a 25mm extension tube on the Canon EOS-M camera. I got the focus right by simply rocking back and forth through focus while rapidly taking images in servo. This was not with the focus ring, but simply leaning back and forward slowly.
A gold dust day gecko (Phelsuma laticauda) on a plumeria blossom
You never frame a photo properly when taken. This is a lesson I learned long ago… In the sometimes frantic process of shooting the photo, you rarely have a chance to frame the subject correctly. That moment when the whale surfaces, or the bear looks right at you, there is little time to adjust the photo for best impact, you just shoot.
The moon setting over the NASA Infrared Telescope Facility (IRTF), note how the imposing feeling is created by placing the telescope high in the imageThe lesson that you take from this, and hopefully apply when shooting, is to shoot a bit wide in order to allow yourself flexibility in the processing. Zoom out a little, knowing that you will crop away some of the image in processing. A wise photographer understands this, the hard lessons one learns along the way. It is much later when you sit at the computer and can truly look at the photo that you can evaluate how best to arrange the subject.
Rotation is also an issue, many photos are taken handheld, often hastily in the moment. These will have small errors in rotation. Do not even mention shots taken from a pitching boat! A modest crop of the photo will also allow correction on the image rotation.
The choice of crop is critical, it is the first step in my processing of the photo. Either the crop works, or move on to the next photo in the folder. Almost all photos can be improved by cropping in a little, to cut away the extraneous areas and to concentrate the viewer’s attention on the primary subject. Much of the time I will throw away 10-25% of the photo, not cropping a lot, just tightening up the composition.
Adobe LightRoom acknowledges this fact of photography, the crop and rotate tool is on top, first on the left of the processing tools. Crop it in, perhaps straighten the rotation, then you know if the photo is worth any further effort.
The art is in choosing the crop… How much to crop. How to position the major elements. This decision is an aesthetic choice of the photographer, and as with many such choices, there is no single best answer. There are some rules that can help. These are rules that can help, but are not ironclad, they can be broken if the composition calls for it.
A photographer needs a guide around Keck for the night? Setup time-lapse cameras throughout the facility? Sounds like fun… Sign me up.
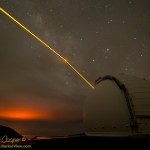
Two AO lasers aimed at the galactic center with a large red glow coming from KilaueaThus I meet local photographer Jason Chu at Keck in the afternoon and help him drag a mountain of camera gear into the summit facility. We loaded quite a pile onto the cart, eight full DSLR cameras and a stack of tripods. The plan is to set them up in the domes for the night then re-collect the cameras in the morning. Six cameras in the domes and a couple more to carry through the night.
Two lasers, both aimed at the galactic center were on the schedule for the second half of the night. Andrea Ghez and her team having time on both telescopes. The weather looked a bit problematic, thick cirrus covered the sky, but the forecast called for clearing after midnight.
Jason came with a carefully drafted plan, where to set and aim each camera, timer settings, lens choice, all carefully considered. A pretty good plan too, only a few details needed changing as we placed each camera. Four cameras in Keck 1, another two in Keck 2. One camera placement was my idea… Clamped to the Keck 1 dome where it would track with the telescope. I had spent a few minutes in the machine shop putting together a solid camera clamp.
Unfortunately the clouds did not clear as predicted, thin cirrus hanging on through the night. It was clear just to the west, but stubbornly would not give us the clear skies we needed overhead. Several times it looked to clear, but the clouds would thicken again. We did have both lasers on sky for a few minutes, just enough for a few photos and not long enough to do any science.
With high hopes for some dual laser time-lapse I was ready to set up my own camera, but ended up with only a few still photos. Jason got a few nice shots during that short time, having eight cameras helped make the most of those few minutes. I did get a nice video clip of the telescope shot by rotating the dome with a camera.
Jason is working on a personal project and will be out shooting more images in the dark. I will certainly feature the results of his effort here on DarkerView when he finishes. For myself? I will have to schedule another opportunity to go up and shoot some laser time-lapse. There is an intriguing night at the beginning of July on the schedule with both Keck lasers. I also need to mail Jason a camera remote, an accomplishment that only one bit of camera gear got left behind.
Once you descend below a few feet underwater photographs begin to be all greens and blue. The reason is that water absorbs the red light, leaving a very skewed color balance in the images. Thus bringing a light source with you becomes important to allow the underwater world to be seen in vivid color.
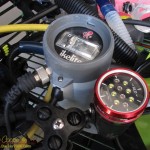
The Sola Photo 800 mounted beside the Ikelight strobeI routinely use a strobe on my camera, resulting in very nice still images. But the strobe is useless for video. Thus my interest in a light that can be used as a main dive light and as a video light underwater.
Enter the Sola Photo 800 by Light and Motion… The Sola offers a nice flood with an even field of illumination for video. Several of my dive buddies use Sola lights, Thus I have had a chance to check out the lights firsthand before putting down a few hundred dollars. I was particularly noting the build quality and the control setup, both are excellent. With dozens of dives on the lights they still work well. Perhaps I should consider one of these little units?
There are several models available, but it is the photo version I was looking at. The light provides 800 lumens of white in an evenly illuminated, large field. The photo version also offers a red mode for framing and focusing that purportedly does not change the behavior of the subject. Deep red light is not seen by many marine critters as there is little to no red light at depth to be seen.
A coincidence of decent sales on the Sola lights occurring on my birthday resulted in a package appearing on my lanai. I ordered light with both the hand grip mount and with a ball mount that will allow attachment to my camera rigs.