What to do when you get a check from selling some time-lapse footage? Go out and buy another camera, of course. Just a case of using hobby income to support the hobby. The curious coincidence of the check arrival and a very nice package deal at B&H Photo helped in the process.
Rasalhague mugging for the camera. Canon 6D and 50mm f/1.8 lensThe new camera is a Canon 6D, my first full-frame digital camera. I have been considering the purchase for quite a while, basically since the camera was first announced just over a year ago.
The real attraction to me is the low noise performance of the full frame sensor. This is critical when shooting in the dark for nightscapes and for astrophotography. The camera is currently one of the best on the market, beating out the more expensive Canon 5D MkII and MkIII’s. I am looking forward to what this camera can do when mounted to a telescope or paired with a fast lens in the dark.
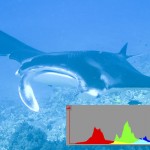
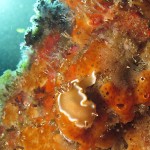
One of the major problems in underwater photography is the loss of color as you descend. The water filters out the red end of the spectrum, creating the blue world all divers are familiar with.
Visually this is a problem, divers are unable to appreciate the beautiful colors of marine life without using an artificial light source. Most divers carry lights, even on daytime dives, for this reason. It can be quite dramatic to turn on a light and watch brilliant reds and yellows appear where there was little color without the light.
A blue manta photographed at 40ft depth
Photographically it is even more challenging, a strobe can light up nearby objects, revealing the colors. For more expansive scenes even the most powerful strobes fail, resulting in photographs heavy in greens and blue, with very little red. For some photos, the blue works, a “true” representation of what was seen. Often the blue does not work, the resulting photograph is an unattractive blue tinged with green, that no amount of fiddling in Photoshop will salvage.
One method in dealing with the loss of color balance is to simply take the loss further, convert the image to a black and white photograph. This is a technique you will see used in underwater photography quite often. By removing the distraction of color, the viewer is able to focus on the subject. The same reason so many modern photographers eschew color, even in an age when wonderful saturated colors are easily reproduced.
What can you do with a little camera? A camera that is rugged and waterproof? A camera that shoots video, stills and timelapse?
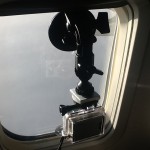
A GoPro set up with a window mount doing a timelapse of sunset as we cross the Pacific.That is the challenge of a GoPro.
It is a fun little camera. The video quality is decent as long as there is enough light. I have been using it for diving, I know that the case is good to well over 100 feet. The little camera is a good choice when the mantas show up to dance.
Why not take the camera fishing in Alaska?
For this trip I have set up to find out just what you can do with it. GoPro camera? Check. A variety of mounting methods? Check. My friend Mark has done some fun things with his GoPro lately, providing some inspiration and setting me a bit of a challenge. I may have taught Mark a few things about video editing to get him started, he has taken those lessons and run with them.
One of the intruging features is the WiFi back. This gives me remote control of the camera from my iPad. There is no viewfinder on the back of the camera, but with the WiFi setup my pad becomes the viewfinder allowing the camera setup to be checked.
The remote option also allows me to mount the camera on the boat somewhere and control it with the tablet. Hanging off the bow? On top of the mast? The little suction cup mount should stick to the boat just about anywhere. One of the provided adhesive mounts, designed for a helmet, looks to have just the right curve for the radar mast.
The front ring of the camera case has been replaced with an aluminum ring and a mounting point for a lanyard. A ten dollar EBay purchase that looked to be a wise idea. This should allow a strong safety tether and more freedom in placing the camera in otherwise risky locations. Need to buy some strong cord in Juneau.
What do I come up with? Anything worth watching? Stay tuned to DarkerView to find out…
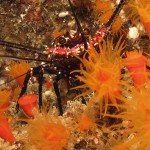
Ever take a photo you think is going to be great, to have it ruined by too much color?
A spiny lobster (Panulirus marginatus) among orange cup coral (Tubastraea coccinea) at 20′ depth, PuakōI turned the color down in the image, then turned it down again. Even working from the raw data was of little use, the colors in this image are just too much. Not that it is a bad photo, just that given the elements of a pretty lobster and brilliant cup coral, I had expected it to be a great photo.
Some of the best underwater images I have are full of subtle colors and textures. While a splash of bright color can make a photo, too much bold color can take it too far. Another lesson in learning the art.
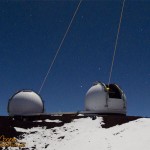
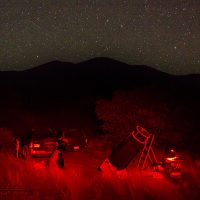
Beaches? Tropical gardens? The volcano? Yeah, BTDT, not what I came to Hawaiʻi for. Visiting Mauna Kea is at the top of the list for some folks who visit our island, a priority I can fully understand. Even better? Bring a camera to this spectacular mountain. After six years of working on Mauna Kea I still carry a camera and find new shots. Some of the most fascinating photographic opportunities occur after the Sun has set. For those who pursue shots in the dark, long exposure photography, the summit provides a setting that is worth the effort to shoot.
The Keck 1 Laser undergoing engineering tests, Subaru telescope in backgroundThe summit is open after dark, but not unconditionally, I need to stress some explanations concerning that. Officially the Mauna Kea Comprehensive Management Plan limits public recreational use to ½hour before dawn and ½hour after dark. This has not been strictly enforced any time in my experience on the mountain. There is no gate in use, you will see people drive up the summit road in the middle of the night.
So what are the real rules for summit access after dark?
It was another hike out to see the lava. Not that I really need an excuse to make this hike. This time it was to take a friend along. I have worked with Olivier for several years, between the two of us we do much of the physical maintenance on the Keck adaptive optics systems. Shortly he will be departing the island for another opportunity. Before he leaves he wanted to cross off one more item from his bucket list, seeing the lava close up.
The ocean entry at KupapaʻuUnlike last time we found the ocean entry was going strong, lava pouring into the sea very near where we saw nothing in December. There were multiple small entries spread along hundreds of yards of sea cliffs. On the west end of a shallow bay, we could get a decent look from promontories on the east end, upwind of the acrid plumes. Right below us was one particularly good font of lava, in reach of a modest telephoto lens.
It was still completely dark, the light of the full moon masked by the clouds. The waves were lit by the crimson glow, occasionally surging against the cliffs and hiding the lava from view. The glow also illuminated the billowing clouds of steam rising above each rivulet of lava. The scene is surreal, something that is both unexpected and somewhat difficult to believe. This is something that is outside our usual daily experience.
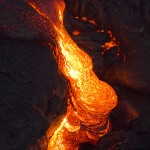
An active pāhoehoe breakout at KupapaʻuAfter spending some time at the ocean entry we searched inland for a breakout we could approach more closely. A slight glow to the north indicated a possible breakout, but I had no idea if it was close or miles away. With hope we headed for the glow and got lucky. It was only about a quarter mile to the breakouts. Several lobes of lava were advancing over the slightly older flows. Dropping our gear well back from the active lava cameras were deployed. This is what we came to see and photograph, lava as close as the heat would let us get.
Olivier hiking over the lava at KupapaʻuFor two hours we shot the breakouts. As usual, the flow would crust over, just to break out and advance again. The changing flow would provide ever different photo opportunities as the light of dawn slowly waxed. It was a cloudy day, small showers moving through, softening the dawn light and making the hot glow stand out all the more. The photos and video capture the scene, but do poor justice to the sound. The crackle of the cooling crust, raindrops hissing on the hot surface, low resounding cracks from deep in the rock under our feet.
With the day well begun we headed back to the ocean entry to shoot a few more frames in the early light. We sat on rock that was fairly warm under us, shooting the lava pouring into the waves. Relaxing a bit, digging a few bites to eat from the pack, we talked of cameras and lenses, of life on the island, a last bit of camaraderie with someone I might never meet again. We sat and just enjoyed this spectacle of raw nature. This was why we came, there is some risk in just being here, but the experience is worth it.
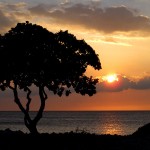
For your viewing pleasure, here are some of the best photos from Darker View assembled into a gallery. New Year is a time for reviewing the year past. I have enjoyed the last year, with the photos to prove it. I hope that 2013 brings you the chance to collect your own gallery of photos and memories.
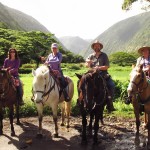
Karen, Darcy, myself and Deb horseback riding in Waipio Valley
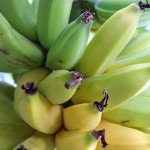
Apple bananas in our patch ready for harvest
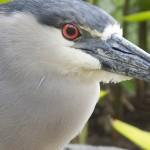
Black-crowned Night Heron (Nycticorax nycticorax)
A pāhoehoe breakout near Kupapa’u
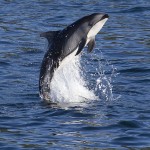
A Pacific white-sided dolphin (Lagenorhynchus obliquidens) leaps from the water near Seymour Narrows, British Columbia
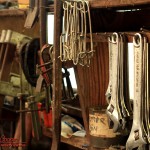
Tools and parts ready for use in the workshop at Lagoon Cove, British Columbia
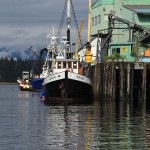
A fishing boat offloads fish at the packing plant in Petersburg, Alaska
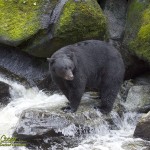
A black bear (Ursus americanus) fishing at the Anan Wildlife Observatory
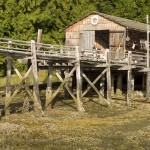
A workshop at Lagoon Cove, British Columbia
Visitors observe through the 40″ Nickel Telescope at Lick Observatory
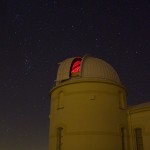
Stars above the 40″ Nickel Telescope at Lick Observatory
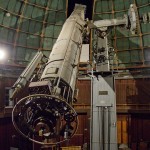
The 36″ refractor at Lick Observatory
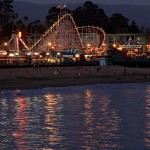
The roller coaster and rides along the boardwalk at Santa Cruz
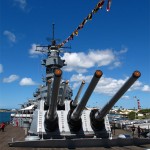
The 16″ guns of the Battleship Missouri in Pearl Harbor
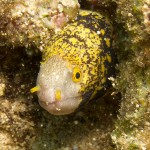
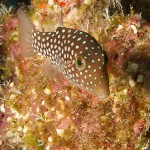
A Snowflake Moray (Echidna nebulosa) in the reef at Three Tables, Oahu
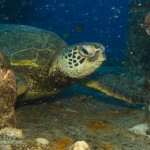
A green sea turtle (Chelonia mydas) rests on the stern of the YO-257
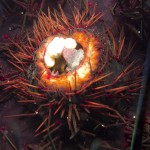
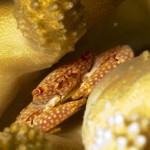
A female sea urchin crab (Echinoecus pentagonus) in the anal cavity of a large banded urchin (Echinothrix calamaris)
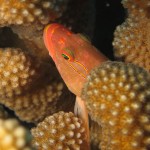
An Arceye Hawkfish (Paracirrhites arcatus) hides from the photographer deep in a coral head
Diver Mark Devenot cruising the reef at Hoover’s Towers north of Honokohau
Hawaiian Toby (Canthigaster jactator) under a coral head at O’oma
Keferstein’s Sea Cucumber (Polyplectana kefersteini) at 30ft, Puakō
Yellow-spotted Guard Crab (Trapezia flavopunctata) at O’oma
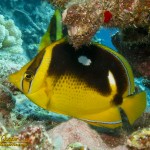
Fourspot Butterflyfish (Chaetodon quadrimaculatus) under a coral head at O’oma
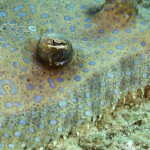
Flowery Flounder (Bothus mancus) on the reef at O’oma
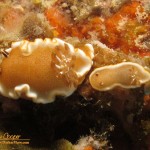
A pair of White-margin Nudibranch (Glossodoris rufomarginata), 25ft depth at O’oma
Blackside Hawkfish (Paracirrhites forsteri) at O’oma
Gold Lace Nudibranch (Halgerda terramtuentis) in a small cave at 25′ depth, Puakō
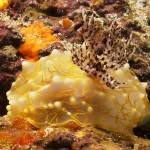
White-margin Nudibranch (Glossodoris rufomarginata) grazing on colorful sponges, 25ft depth at O’oma
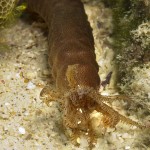
You never know what terrifying monsters of the deep lurk in these caves… Oh.. Hello dear.
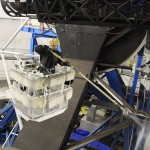
The Keck crew lowering OSIRIS into Keck 1 AO
The team moving a mirror segment from the telescope to the coating facility
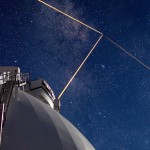
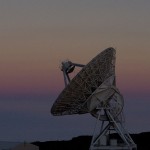
Three AO lasers aimed at the center of our Milky Way galaxy, the lasers are from both Keck 1 and Keck 2 as well as the Subaru telescope
George Wall snowing the Keck 1 Primary Mirror
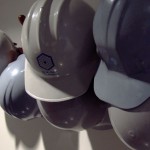
Hard hats ready for use just outside the Keck 1 dome
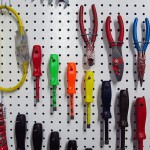
A set of tools ready for use on the Keck 1 nasmyth deck
Both the Keck 1 and Keck 2 lasers in operation under a nearly full Moon
It took 3 hours to fly to Juneau, it took 18 days to get back.
The video is done. Shot with a Canon 60D, a Canon G11 and an iPad, the video documents the voyage from Juneau to Anacortes I took last month. Bears, whales, dolphins, and a whole lot of water. It was a great trip, I can only hope I convey a little of the experience in the video.
Compressing 1,800+ photos and dozens of video clips to three minutes is an interesting exercise. This is compounded by the thousands of timelapse exposures that needed to be assembled. It went surprisingly quickly this time, a mere three evenings of work. (As long as you classify evening as getting to bed before 2am.) Either I am getting better with the tools, or I just got lucky when it came to fitting the thing together.
I have produced several videos about these voyages by boat through the wilds of the Pacific Northwest. How do you keep each video from looking just like the last? This time I changed it up stylistically, opting for a much more driving soundtrack coupled with the frenetic pace of timelapse.
The G11 clamped to a piece of construction gear to shoot a time lapse of sunrise atop Mauna KeaA few projects have been completed, but more are in work. I continue to accumulate material for new video projects.
Sometimes I specifically plan to shoot a scene. Other times I simply take advantage of what opportunities present as go about the usual business of life. Driving home the light and clouds catch my attention. I stop along the road, setting up the camera and shooting 20 minutes of time lapse. This will become ten seconds of video, clouds sweeping past the summit of Mauna Kea in late afternoon light.
I have located several more pieces of music appropriate for soundtracks. It is the music I start with, building the video around the soundtrack. With music in hand I can plan, visualizing the finished video, deciding what further scenes I need to go out and shoot.
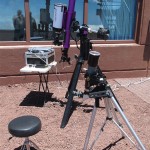
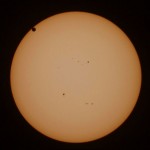
With the Transit of Venus looming on the calendar, a discussion of solar photography is in order. Taking good photos of the Sun is not that difficult, but can be aided with a little information. There are some unique challenges in solar photography.
A solar filter mounted on a refracting telescopeThe one obvious problem is dealing with the sheer intensity of the Sun. An intensity that can easily damage a camera if placed behind unfiltered optics. A proper solar filter is the easiest way to reduce the light to a safe level.
A solar filter will also produce the most pleasing images of the Sun. Indirect techniques like projection can be used. But for good solar photos, a proper filter in front of your optics is the single best method.
Solar filters for optics are constructed with a thin film of metal such as aluminum or stainless steel vacuum deposited on a substrate. This substrate is usually glass or a thin mylar film. The resulting filter allows only a small fraction of the light through, about 0.01% or 1/10,000 of the unfiltered value. Importantly, the filter blocks the ultraviolet and near infrared part of the spectrum as well. The result is a safe filter than can be used on a telescope or telephoto camera lens.
Sufficient magnification is needed if details of the Sun’s surface are to be well recorded. A few hundred millimeters focal length, found in common telephoto lenses will produce a reasonable solar image. The image will still be fairly small. To fill the sensor requires more. For an APS-C sized sensor (Canon T2i, 60D, 7D, Nikon D5000, D3200 or similar) a telescope with 1,000mm focal length will create an image filling a good portion of the image.
Image sizes for APC-C Sensors
Focal Length
Image Size (arcmin)
100mm
760×510
400mm
190×128
800mm
95×64
1000mm
76×51
1500mm
51×34
2000mm
38×25
The table to the left shows the resulting images sizes, in arc-minutes, given various focal length lenses, on an APC-C sized sensor. Recall that the Sun is about 30 arcminutes across as seen in our sky. With 100mm the resulting image is 510 arcminutes from top to bottom in the frame. This is 17 times the width of the solar image, a pretty small image indeed. With 400mm this improves to about 4, thus the Sun will reach about 1/4 the height of the image. At 1000mm this is about ideal, the Sun will reach more than halfway across the frame.
1500mm will just fit the solar image. While this may seem ideal, there is an issue. A small amount of drift will put part of the Sun out of the image, cutting off part of the disk. Sizing the image to fit in the frame with a good margin will allow some drift, while still giving a good image scale.
If you have a full frame camera (Canon 5DMkII, Nikon D800, etc.) a larger image can be used to fill the larger sensor, thus a longer focal length can be used. A telescope with 2000mm focal length will produce an image 17mm across, neatly fitting in the area of a full frame sensor.
Few compact cameras can boast a lens that will zoom far enough to produce an image of the Sun filling the frame. For these cameras another technique can be used, afocal photography. This can also produce good images, but will require experimentation to find the right combination of telescope, eyepiece and camera to produce a correctly sized image.
The full frame solar image with about 1000mm of focal length and a Canon 60DIf you want to calculate the image scale for your optical combination, lens and camera, I suggest downloading the CCD Calculator from New Astronomy Press. You can enter the optical parameters and see exactly what the resulting image will look like with a sample image of the Sun, Moon or other selected objects.
Another issue is resolution. Our atmosphere usually limits the practical resolution to about one or two arcseconds, blurring any finer detail through atmospheric distortion. This can be much worse in the daytime with solar heating of the ground and air around the telescope. Thus the limit for resolution will be reached with about 1000mm focal length and a modern 10-15 megapixel camera. Any further magnification beyond about 1000mm will simply result in magnifying the blur. There are techniques for overcoming this (image selection and stacking), but if you know how to do that, you already know what you are doing.
Just a bit of summing up… You need a proper solar filter or other method of safely reducing the solar intensity. A long telephoto (400mm or more) will produce a reasonable solar image. A small telescope with about 1000mm of focal length is ideal for photographing the entire disk of the Sun with a DSLR camera.