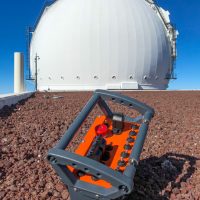
The Keck domes can be controlled three ways… From a set of manual controls on a panel at the base of the dome, via computer control when observing, and from a radio controller that you can use from anyplace in the dome. This radio controller has long been called Capt. Marvel around Keck, the original versions looked like a prop from a 1930’s sci-fi serial movie.
The dome radio controller, called Capt. MarvelThe radio controller is actually a crane controller, a standard unit you can buy that can safely control large machinery, including enormous factory or dockyard cranes. Being a standard unit it has a number of safety and security features built-in… Fail-safe operation, coded communications, and more insure reliable operation.
The unit is standard, the panel is custom. When buying the transmitter you need to specify the front panel layout including the switches and labels for your application. Thus our transmitter has a panel arranged to our specification with switches for dome rotation and opening the shutters. In the middle is a bright red-emergency stop switch to insure you can immediately stop everything if something goes wrong.
Another little problem around the house that can use a little creative circuitry to make it better. Do I really have to do it? No. I do it because I can, and because it is fun!
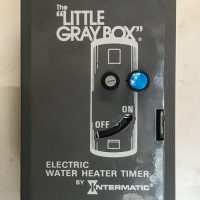
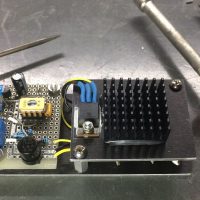
A hot water heater timer setup for a solar water heater.This time it is the electric back up heater for my solar hot water heater.
In Waikoloa solar hot water is an obvious addition to the house, we had it installed within a couple months of moving in. Considering electric power is about $0.40/kWh on the island, and tropical sunlight is quite intense, the use of solar to heat our water has been good money saving move… Long, hot showers with no guilt!
Once or twice a year we will get a period of heavy clouds and the water temperatures will fall to the point we need to turn on the electric back-up heating element in order to have that hot shower. Like most solar setups the storage tank has a electric element that will heat the water when needed.
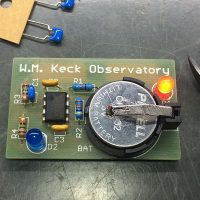
With the Keck Observatory open house approaching I am helping get one of the most popular activities ready. At the last two open houses we have made flasher pins, we will do so again this year.
A simple electronics project… The Flasher PinFlashers? These are a simple circuit built on a PCB that flashes a pair of LED’s. Nothing serious, just a bit of electronics fun. The activity allows folks to learn a little electronics and soldering.
The PCB is configured as a pin or badge, with a brooch pin soldered to the back that also serves as a switch to turn on the LED’s.
The original design came from John Maute at SAO. The circuit is based around the venerable LM555 timer IC configured as an astable multivibrator. The LM555 timing circuit is simple enough to solder together in a few minutes, complex enough to look cool and provide a real introduction to an electronic circuit.
In this ever complex world in which we live the rules are always changing, and usually getting more complex. A modern, information society has many rules that govern who owns what. Copy a photograph from the web and you are probably breaking the laws concerning copyrights. There is a complex and sometimes contradictory set of laws that governs all manner of ownership in this technological age.
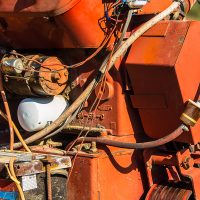
The engine on a hay baler offers a view of mechanical paraphernaliaDo you know the rules?
Buy a CD with your favorite tunes… Can you copy the tracks onto your phone? Can you create a video with the music and post it to YouTube? What about that expensive photo software package? Can you put it on your laptop and desktop? The rules are often complex, and often the answer is not clear cut.
Increasingly we do not actually own what we buy. At least that is what many corporations will tell us.
You would think that the answer is easier if the thing we are talking about is a physical object. If you buy a car, can you re-paint it, install a new stereo, or ignition system. Of course you can do that. Can you? Sometimes the answer is no.
Increasingly corporations attempt to maintain control of a product after the sale. They use many tools to do this. One is intellectual property, copyrights and copy protection on the software that is now embedded into many of the things we buy.
I was looking at some photos and realizing how much perfboard I have used in recent years. I routinely find myself building small circuits, and that process almost always begins with grabbing a bit of perfboard from the supply stash.
Hand wired point-to-point wiring on perfboardPerfboard is the basis of point-to-point wiring and has been around since well before I started in electronics as a young teenager. It is generally a small circuit board with holes drilled in a 0.1″ grid.
The holes are usually about 0.042″ and will accommodate a wide range of electronic components without modification. Cheap perfboard will have no copper pads or traces, good perfboard will have a pattern of copper traces and pads to which you can solder your components. Better yet is perfboard with plated-thru holes and pads on both sides.
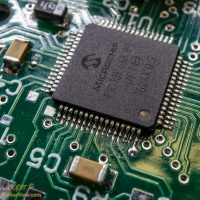
A minor code revision as I slowly get everything working properly. I am adding new modules as I need them for other projects.
The microprocessor on a GenPIC PCB assemblyThe latest GenPIC deployed will be a coolant valve controller that allows remote control of some glycol valves in the AO bench. It is a pretty simple device, just four relays with some automatic timing rules and a serial control interface.
In the process I added support for the service connectors including parallel and simple serial modules to the GenPIC code base, may as well release it. Thus you get code release 0.2…
Next up will probably be SD card support, I have a project that needs to be finished requiring some reasonable data storage. Just ordered a few micro-SD card breakout boards from SparkFun
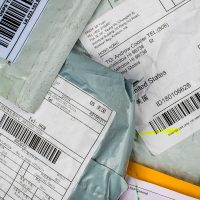
Hardly a week goes by without some little padded envelopes in my mailbox. 16×2 LCD character displays, 74HCT541 IC’s, 6mm encoders, some 10mm spirit levels, a couple more ESP-01 modules, and that is just this last month. Living on an island in the middle of the Pacific, there is no place I can buy electronic components. I must order everything.
Little Padded Envelopes from ChinaThose envelopes often arrive from places like Hong Kong and Shenzen, China. I find them on my desk where Deb just drops the latest little shipment from the other side of the planet.
The surreal part of this is that it is even conceivable that it would be cost effective to buy components from halfway around the globe like this. Not only is it affordable, but it is easy. It is easy to locate the correct components , it is easy to pay for the items, and it is easy to ship the parts across oceans.
Just a few years ago, buying products like this would have indeed been an insurmountable challenge, now it is routine. The internet and electronic storefronts like eBay that make shopping easy.
Electronic payment networks, notably PayPal, that make payment easy. And a global shipping network capable of getting those little padded envelopes to the correct location. For anyone familiar with history these networks are simply stunning in their capability, something inconceivable even a few decades ago.
Some would question the quality of components from China. You do need to be careful, but unlike cheap consumer goods, electronics components are usually quite acceptable in quality. I have had very little trouble ordering from Asia, the items perform as advertised.
I would probably not order from China if building life support equipment. For my littleelectronicsprojects the stuff works. Just check the seller’s ratings and record, then press ‘Buy it Now’.
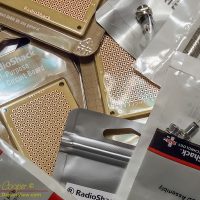
A pile of RadioShack components purchased at the local closing sale.Our local RadioShack has survived several rounds of store closures as the chain has moved in and out of bankruptcy court. Time has finally run out for the store and it is liquidating the stock and will close by the end of the month.
I have commented on my view on RadioShack before. As an electronic hobbyist I have mixed feelings about RadioShack. In my younger years it was a decent place to buy electronic components. Some of the early computers I learned on were RadioShack products like the TRS-80 and Tandy 1000. I even worked as a RadioShack sales clerk one summer during high school.
How do you power a device that must stay on through an event that may cause a power outage? Battery backup of course. But that answer leads to whole new level of complications. There must be a circuit in place to allow power to be drawn from the battery or the power supply. The proper battery technology should be chosen. You need a another circuit to care for the battery, allowing for very long term reliability. Long term? Years.
A 6V lead-acid battery charger based on the venerable LM555.A good answer for the battery technology is sealed lead-acid. A properly used lead-acid battery should last a decade or more while providing power to operate for over a day. Lead-acid may not be a good choice for a portable device where weight and size are the primary considerations. But for a stationary application this venerable technology is a good choice.
What about the charge circuit? A simple charger that can fully charge the battery, but not overcharge the battery is needed. In the case of lead-acid charging is usually accomplished by charging to a chosen voltage before shutting off or lower the voltage to a safe lower value called a “float charge”.
I took a break from working with a “big” microcontroller to work with a little one. The PIC12C671 is definitely little when compared with the PIC18F66K80 I am using in the GenPIC utility PCB. With less than 2k of program space and a mere 128 bytes of RAM it is definitely limited. Consider that the chip only has eight pins, two of which are power and ground, leaving six I/O pins to get the job done. No problem, I only need two I/O pins for this task and that few bytes of RAM is more than enough!
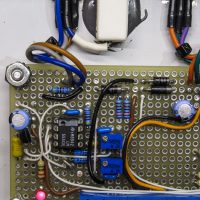
A simple heater using a bang-bang controller.This project is pretty basic… A bang-bang heater controller. This simple form of controller simply turns on and off as the temperature (or some other controlled parameter) goes up and down, there is no attempt to vary the output, all or nothing. Bang on, bang off, or simply a bang-bang controller as it is known in the trade.
A bang-bang controller is inherently reliable and stable because it uses two different control setpoints, a high and a low. Because these control points are separated by a large margin, called hysteresis, the controller will not oscillate or rapidly turn on and off. In this case the heater will not turn on until the temperature falls below 10°C and will not turn back off until the temperature rises above 15°C. That five degree margin is called hysteresis, and ensures a good period of time between on and off.