It is always another little problem. But, on occasion, a problem is an excuse to have a little fun while getting the job done.
Enter an old WYKO interferometer with a composite video output. The gear is a critical piece of kit used to monitor the deformable mirror used in the adaptive optics system. The images from the interferometer are analyzed by a windows PC with special software. Windows, as in Windows 98!
Updating this computer has been on our to-do list for way too long. Time to get it done… When installing the new computer and video board to update this system I found that the video quality was quite bad. It would tear about halfway down the image, something wrong with the horizontal sync? Looking back it was not great on the old system, but usable. On the new system it was just not going to work.
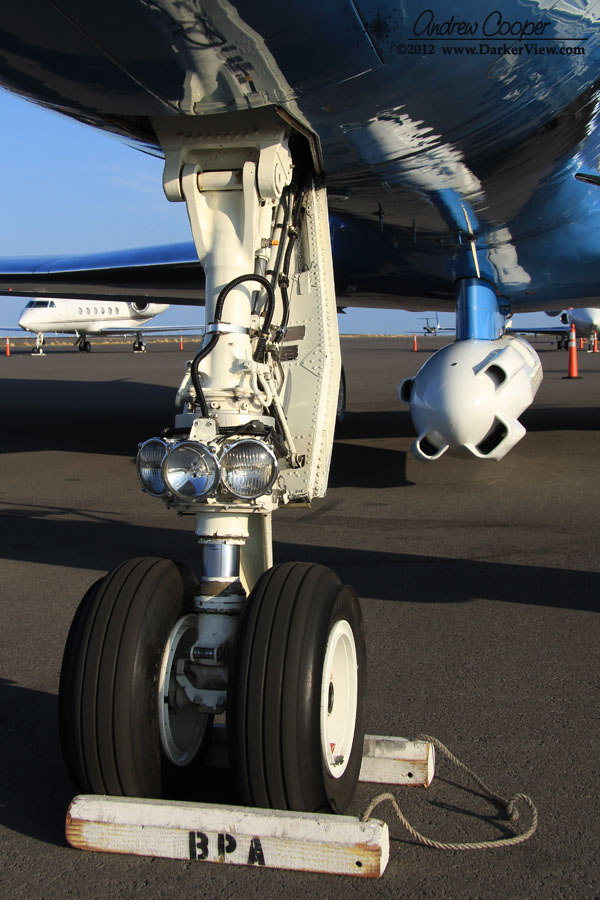
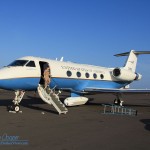
The aircraft is rather unremarkable, a standard small jet sitting among many similar aircraft at the Kona airport. It is the NASA colors and the odd pod hanging underneath that belies that this jet is somewhat unusual. This aircraft does not shuttle passengers across the country, it is home to a unique instrument called UAVSAR.
NASA aircraft equipped with UAVSAR podAfter giving the JPL staff a tour of Keck, they reciprocated and offered a tour of their aircraft. An offer that we readily accepted! After three days of watching the jet fly overhead, an opportunity to to see this aircraft up close was not to be wasted.
During this deployment the aircraft has quartered the Big Island, mapping any changes in the landscape on this volcanically active land. The acronym UAVSAR stands for Uninhabited Aerial Vehicle Synthetic Aperture Radar. As the name implies the system is designed to operate from a UAV, but it is currently installed in a crewed Gulfstream III aircraft.
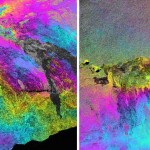
Color-enhanced UAVSAR interferogram images of Hawaii’s Kilauea volcano, image credit: NASA/JPL-CaltechThe system is capable of sub-centimeter accuracy, mapping the surface of our planet with a reconfigurable, polarimetric L-band synthetic aperture radar (SAR). This can reveal precise information about the shape of the land, moisture content of the soil, vegetation differences and more. Making multiple passes of the same area allows study of subtle changes in the terrain due to erosion or volcanic activity. Flying at 12,000 meters (40,000ft) the aircraft must navigate with exceptional accuracy to allow the radar to gather the data. A custom autopilot flies the aircraft through a 33 foot (10 meter) “tube” in the air between two GPS waypoints.
For this mission it is this volcanic island that is the target. As any islander knows we live on a rock that moves. The island settles into the sea, slides into the ocean, and swells where magma pushes its way into the volcano. Each year they return to Hawai’i to re-map the island, this is the fourth year they have returned to check the changes wrought by the volcanoes.
The JPL/NASA folks have completed their mission to the island for the year. Our tour was the morning they were due to depart, flying back to the Dryden Flight Research Center in California.
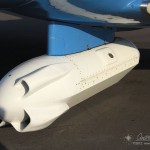
UAVSAR radar podThe aircraft is not as jammed with electronics as I envisioned. Boarding the plane one finds a few equipment racks and a number of comfortable seats available for the folks that have to tend the electronics through ten hour missions. It is an odd combination of custom electronics built to aerospace standards and off-the-shelf electronics fastened into the racks, including computers, monitors and ethernet routers. Much of the gear is used for simply monitoring the instrument, rather than needed for the radar. One can see how the system could be installed in a smaller UAV.
Hanging underneath the aircraft is the pod containing the radar itself. Bright white, the pod sports a flat antenna down the port side for the sideways looking beam. A trio of scoops on the front ram air through the pod to keep the electronics cool.
We chatted with the flight crew and the radar team learning about the instrument and aircraft. They travel all over the US and sometimes around the globe. They have mapped volcanoes in Alaska and Japan, glaciers in Iceland, measured oil spills, and scanned regions effected by major earthquakes. We noted that they had a fascinating job, while they said the same right back at us.
After the tour our hosts kicked us off the plane and began start-up for their hop back to the mainland. We got the data disks with the GPS data we needed for our tests and traded business cards and contact info. I will have to keep my eye out for the results of this year’s Big Island deployment.
One of the little side jobs I have gotten assigned at Keck is updating the weather station. This involves replacing all of the weather monitoring equipment that allows the operators to keep an eye on conditions around the telescopes. This gear is absolutely critical, giving the operators the data they need to protect our equipment, including the irreplaceable mirrors.
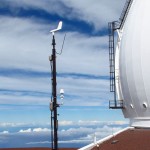
The weather mast atop the Keck observatory buildingAs a side job it has been fun. A simple job that can be completed with a minimum of complications and the usual folderol that surrounds larger engineering projects. Just come up with a plan, put some numbers on the plan, buy the gear and install it. As budget has allowed I have worked my way through the plan, replacing bits of gear one item at a time.
It has been fun to learn about measuring temperature, humidity, dew point and more. It seems so simple at first, but the complications of getting a good reading are subtle. Passive instrument shelters, active ventilation, instrument positioning, calibration and more. Issues that can make a good instrument give bad data.
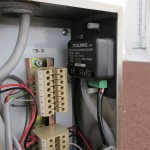
A barometric sensor installed in the Keck weather mastLikewise the severity of the weather at the 13,600ft elevation of the observatory is a real challenge. How do you get a good reading in 70mph blowing snow? What do you do about 8 inches of ice that has formed over every vertical surface. That one was a challenge, the first shelter I put up for the temperature and humidity partially collapsed under the weight of the ice on the sensor cables.
Last week I installed a new barometric sensor. This was the last part of the existing weather instrument suite that needed to be replaced. I got lucky, it was a great day on the summit, sunny with just a modest breeze. Just the day to spend a couple hours hanging off the weather mast in a climbing harness rewiring a junction box for the new cables. A few holes to drill, a few bolts, a couple cables… done!
My next item is to install an anemometer. We have not had an operational anemometer in many years and our observing staff has made it abundantly clear that they want an anemometer. Not that this one will be easy, it is a bit of a challenge to get a decent wind reading anywhere near a 100ft diameter dome. This challenge will be a bit more involved, and involve some good engineering fun. Time to learn about measuring wind-speed and how to do it right. Looking forward to the next part of the plan!
The original NexStar telescopes are great instruments. Ours has seen many uses, from dark skies to not so dark skies as it has been set up in the Arizona Desert, the summit of Mauna Kea, or various school yards and resorts for public viewing. It has been used as a visual instrument, a photographic ‘scope, even done a little real work.
For the most part the scope has worked well, and has been well maintained, even updated with the latest hand pad controller. But on occasion there is a problem… connection issues would crop up. The dreaded “No Response 16” or “No Response 17” errors would appear, indicating that the motor control board is not talking. This would result in having to power cycle and realign the telescope.
Lately the errors have become more problematic. The last straw was a public event I recently used the telescope for, setting up the telescope for Halloween. Continual errors plagued the evening, a constant struggle. While the scope usually tracked, I could not use GOTO as each alignment was quickly off by just enough to be useless.
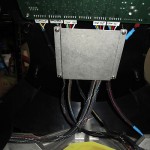
Under the hood of the NexStar showing the new cables
I have had the telescope apart too often in attempts to fix this, inspecting and re-seating the cables. This usually works, the problem will go away, for a while.
In general I like what I see inside the telescope. A well designed piece of kit with good components. Decades of taking gear apart have provided me so many examples of poor or good design. Inside the NexStar I just like what I see. The telescope is easy to get apart, just a few screws to remove each cover, exposing everything you might need to work on. The designers of this telescope obviously took pride in their work, it shows.
The exception to this is the wiring. There are a number of issues that can create trouble. Or rather there were a few issues, I just took care of that…
The changeover is inevitable. LEDs are the most power-efficient commercially available light source. Their longer lifetimes, greater light-per-watt and lower installation costs make it only a matter of time before most light sources in the world are LED. The fixtures and bulbs are still notably more expensive, but that’s offset by lower energy usage and longer lifetimes.
Downtown Waimea with new streetlightsNo light is exempt from the LED changover, not even the ubiquitous streetlamp.
Streetlights consume an enormous amount of the power generated across the globe. Here in the islands, where power is more expensive than much of the nation, the power savings make LED streetlights very attractive. As Hawai’i County taxpayers this is something that we should all be concerned with, we pay the power bill for the thousands of streetlights across the island.
The best competing technology is low pressure sodium (LPS). It is this streetlight technology that is currently used throughout Hawai’i. LPS emits all of its light at a single wavelength, 589nm, a golden yellow. Many people dislike the yellow color, and it can be confused with the yellow of a changing intersection signal. The large LPS bulbs are difficult to design fixtures around, resulting in lamps that throw light in all directions, not just where needed. As a result, many LPS fixtures create a lot of glare for drivers and surrounding homes and businesses.
LPS lights do have advantages, of course. They are quite power efficient, emitting all the light near the peak sensitivity of the human eye. Astronomers prefer the light of LPS lamps, as the single wavelength can be easily filtered or simply ignored when seen in their data. Between the power savings and the astronomy friendly aspects, LPS had been the outdoor lighting of choice across the state. The result is the familiar golden glow above any urban area in the islands.
But change is coming, with LEDs already beginning to replace LPS streetlights. Hawai’i County has planned for some time to convert to LED technology and evaluation of the new lamps has been going on at several test locations. With the success of those tests more widespread deployment is just beginning. This last month the new LED streetlights were installed around the town of Waimea. For many this is the first chance to see the new lights in place.
The recent conversion allowed an opportunity to compare the new with the old. Taken midway through the change out, the photo shows the new lights down the right side of the street, while the older low pressure sodium lights have yet to be replaced on the left side of the street. In order to faithfully reproduce the scene, the photo was taken in raw mode with daylight white balance used to produce the image shown.
The new lights are dramatically better than the old, unshielded LPS lights. Because of their vastly reduced glare, you simply do not see the lights themselves from any distance. Even nearby the lights do not produce the distracting glare of the older designs. Note, also, that all of the older LPS lights create yellow halos of glare in the photo, all the way down the street. While the new LED lights become hard to see once you are out from underneath the light. In the photo, the third LED light from the camera is just seen and the fourth is hard to pick out.
The improvement is immediately noticeable while driving the main street of Waimea. The LED lights are difficult to see directly, while the light provided on the roadway is just as good if not better than the older LPS fixtures. This is a street that has substantial pedestrian traffic and other vehicles pulling in and out of the many businesses, so good visibility is critical for safety.
The comparison here is not completely fair. The low pressure sodium fixtures used on much of the island, including Waimea are poor examples of modern lighting design. Well-designed low pressure sodium fixtures would compare somewhat more favorably. Still, LED’s are easier light sources to design a decent fixture around because LED’s are nearly point sources, not a large gas tube. Designing a good reflector and a decent cutoff shield is quite difficult for low pressure sodium bulbs.
One advantage of the better light design is reduced “light trespass.” That means less light shining onto areas where it is not needed. Directing the light properly onto the roadway means less light shining into the windows of adjacent homes, or upwards to light the sky and outwards to confuse birds or sea turtles.
Additionally, the new LED lamps installed on the island have specially designed blue cutoff filters. This is critical for the observatories. White LED lights use a blue or violet LED to excite a phosphor that converts the blue light to a white light. After the conversion a large amount of this blue light leaks through the phosphor. It is this blue light that is most troubling to astronomers because it readily scatters in air, an effect called Rayleigh scattering. This is the same effect that makes the sky blue during the day. The sky is naturally darker in the blue region of the spectrum, thus any light pollution at this wavelength creates a larger impact on astronomy. The special filters, therefore, keep the LED lamps from backfiring and creating more light pollution.
So far Hawai’i County’s conversion to LED lights is just beginning. One thousand lamps were ordered, and only a handful have been installed so far, mostly near intersections. While we hope that the effects improve safety, reduced light pollution, and reduced power bills, it will be some time before we see the real impact of the new lights and have a chance to measure the changes.
Another quick project to solve a little equipment issue. I realized I had a problem the morning before I was planning to spend a night shooting astrophotos up on the mountain. The batteries for my 20Da are old and do not hold a charge, no way I was going to be able to use the camera through the night.
The regulator circuit installed inside the battery shell and connected to the existing contactsThe camera is an older model that remains quite valuable to me as it has been adapted to shoot astrophotos. The 20Da model differed from the standard 20D in having live focus and a re-tuned red cutoff filter that allows the glowing red of nebulae to reach the sensor. After seven years I still use the camera regularly.
I have the AC power supply for the 20Da, this is what I have been using for some time now. Shooting astrophotos in the driveway allows access to AC power. For field use this will not do, I need to operate fully from battery power. The camera batteries that I do have for the camera are now at least six years old, and do not hold enough charge to last.
Without AC power available I needed something that could plug into one of my 12V field battery packs. I really did not want to cut up the existing AC power supply to create a version to be used with an external battery. Plus, Canon used odd, proprietary connectors on the supply. (I really hate it when they do that!) I can not even use parts of the AC supply without modification.
With only a few hours available I came up with a plan. A little digging showed I had all of the needed components on-hand. Off to the work bench!
The rearrangement of my astrophoto setup proceeds. If somewhat frantically in the face of the upcoming Transit of Venus. Another device has joined the toolkit, a bit of hand-wired electronica that gets the job done.
A copy of Gene Nolan's USB to ST-4 guiding adapterThis particular device will allow remotely guiding of the telescope during the seven hour long event. The computer sitting beside the telescope will be controlling both a camera and the mount. Also set up on the computer is a VNC server, so I can remotely view the screen from inside. With this arrangement I can keep an eye on the whole setup, including nudging the telescope as needed to keep the Sun centered in the image. Since the mount will only be roughly polar aligned, set up during the day, I expect to get a fair amount of drift during the event.
I did not design the device this time. This would have been completely within my capability, but why do so when someone else has already done the job? This is typical within the astronomy hobby, where many designs are shared for the benefit of everyone. In this case it is the USB to ST4 adapter designed by Gene Nolan.
All I had to do was follow the schematic and download the code into the microcontroller, the device worked first time. Gene does sell kits, but I wanted to do this quickly and had everything I needed on hand except the microcontroller and opto-isolators.
The only real problem that cropped up during construction was the wrong part received for the opto-isolators. The DigiKey description read DIP-8, so I ordered it, expecting to get something that fit into the DIP socket I had already wired onto the board. When the parts arrived I found that they were indeed DIP… lead-formed DIP packages meant to be surface mounted, with chopped off leads. I ended up soldering the devices to another DIP socket, using it as a header, which then plugged into the socket on the board. It looks funny, but it works.
It did take a couple hours of downloading and installing the drivers and other useful software packages to get everything working. This includes the very useful ASCOM driver framework, and PHD Guide. Both of which I plan to use beyond the upcoming Transit of Venus to do more astrophotography.
My wife may have been a little perturbed by the testing setup strung across the kitchen table, a laptop and the heavy Losmandy head, a Canon 60D camera, all connected by a snake pit of cables. But it worked, first time, that is always nice.
I have had a problem observing here in Hawai’i. The skies can be gorgeous, there is little to no light pollution, and you have access to much more of the southern sky. What could go wrong? …Dew!
A view of the interior of the handwired dew heater controllerThis is a tropical island, this means tropical humidity and moisture. Dew is a feature of observing that I have not had much problem with in the past. In Arizona it was rarely an issue, but here it can quickly shut down a night’s observing. My last time out on Mauna Kea dew was a problem, it didn’t shut me down, but it was a constant hassle. I had to be quite careful about breathing on the eyepiece. One mis-aimed exhalation and that eyepiece needed to be put in the back of the vehicle to dry out!
I had one dew strap available, given to me by a friend and fellow observer, a small one just right for wrapping around an eyepiece. So I just needed a controller to get started. There are several of these available on the market. But I had some issue with the cost, it seemed a bit high for what was essentially a very simple device. Some of the commercial units offered features like temperature sensing and regulation. Simple overkill for most users actual needs, just warm the optic slightly until the dew goes away. Sounds like an excuse for another evening project to me… Build it!
It is always gratifying to see. Tangles of wire, zip ties, plastic and metal bent and warped into odd shapes, contraptions that occasionally come apart. They may not be pretty, buy they usually work. This is engineering!
Students from Hawai'i Preparatory Academy pilot an ROV in the Big Island Regional MATE ROV CompetitionThe goal? To build and pilot and underwater ROV through a simulated mission. Not an easy task, actually downright difficult. That the engineers and pilots are elementary, middle and high school students makes the results that much more impressive.
This is the fourth year I have helped to judge the 2012 Big Island Regional MATE ROV Challenge. Back again, it is just too much fun to see what the students come up with. Last year I helped judge the technical presentations and posters. While that is OK, the action is in the pool. This year it was poolside judging, getting a first hand view of the event. I was not alone, Keck provided many of the judges for the 2012 event. An investment in the next generation of engineers and techs that will follow our path.
A student built ROV attempting a mission in the Hilo regional 2012 MATE ROV CompetitionMost of the ROV’s followed the usual pattern we have seen each year. A box frame built of PVC pipe with bilge pump motors attached to provide maneuvering capability. Cameras provide the vehicles eyes. Indeed, the operators must control the craft with only the visuals on the display screen, no looking around into the pool.
The mission this year was to survey a shipwreck, a victim of war, an oil tanker lying on the bottom with the potential to create an environmental disaster. The students must survey the wreck, then attempt to remove a sample of the “oil” trapped within. No matter that the “oil tanker” is a frame of PVC pipes at the bottom of a swimming pool, this was a challenging mission.
There were a number of rookie teams this year. It showed, a rough day in the pool for several of the teams. Experience showed, those teams with a couple years of competitions behind them performed much better. It was Kealakehe that won the Ranger class title… again. Give the new guys another chance next year, and I think the competition will be much closer.